
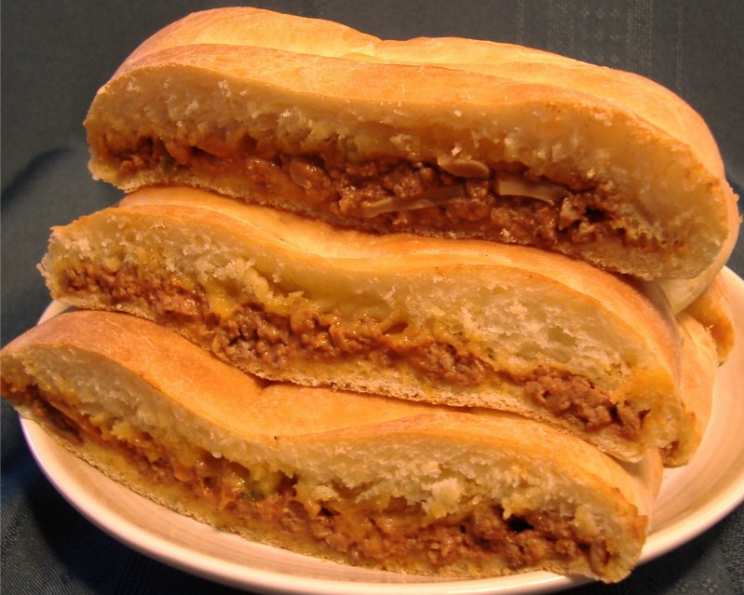
Taco Braid: A Savory Fiesta of Flavor
I can still picture my grandmother’s kitchen, sunlight streaming through the window as she hummed a cheerful tune. This Taco Braid recipe was one of her staples, always making an appearance at family gatherings. The aroma of seasoned ground beef and bubbling cheese, mingled with the yeasty fragrance of freshly baked bread, would fill the house, instantly creating a sense of warmth and anticipation. It wasn’t just the taste that made it special; it was the laughter, the stories, and the feeling of togetherness that accompanied every slice. This recipe is my humble attempt to recapture that magic.
Recipe Overview
- Prep Time: 45 minutes
- Cook Time: 20-25 minutes
- Total Time: 2 hours 45 minutes (includes rising time)
- Servings: 12
- Yield: 1 Taco Braid
- Dietary Type: Not specified, can be adjusted
Ingredients
- 1 teaspoon active dry yeast
- 2 tablespoons sugar, divided
- 3/4 cup warm water, divided (110 to 115 degrees)
- 2 tablespoons butter, softened
- 2 tablespoons nonfat dry milk powder
- 1 egg, beaten
- 1/2 teaspoon salt
- 2 cups all-purpose flour
- 1 lb lean ground beef
- 1/4 cup sliced mushrooms
- 1 (8 ounce) can tomato sauce
- 2 tablespoons taco seasoning
- 1 egg, beaten (for egg wash)
- 1/2 cup shredded cheddar cheese
- 1/4 cup sliced ripe olives
Equipment Needed
- Mixing bowl
- Measuring cups and spoons
- Floured surface
- Greased bowl
- Skillet
- Greased baking sheet
- Wire rack
Instructions
- In a mixing bowl, dissolve the yeast and 1 teaspoon sugar in 1/2 cup warm water. Let stand for 5 minutes until foamy – this proves the yeast is active.
- Add the softened butter, nonfat dry milk powder, beaten egg, salt, and the remaining 1 tablespoon sugar and 1/4 cup warm water to the yeast mixture.
- Gradually stir in enough all-purpose flour to form a soft dough. You might not need all 2 cups, depending on the humidity.
- Turn the dough out onto a lightly floured surface and knead until it is smooth and elastic, about 6 to 8 minutes. The dough should be supple and spring back when gently pressed.
- Place the dough in a greased bowl, turning it once to grease the top. This prevents a skin from forming as it rises.
- Cover the bowl with plastic wrap or a clean kitchen towel and let it rise in a warm place until doubled in size, about one hour. A warm oven (turned off!) or a sunny spot works well.
- While the dough is rising, prepare the filling. In a skillet, cook the lean ground beef and sliced mushrooms over medium heat until the meat is no longer pink. Break up the beef with a spoon as it cooks.
- Drain any excess grease from the skillet. This step is crucial to prevent the filling from becoming soggy.
- Stir in the tomato sauce and taco seasoning into the cooked beef and mushroom mixture. Mix thoroughly to ensure even distribution of the seasoning.
- Set aside 1 tablespoon of the remaining beaten egg for the egg wash later.
- Stir the remaining beaten egg into the beef mixture. This helps bind the filling together.
- Cool the beef mixture completely before using it as a filling. This prevents the dough from becoming too soft and ensures even baking.
- Once the dough has doubled, punch it down to release the air.
- Turn the dough out onto a lightly floured surface and roll it into a 15×12 inch rectangle.
- Place the rolled-out dough on a greased baking sheet.
- Spread the cooled beef filling lengthwise down the center third of the rectangle, leaving a few inches clear at each end.
- Sprinkle the shredded cheddar cheese and sliced ripe olives evenly over the beef filling.
- On each long side of the rectangle, cut 1-inch wide strips about 2 1/2 inches into the center, stopping at the filling. You should have an equal number of strips on each side.
- Starting at one end, fold alternating strips at an angle across the filling, creating a braided effect. Pinch the ends of each strip to seal and tuck them under the braid.
- Cover the assembled taco braid and let it rise for 30 minutes. This allows the braid to become light and airy before baking.
- Brush the top of the braid with the reserved beaten egg (egg wash) to give it a golden-brown color.
- Bake in a preheated oven at 350 degrees F (175 degrees C) for 20-25 minutes, or until golden brown. Check for doneness by inserting a toothpick into the center of the bread; it should come out clean.
- Remove the taco braid from the baking sheet and place it on a wire rack to cool slightly before slicing and serving.
Expert Tips & Tricks
- For an extra layer of flavor, add a packet of ranch dressing mix to the ground beef while it’s cooking.
- If you want a spicier braid, use pepper jack cheese or add a pinch of cayenne pepper to the beef filling.
- To make the braid ahead of time, prepare it up to the point of baking, then cover it tightly and refrigerate it overnight. Let it come to room temperature for about 30 minutes before baking.
- If the braid starts to brown too quickly in the oven, tent it loosely with foil.
- If you want to make the dough in a bread machine, use the dough setting.
Serving & Storage Suggestions
Serve the Taco Braid warm, sliced into individual portions. It’s fantastic on its own or with a side of sour cream, salsa, guacamole, or a fresh green salad.
Leftover Taco Braid can be stored in an airtight container in the refrigerator for up to 3 days. To reheat, wrap individual slices in foil and bake in a preheated oven at 350 degrees F (175 degrees C) for about 10 minutes, or until heated through. You can also microwave slices in 30-second intervals until warm.
For longer storage, you can freeze the Taco Braid. Wrap it tightly in plastic wrap and then in foil, or place it in a freezer-safe bag. It can be frozen for up to 2 months. Thaw it in the refrigerator overnight before reheating.
Nutritional Information
Note: Nutritional information is an estimate and may vary based on specific ingredients and portion sizes.
| Nutrient | Amount per Serving | % Daily Value |
|---|---|---|
| Calories | 213.8 kcal | N/A |
| Calories from Fat | 78 g | 36% |
| Total Fat | 8.7 g | 13% |
| Saturated Fat | 4.1 g | 20% |
| Cholesterol | 70.1 mg | 23% |
| Sodium | 308.2 mg | 12% |
| Total Carbohydrate | 20.5 g | 6% |
| Dietary Fiber | 1 g | 4% |
| Sugars | 3.7 g | N/A |
| Protein | 12.8 g | 25% |
Variations & Substitutions
- Vegetarian: Replace the ground beef with crumbled vegetarian ground beef substitute or a mixture of black beans, corn, and diced bell peppers.
- Gluten-Free: Use a gluten-free all-purpose flour blend for the dough. You may need to adjust the amount of liquid.
- Dairy-Free: Substitute the butter with a dairy-free butter alternative and use dairy-free cheese.
- Spicier: Add chopped jalapeños or a dash of hot sauce to the beef filling.
- Italian Twist: Replace the taco seasoning with Italian seasoning and use mozzarella cheese instead of cheddar.
- Pizza Braid: Replace the ground beef and taco seasoning with pizza sauce, pepperoni, and mozzarella cheese.
FAQs (Frequently Asked Questions)
Q: Can I use store-bought pizza dough instead of making my own?
A: Yes, you can substitute store-bought pizza dough for the homemade dough to save time. Be sure to adjust the baking time accordingly.
Q: What if my yeast doesn’t foam when I mix it with sugar and water?
A: If the yeast doesn’t foam after 5 minutes, it’s likely inactive and you’ll need to use fresh yeast. Inactive yeast will prevent the dough from rising properly.
Q: Can I prepare the Taco Braid ahead of time and bake it later?
A: Absolutely! Assemble the braid up to the point of baking, then cover it tightly and refrigerate it for up to 24 hours. Let it sit at room temperature for 30 minutes before baking.
Q: The edges of my braid are getting too brown. What should I do?
A: Tent the braid loosely with aluminum foil during the last few minutes of baking to prevent it from burning.
Q: What can I serve with Taco Braid to make it a complete meal?
A: Taco Braid pairs well with a variety of sides, such as a fresh green salad, Mexican rice, refried beans, or guacamole and chips.
Final Thoughts
This Taco Braid is more than just a recipe; it’s an invitation to create lasting memories around the table. Gather your loved ones, roll up your sleeves, and embark on this culinary adventure together. Whether you follow the recipe to the letter or add your own creative twists, I hope this dish brings as much joy to your home as it has to mine. Don’t hesitate to share your creations and feedback – I’m always eager to hear how you’ve made this recipe your own!