
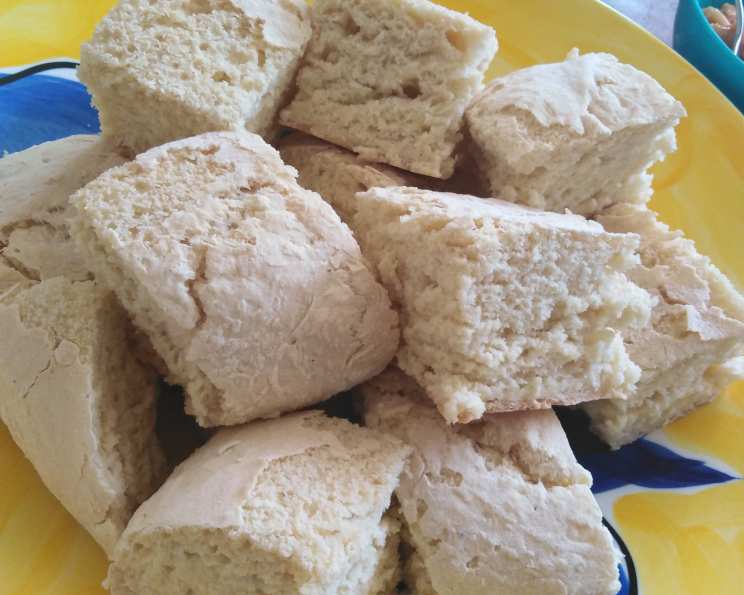
Takakau: A Taste of Aotearoa
The memory swims back with the aroma of woodsmoke and the echoing laughter of my cousins. It was late afternoon at my Nana’s marae, and the communal kitchen was a hive of activity. While the older women prepared the main meal, a group of us children were tasked with helping make the takakau. Nana, her hands dusted white with flour, guided us with gentle authority, showing us how to knead the simple dough, the warmth of the makeshift oven radiating across our faces. Even then, I knew this humble bread was more than just sustenance; it was a tangible link to our whakapapa, a taste of belonging baked into every bite.
Recipe Overview
- Prep Time: 15 minutes
- Cook Time: 30 minutes
- Total Time: 45 minutes
- Servings: 20
- Yield: 1 large loaf
- Dietary Type: Vegetarian
Ingredients
- 5 cups flour
- 5 teaspoons baking powder
- Approximately 1 pint milk
Equipment Needed
- Large mixing bowl
- Floured work surface
- Round pizza tray (or baking sheet)
Instructions
-
Preheat your oven to 400°F (200°C). It’s essential that your oven is fully heated before baking to ensure the takakau cooks evenly.
-
In a large mixing bowl, sift together the flour and baking powder. Sifting incorporates air into the mixture, resulting in a lighter, more tender bread.
-
Create a well in the center of the flour mixture. Gradually pour in the milk, and combine the mixture until a soft dough forms. The amount of milk may vary slightly depending on the humidity and type of flour used, so add it slowly until the dough comes together.
-
Turn the dough out onto a lightly floured work surface. With lightly floured hands, knead the dough gently until it is smooth and elastic. Be careful not to over-knead, as this can result in a tough bread. Aim for about 5-7 minutes of gentle kneading.
-
Roll the dough into a flat, round shape, approximately 1 inch thick.
-
Ideally, lightly flour a round pizza tray or baking sheet. Knead the dough into the tray, pressing it to fit the inside edges. If you don’t have a pizza tray, a regular baking sheet will work just fine. Just ensure it’s lightly floured to prevent sticking.
-
Bake for approximately 30 minutes, or until the takakau is golden brown. Keep an eye on it during the last few minutes of baking to prevent burning. A skewer inserted into the center should come out clean.
-
Serve hot and/or allow to cool. Leftovers, once cooled, can be covered with a damp tea towel and/or stored in an airtight container.
Expert Tips & Tricks
- For a richer flavor, try using a combination of whole milk and a tablespoon or two of melted butter in place of some of the milk.
- If you want a softer crust, brush the top of the takakau with a little melted butter or milk just before baking.
- To prevent the bottom from burning, place a baking sheet underneath the pizza tray or baking sheet in the oven.
- Don’t have baking powder? While this recipe includes baking powder, traditional takakau relies solely on flour, water, and skillful kneading. You can omit the baking powder, but the texture will be denser.
- To add a touch of sweetness, incorporate a tablespoon of sugar or honey into the dough mixture.
- For a herbed variation, knead in chopped fresh herbs like rosemary or thyme before baking.
Serving & Storage Suggestions
Takakau is best served warm, straight from the oven. The simple, rustic flavor pairs beautifully with butter, jam, honey, or even savory spreads like pate or hummus. It’s also a delicious accompaniment to stews, soups, and other hearty dishes.
Leftover takakau can be stored at room temperature for up to 2 days, wrapped in a damp tea towel to prevent it from drying out. Alternatively, store it in an airtight container in the refrigerator for up to 5 days. To reheat, wrap the takakau in foil and warm it in a moderate oven (350°F/175°C) for about 10-15 minutes, or until heated through. You can also reheat individual slices in a toaster oven or microwave. Takakau can also be frozen for up to 2 months. Wrap it tightly in plastic wrap and then foil before freezing. Thaw overnight in the refrigerator before reheating.
Nutritional Information
Nutritional information is an estimate and may vary based on specific ingredients and portion sizes.
| Nutrient | Amount per Serving | % Daily Value |
|---|---|---|
| Calories | 130 kcal | 7% |
| Total Fat | 1.2g | 2% |
| Saturated Fat | 0.6g | 3% |
| Cholesterol | 3.4mg | 1% |
| Sodium | 103mg | 4% |
| Total Carbohydrate | 25.3g | 8% |
| Dietary Fiber | 0.8g | 3% |
| Sugars | 0.1g | 0% |
| Protein | 4g | 8% |
Variations & Substitutions
- Gluten-Free Takakau: Substitute the all-purpose flour with a gluten-free blend. You may need to add a binder like xanthan gum to improve the texture.
- Dairy-Free Takakau: Use your favorite non-dairy milk alternative, such as almond milk, soy milk, or oat milk.
- Sweet Takakau: Add dried fruit like raisins or cranberries and a touch of cinnamon to the dough for a sweeter version.
- Savory Takakau: Incorporate grated cheese, chopped herbs, or sun-dried tomatoes for a flavorful savory loaf.
- Kamokamo Takakau: Puree cooked kamokamo (pumpkin) and substitute some of the milk with the kamokamo puree.
FAQs (Frequently Asked Questions):
Q: Why is my takakau so dense?
A: Over-kneading the dough or using too much flour can result in a dense takakau. Be gentle when kneading, and add the milk gradually until the dough just comes together.
Q: How can I make my takakau more golden brown?
A: Brushing the top of the takakau with a little milk or melted butter before baking will help it achieve a more golden-brown color.
Q: Can I freeze takakau dough?
A: While it’s best to bake takakau fresh, you can freeze the dough. Wrap it tightly in plastic wrap and then foil, and freeze for up to 2 months. Thaw overnight in the refrigerator before baking.
Q: Is baking powder essential for this recipe?
A: While the recipe includes baking powder for a lighter texture, traditional takakau recipes omit it. You can leave it out, but the bread will be denser and require slightly longer baking time.
Q: What’s the best way to reheat leftover takakau?
A: For the best results, wrap the takakau in foil and warm it in a moderate oven until heated through. You can also reheat individual slices in a toaster oven or microwave.
Final Thoughts
Takakau is more than just bread; it’s a connection to the past, a taste of home, and a celebration of simplicity. I encourage you to try this recipe and experience the warmth and comfort of this traditional Maori bread. Don’t be afraid to experiment with variations and make it your own. Share your creations with family and friends, and let the aroma of freshly baked takakau fill your home with love and memories. Kia pai to kai! (Enjoy your meal!)