
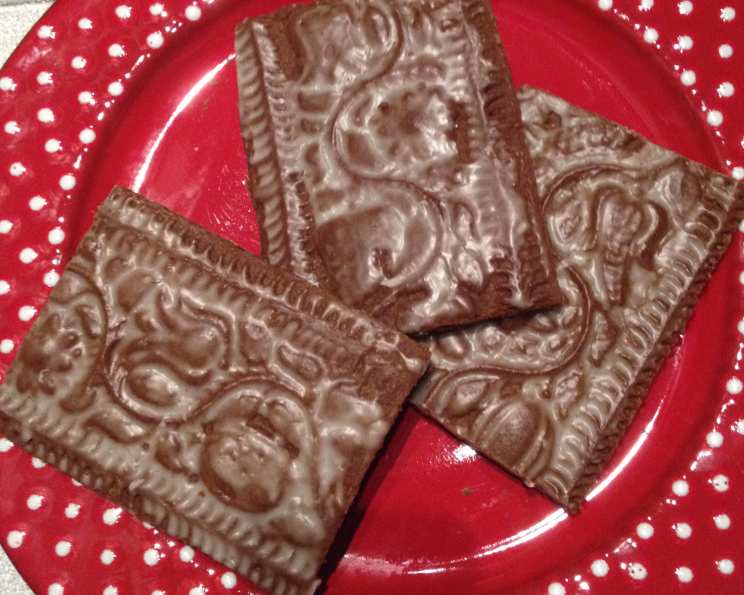
Tartine’s Soft Glazed Gingerbread: A Holiday Classic
Gingerbread has always been synonymous with the holidays for me. I remember as a child, the delightful aroma that would fill our home as my grandmother carefully decorated gingerbread men with colorful icing and candies. Each bite was a symphony of warm spices and sweetness, a memory I cherish and try to recreate every year with this recipe. This Tartine version, with its soft texture and delicate glaze, elevates gingerbread to a whole new level of deliciousness.
Recipe Overview
- Prep Time: 30 minutes
- Cook Time: 7-15 minutes
- Total Time: At least 12 hours (including overnight chilling)
- Servings: Varies
- Yield: Approximately 24 cookies (depending on size)
- Dietary Type: Not specified, contains dairy and gluten
Ingredients
Cookies
- 3 3/4 cups all-purpose flour
- 1 tablespoon cocoa powder
- 4 teaspoons ground ginger
- 1 1/2 teaspoons ground cloves
- 2 teaspoons ground cinnamon
- 1/2 teaspoon baking soda
- 1 teaspoon salt
- 1 1/4 teaspoons black pepper, freshly ground
- 1 cup unsalted butter, at room temperature
- 3/4 cup and 2 tablespoons granulated sugar
- 1 large egg
- 1/2 cup blackstrap molasses
- 2 tablespoons light corn syrup
Glaze
- 1 cup confectioners’ sugar
- 2 tablespoons water
Equipment Needed
- Mixing bowls
- Stand mixer with paddle attachment
- Rubber spatula
- Plastic wrap
- Baking sheet
- Parchment paper or nonstick liner
- Floured work surface
- Cookie cutters or gingerbread plaque (optional)
- Small knife
- Wire rack
- Small bowl for glaze
- Whisk
- Pastry brush
Instructions
-
Combine the dry ingredients: In a mixing bowl, stir together the all-purpose flour, cocoa powder, ground ginger, ground cloves, ground cinnamon, baking soda, salt, and freshly ground black pepper. Set this mixture aside.
-
Cream the butter and sugar: Using a stand mixer fitted with the paddle attachment, beat the unsalted butter on medium-high speed until it’s creamy and light. Slowly add the granulated sugar and continue to mix on medium speed until the mixture is completely smooth and soft. Be sure to stop the mixer periodically and scrape down the sides of the bowl with a rubber spatula to ensure even mixing.
-
Incorporate the wet ingredients: Add the egg to the butter and sugar mixture and mix well until fully incorporated. Then, add the blackstrap molasses and light corn syrup. Beat until all ingredients are thoroughly incorporated. Again, stop the mixer and scrape down the sides of the bowl to ensure a homogenous mixture.
-
Combine wet and dry: Gradually add the flour mixture to the wet ingredients. Beat on low speed until a dough forms that pulls away from the sides of the bowl and all the ingredients are well incorporated. Be careful not to overmix, as this can result in tough cookies.
-
Chill the dough: Remove the dough from the bowl and flatten it on a large piece of plastic wrap into a rectangle about 1 inch thick. Cover the dough completely with the plastic wrap. Refrigerate the dough overnight (or for at least 8 hours) to allow the gluten to relax and the flavors to meld together. This chilling process is crucial for achieving the right texture.
-
Preheat the oven: The next day, preheat your oven to 350 degrees Fahrenheit (175 degrees Celsius). Line a baking sheet with parchment paper or a nonstick liner to prevent the cookies from sticking.
-
Roll and cut the dough: Unwrap the chilled dough and place it on a lightly floured work surface. If you are using a cookie plaque with a design, roll out the dough to about 1/3 inch thick. Lightly dust the top of the dough with flour. Press your cookie molds firmly over the dough, then cut out the shapes precisely with a small knife. Place the cut-out cookies on the prepared baking sheet, spacing them about 1 inch apart.
Alternatively, if you’re using the mold as a guide, cut around it with a small knife. Flip the mold over so the design is facing you, and place the dough over it, pressing it gently into the design. Carefully unmold the shapes onto the prepared baking sheet, again leaving about 1 inch of space between them.
-
Using a Patterned Rolling Pin: If you are using a patterned rolling pin, lightly dust the lined baking sheet with flour and transfer the dough to the pan. Lightly dust the top of the dough with flour and roll it into a rectangle about 1/3 inch thick with a plain pin. Then, using the patterned pin, roll over the dough with enough pressure to ensure a clear impression of the design. Trim the sides with a small knife. It is not necessary to cut into smaller sizes before baking if you prefer one large piece.
-
Bake the cookies: Bake the cookies until they are lightly golden along the sides but still soft to the touch in the centers. The baking time will vary depending on the size of the individual cookies, or if you have made a single large patterned piece that will be cut after baking. Generally, this will take between 7 and 15 minutes. Keep a close eye on them to prevent burning.
-
Prepare the glaze: While the cookies are baking, prepare the glaze. In a small bowl, whisk together the confectioners’ sugar and water until the mixture is smooth and has a slightly thickened consistency. Add a touch more water if it is too thick.
-
Glaze the cookies: When the cookies are ready, remove them from the oven and let them cool on the pan on a wire rack for about 10 minutes. While the cookies are still warm, using even strokes, brush a light coat of glaze on the top of each cookie, evenly covering it.
-
Cool and dry: Let the cookies cool completely on the wire rack. As the glaze dries, it should leave a shiny, opaque finish. If you have used a patterned pin to make a single large plaque, cut it into the desired sizes with a small, very sharp knife after the glaze has set. At Tartine, they cut them into 3-by-4-inch rectangles, but 1 1/2 by 4 inches makes a nice smaller size.
Expert Tips & Tricks
- Don’t overmix the dough: Overmixing develops the gluten, leading to tough cookies. Mix just until the ingredients are combined.
- Chill the dough thoroughly: Chilling allows the butter to firm up, which prevents the cookies from spreading too much during baking.
- Use quality ingredients: High-quality butter and molasses will make a noticeable difference in the flavor.
- Keep a close eye on the baking time: Gingerbread can burn easily, so check the cookies frequently after about 7 minutes.
- For a richer flavor, try adding a pinch of cardamom or allspice to the dough.
- If the glaze is too thick, add a tiny bit more water, one drop at a time, until you reach the desired consistency.
- If the glaze is too thin, add a little more powdered sugar.
Serving & Storage Suggestions
Serve these delightful gingerbread cookies with a warm cup of tea or coffee for a perfect holiday treat. They also make a wonderful homemade gift. Store the completely cooled and glazed cookies in an airtight container at room temperature for up to 5 days. For longer storage, you can freeze the unglazed cookies for up to 2 months. Thaw them completely at room temperature before glazing.
Nutritional Information
Please note that these are estimates and can vary based on specific ingredients and portion sizes.
| Nutrient | Amount per Serving | % Daily Value |
|---|---|---|
| Calories | 214 kcal | 11% |
| Total Fat | 8g | 10% |
| Saturated Fat | 5g | 25% |
| Cholesterol | 28mg | 9% |
| Sodium | 132mg | 6% |
| Total Carbohydrate | 34g | 12% |
| Dietary Fiber | 1g | 4% |
| Sugars | 16g | 32% |
| Protein | 3g | 6% |
Variations & Substitutions
- Gluten-Free: Substitute the all-purpose flour with a high-quality gluten-free all-purpose blend. Be sure to add a binding agent such as xanthan gum if your blend doesn’t already contain it.
- Dairy-Free: Replace the unsalted butter with a plant-based butter alternative.
- Spicier: Increase the amount of ground ginger, cloves, and cinnamon for a more intense spice flavor. Add a pinch of cayenne pepper for a kick.
- Citrusy: Add the zest of one orange or lemon to the dough for a bright, citrusy note.
FAQs (Frequently Asked Questions)
Q: Why do I need to chill the dough overnight?
A: Chilling the dough allows the gluten to relax, preventing the cookies from being tough. It also allows the flavors to meld together, resulting in a richer, more complex flavor.
Q: Can I use a different type of molasses?
A: While blackstrap molasses is recommended for its deep, rich flavor, you can use other types of molasses, such as light or dark molasses. Keep in mind that this will affect the final flavor of the cookies.
Q: My cookies are spreading too much during baking. What can I do?
A: Make sure your oven is at the correct temperature and that your butter was properly creamed with the sugar. Also, ensure that the dough was chilled for the recommended amount of time.
Q: Can I decorate the cookies with royal icing instead of the glaze?
A: Absolutely! Royal icing is a great alternative for decorating gingerbread cookies and allows for more intricate designs.
Q: How do I prevent the cookies from burning?
A: Keep a close eye on the cookies while they are baking and check them frequently. If they start to brown too quickly, lower the oven temperature slightly or cover them loosely with foil.
Final Thoughts
I hope you enjoy making and sharing these soft glazed gingerbread cookies as much as I do. They are a perfect treat for the holidays, guaranteed to bring joy and warmth to your home. Feel free to experiment with different spices and decorations to create your own unique version. Happy baking!