
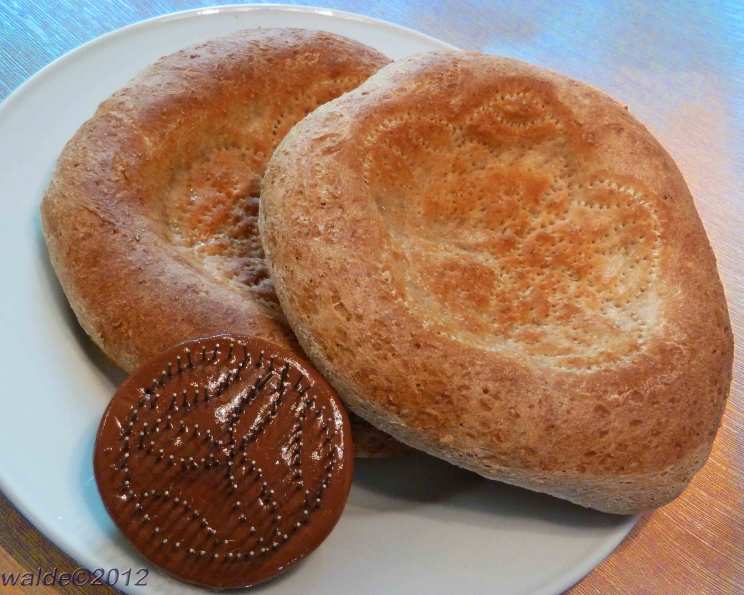
Tashkent Non: A Taste of Uzbek Hospitality
I can still remember the first time I tasted Tashkent Non. It wasn’t in Tashkent, mind you, but at a small family-run restaurant tucked away in a bustling London neighborhood. The aroma alone – a comforting blend of baked wheat and something subtly nutty – drew me in. The crust, a beautiful golden brown, gave way to a soft, airy interior that practically melted in my mouth. Paired with a simple plov, it was a revelation, a taste of a culture and tradition I immediately wanted to explore. Now, I’m excited to share my version, adapted for the home oven, so you can experience a little slice of Uzbekistan right in your own kitchen.
Recipe Overview
- Prep Time: 3 hours
- Cook Time: 15 minutes
- Total Time: 3 hours 15 minutes
- Servings: 4
- Yield: 4 loaves
- Dietary Type: Vegetarian
Ingredients
- 2 teaspoons active dry yeast
- 2 cups lukewarm water
- 1 1/2 teaspoons salt
- 3 1/2 – 4 cups all-purpose flour
- 1 cup whole wheat flour
- Milk, oil, or lard (optional, for brushing)
- Nigella seeds or sesame seeds (optional, for sprinkling)
Equipment Needed
- Large mixing bowl
- Clean kitchen towel
- Baking sheet or pizza stone
- Fork or Chekich (optional)
Instructions
-
Begin by activating the yeast. In a large mixing bowl, combine the active dry yeast with the lukewarm water. Allow it to sit for about 5-10 minutes, until the yeast blooms and becomes foamy. This indicates the yeast is alive and ready to leaven the dough.
-
Create the dough. Add the salt, all-purpose flour, and whole wheat flour to the yeast mixture. Start with 3 1/2 cups of all-purpose flour, gradually adding more as needed. Mix until a soft dough forms. The dough should be slightly sticky, but manageable.
-
Knead the dough. Turn the dough out onto a lightly floured surface and knead for 8-10 minutes, until it becomes smooth and elastic. The dough will still be slightly sticky, but it should hold its shape. If the dough is too sticky, add a little more all-purpose flour, one tablespoon at a time.
-
First rise. Place the kneaded dough in a lightly oiled bowl, turning to coat. Cover the bowl with a clean kitchen towel and let it rise in a warm place for approximately 2 hours, or until the dough has doubled in size. This is crucial for developing the flavor and texture of the bread.
-
Divide and shape. Once the dough has doubled, gently punch it down to release the air. Turn it out onto a lightly floured surface and divide it into 4 equal pieces. Form each piece into a flattened round, about 8-10 inches in diameter.
-
Create the signature center. Using your fingertips, gently press in the center section of each round. The goal is to create a depression in the center, preventing it from rising as much as the edges during baking.
-
Second rise. Place the shaped rounds on a lightly floured surface, cover them loosely with a clean kitchen towel, and let them rest for about 20 minutes. This allows the dough to relax and further develop its flavor.
-
Preheat the oven. While the dough is resting, preheat your oven to 450°F (232°C) or 475°F (246°C). If you have a pizza stone or quarry tiles, place them in the oven to preheat as well. Otherwise, use a baking sheet. The high heat is essential for achieving the characteristic crispy crust.
-
Prepare for baking. Just before baking, press down the center of each round again, if necessary. Then, traditionally, a chekich is used to prick the center area, creating a decorative pattern. If you don’t have a chekich, use a fork to create a pattern. Get creative and make star shapes, lines, or any design you like! Do this just before putting the loaves into the oven. If your oven cannot hold all four loaves at once, prepare only the loaves that will be baked immediately.
-
Glaze and sprinkle. Lightly brush each loaf with milk, oil, or melted lard (if using). Then, sprinkle with nigella seeds or sesame seeds, if desired. These additions add flavor and visual appeal to the bread.
-
Bake. Carefully transfer the prepared loaves to the preheated baking sheet or pizza stone. Bake for about 15 minutes, or until the loaves are golden brown and sound hollow when tapped on the bottom.
-
Cool and enjoy. Remove the baked loaves from the oven and let them cool slightly on a wire rack before serving. Tashkent Non is best enjoyed warm, fresh from the oven.
Expert Tips & Tricks
- Water Temperature: Ensure your water is lukewarm, not hot. Hot water can kill the yeast, preventing the dough from rising. The ideal temperature is around 105-115°F (40-46°C).
- Flour Consistency: The amount of flour needed can vary depending on humidity and the type of flour used. Add flour gradually until the dough reaches the desired consistency – soft, slightly sticky, but not overly wet.
- Oven Spring: For a better oven spring (the rapid rise of the dough in the oven), try adding a pan of hot water to the bottom rack of your oven during baking. This creates steam, which helps the crust to become crispier.
- Pattern Perfection: Don’t be afraid to experiment with different patterns in the center of the bread. Use a fork, knife, or even a cookie cutter to create unique designs.
- Make-Ahead Tip: You can prepare the dough up to the point of shaping, then refrigerate it overnight. Bring the dough back to room temperature before shaping and baking.
Serving & Storage Suggestions
Tashkent Non is traditionally served alongside a variety of Uzbek dishes, such as plov, shashlik, and lagman. It’s also delicious on its own with butter, honey, or jam. For serving, consider presenting the bread on a wooden board with a sharp knife for easy slicing.
To store leftover Tashkent Non, wrap it tightly in plastic wrap or place it in an airtight container. It will stay fresh at room temperature for 1-2 days. For longer storage, you can freeze the bread for up to 2 months. To reheat, thaw the bread completely and then warm it in a preheated oven at 350°F (175°C) for about 10 minutes, or until heated through.
Nutritional Information
| Nutrient | Amount per Serving | % Daily Value |
|---|---|---|
| Calories | 506.6 kcal | N/A |
| Calories from Fat | 17 g | 3% |
| Total Fat | 2 g | 3% |
| Saturated Fat | 0.3 g | 1% |
| Cholesterol | 0 mg | 0% |
| Sodium | 879.4 mg | 36% |
| Total Carbohydrate | 105.9 g | 35% |
| Dietary Fiber | 6.7 g | 26% |
| Sugars | 0.4 g | 1% |
| Protein | 16.1 g | 32% |
Note: Nutritional information is an estimate and may vary based on specific ingredients and preparation methods.
Variations & Substitutions
- Gluten-Free: For a gluten-free version, substitute the all-purpose and whole wheat flour with a gluten-free all-purpose flour blend. You may need to adjust the amount of liquid to achieve the right dough consistency.
- Sweet Non: Add 1-2 tablespoons of sugar to the dough for a slightly sweeter bread.
- Herb-Infused: Incorporate chopped fresh herbs, such as rosemary, thyme, or dill, into the dough for added flavor.
- Garlic Non: Brush the baked bread with garlic-infused oil for a savory twist.
- Seed Variations: Experiment with different types of seeds, such as poppy seeds, sunflower seeds, or flax seeds.
FAQs (Frequently Asked Questions)
Q: Why is my dough not rising?
A: Several factors can affect the dough’s rise, including the freshness of the yeast, the water temperature, and the room temperature. Make sure your yeast is active, your water is lukewarm, and the dough is in a warm, draft-free place.
Q: Can I use bread flour instead of all-purpose flour?
A: Yes, you can substitute bread flour for all-purpose flour. Bread flour has a higher protein content, which will result in a chewier bread.
Q: How do I prevent the center of the bread from rising too much?
A: Pressing down the center of the dough before baking and creating the pattern with a fork or chekich will help to prevent it from rising excessively.
Q: Can I freeze the baked bread?
A: Yes, you can freeze the baked bread for up to 2 months. Wrap it tightly in plastic wrap or place it in an airtight container to prevent freezer burn.
Q: What is a chekich?
A: A chekich is a traditional Uzbek tool used to create decorative patterns on bread. It typically has a spiked or patterned surface that is pressed into the dough.
Final Thoughts
Creating Tashkent Non in your own kitchen is a rewarding experience, allowing you to connect with a rich culinary tradition. The warm, comforting aroma and the satisfying taste of freshly baked bread are sure to delight your senses. Don’t be afraid to experiment with different variations and make it your own. Whether you serve it with a hearty meal or enjoy it as a simple snack, I hope this recipe brings a little bit of Uzbek hospitality to your table. I encourage you to try this recipe and share your feedback – I’d love to hear about your experience!