
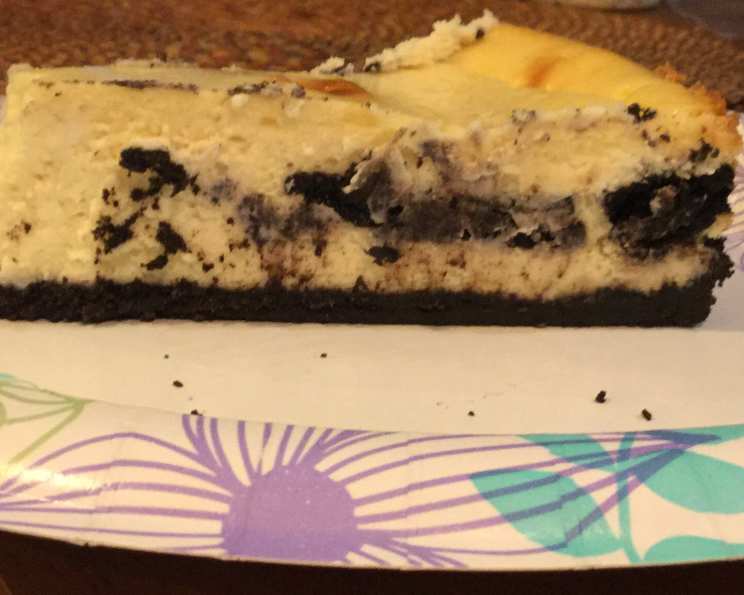
Teenager’s Dream Cheesecake: A Culinary Nostalgia Trip
The scent of baking cheesecake always transports me back to my teenage years. I vividly remember the excitement of raiding the pantry, grabbing that familiar blue package of Oreos, and embarking on what felt like a grand culinary adventure. This wasn’t just baking; it was creating something special, something delicious to share (or secretly devour myself!). This Teenager’s Dream Cheesecake, a timeless treasure from a well-worn Sunset magazine clipping, has been a constant in our family, a comforting reminder of simpler times and sweet indulgences.
Recipe Overview
- Prep Time: 30 minutes
- Cook Time: 1 hour 20 minutes
- Total Time: 5 hours (including chilling)
- Servings: 12-16
- Yield: 1 Cheesecake
- Dietary Type: Not Gluten-Free
Ingredients
- 1 (1 1/4 lb) package chocolate sandwich style cookies (like Oreos)
- 1/3 cup butter, melted
- 4 (8 ounce) packages cream cheese, softened
- 1 cup sugar
- 1/3 cup whipping cream
- 6 large eggs
- 2 tablespoons all-purpose flour
- 2 teaspoons vanilla extract
Equipment Needed
- Food processor
- 9-inch cheesecake pan with removable bottom
- Mixer (stand or hand mixer)
- Measuring cups and spoons
- Rubber spatula
- Cooling rack
Instructions
-
Prepare the Oreo Crust: In a food processor, whirl approximately half the package of chocolate sandwich cookies (including the creamy filling!) until you achieve fine crumbs. Don’t over-process; you want the crumbs to still have some texture.
-
Combine Crust Ingredients: In a bowl, mix the Oreo crumbs with the 1/3 cup of melted butter. Ensure the butter is evenly distributed throughout the crumbs.
-
Press into Pan: Scoop the crumb mixture into the bottom of a 9-inch cheesecake pan with a removable bottom. Use your fingers or the back of a spoon to firmly and evenly press the crumbs over the bottom of the pan and about 1/2 inch up the sides. This forms the base of your delicious cheesecake.
-
Chill the Crust: Cover the crust with plastic wrap and chill it in the refrigerator for about 20 minutes. This allows the butter to solidify, helping the crust maintain its shape during baking.
-
Prepare the Cream Cheese Filling: In a large mixing bowl, using a mixer (either stand or hand mixer), combine the 4 packages of softened cream cheese, 1 cup of sugar, and 1/3 cup of whipping cream. Beat at medium speed until the mixture is smooth, creamy, and completely lump-free.
-
Add Eggs, Flour, and Vanilla: Add the 6 large eggs one at a time, beating well after each addition. Be sure to scrape down the sides of the bowl to ensure everything is evenly incorporated. Next, add the 2 tablespoons of all-purpose flour and 2 teaspoons of vanilla extract. Beat again until just blended. Be careful not to overmix at this stage, as it can incorporate too much air into the batter.
-
First Layer of Filling: Pour half of the cream cheese mixture into the chilled Oreo crust, spreading it evenly.
-
Add the Oreo Cookie Layer: Break the remaining chocolate sandwich cookies (from the package) in half and scatter them evenly over the cream cheese mixture. Overlap the cookies if necessary to ensure they are well distributed across the filling.
-
Second Layer of Filling: Pour the remaining cream cheese mixture over the Oreo cookie layer, gently spreading it to cover all the cookies.
-
Bake the Cheesecake: Bake the cheesecake in a preheated 300°F (150°C) oven for approximately 1 hour and 20 minutes. The cheesecake is done when it is golden on top and jiggles only slightly in the center when the pan is gently shaken.
-
Cool and Chill: Remove the cheesecake from the oven and place it on a cooling rack. Allow it to cool completely to room temperature on the rack. Then, cover the cheesecake and chill it in the refrigerator for at least 4 hours, or preferably overnight. This chilling time is crucial for the cheesecake to set properly and develop its rich flavor.
-
Release and Serve: Before serving, carefully run a thin knife between the cake and the sides of the pan to loosen it. Then, gently remove the rim of the springform pan. Slice and serve!
Expert Tips & Tricks
- Room Temperature Cream Cheese: Ensure the cream cheese is at room temperature before mixing. This will help prevent lumps and create a smoother filling.
- Water Bath (Optional): For an even more decadent and creamy cheesecake, consider baking it in a water bath. Wrap the bottom of the springform pan tightly in aluminum foil, place it in a larger baking pan, and add hot water to the larger pan until it reaches about halfway up the sides of the cheesecake pan.
- Prevent Cracks: To minimize cracking, avoid opening the oven door frequently during baking. After baking, turn off the oven and let the cheesecake cool inside with the door ajar for about an hour before removing it.
- Crumb Consistency: Experiment with the texture of your Oreo crust. Some prefer a finer crumb, while others enjoy a coarser texture for added crunch.
- Cookie Placement: For a prettier presentation, arrange the Oreo halves in a decorative pattern on top of the first filling layer.
Serving & Storage Suggestions
Serve the Teenager’s Dream Cheesecake chilled, ideally straight from the refrigerator. A dollop of whipped cream or a drizzle of chocolate sauce makes for a delightful accompaniment. Leftover cheesecake should be stored in an airtight container in the refrigerator for up to 5 days. For longer storage, the cheesecake can be frozen for up to 2 months. Thaw it in the refrigerator overnight before serving.
Nutritional Information
| Nutrient | Amount per Serving | % Daily Value |
|---|---|---|
| Calories | 655.4 kcal | N/A |
| Calories from Fat | 406 g | 62% |
| Total Fat | 45.2 g | 69% |
| Saturated Fat | 23.2 g | 115% |
| Cholesterol | 198.9 mg | 66% |
| Sodium | 564 mg | 23% |
| Total Carbohydrate | 54.5 g | 18% |
| Dietary Fiber | 1.4 g | 5% |
| Sugars | 38.6 g | N/A |
| Protein | 10.6 g | 21% |
Note: Nutritional information is an estimate and may vary based on specific ingredients and portion sizes.
Variations & Substitutions
- Gluten-Free: Use gluten-free chocolate sandwich cookies for a gluten-free version. You may need to adjust the amount of butter in the crust, as gluten-free cookies can sometimes be drier.
- Different Cookie Flavors: Experiment with different flavors of chocolate sandwich cookies, such as mint, peanut butter, or golden Oreos.
- Reduced Sugar: Reduce the amount of sugar in the filling for a less sweet cheesecake.
- Chocolate Drizzle: Drizzle melted chocolate over the top of the cheesecake after it has chilled for an extra touch of indulgence.
- Seasonal Fruit: Top the cheesecake with fresh seasonal fruit, such as berries or peaches, for a refreshing twist.
FAQs (Frequently Asked Questions)
Q: Can I use a different size cheesecake pan?
A: Yes, but the baking time may need to be adjusted. A smaller pan will require a longer baking time, while a larger pan may require a shorter time. Keep an eye on the cheesecake and check for doneness using the jiggle test.
Q: Why did my cheesecake crack?
A: Cheesecakes can crack due to rapid temperature changes or overbaking. Try baking in a water bath or allowing the cheesecake to cool slowly in the oven to prevent cracking.
Q: Can I make this cheesecake ahead of time?
A: Absolutely! Cheesecake is a great make-ahead dessert. It can be made up to 2 days in advance and stored in the refrigerator.
Q: How do I prevent the Oreo crust from getting soggy?
A: Chilling the crust before adding the filling helps to prevent it from becoming soggy. Also, make sure the crust is firmly pressed into the pan.
Q: Can I freeze this cheesecake?
A: Yes, you can freeze this cheesecake for up to 2 months. Wrap it tightly in plastic wrap and then in aluminum foil before freezing. Thaw it in the refrigerator overnight before serving.
Final Thoughts
I sincerely hope you find as much joy in baking this Teenager’s Dream Cheesecake as my family and I have over the years. It’s a simple recipe with an incredibly rewarding outcome, perfect for sharing with loved ones or indulging in a moment of sweet nostalgia. Don’t be afraid to experiment with variations and make it your own! I would love to hear about your baking adventures and any creative twists you add to this classic recipe. Enjoy!