
Mastering the Art of Tenderflake Pie Crust: A Chef’s Guide
The scent of baking pie crust is more than just a pleasant aroma; it’s a time machine. One whiff and I’m transported back to my grandmother’s kitchen, flour dusting every surface like freshly fallen snow. Her secret? A recipe scribbled on a faded index card, simply titled “Perfect Pie Crust” – which, as I later discovered, was essentially the blueprint from the back of the Tenderflake lard box. Though I’ve experimented with countless variations over the years, nothing quite replicates the nostalgic comfort and consistently flaky texture of that classic. This recipe is a tribute to those cherished memories and the reliable, time-tested goodness of Tenderflake.
Recipe Overview
- Prep Time: 30 minutes
- Cook Time: 15-20 minutes (for blind baking)
- Total Time: 1 hour 15 minutes (including chilling)
- Servings: 6
- Yield: 6 pie shells or 3 double-crust pies
- Dietary Type: Not specified, but can be adapted with vegan shortening
Ingredients
- 5 ½ cups all-purpose flour
- 2 teaspoons salt
- 1 lb Tenderflake lard, chilled
- 1 egg, stirred slightly
- 1 tablespoon vinegar
- ⅞ cup cold water
Equipment Needed
- Large mixing bowl
- Pastry blender or two knives
- Measuring cups and spoons
- Wooden spoon
- Plastic wrap
- Rolling pin
- Pie dish(es)
Instructions
-
In a large mixing bowl, thoroughly combine the all-purpose flour and salt. This ensures even distribution and prevents pockets of saltiness in the final crust.
-
Add the chilled Tenderflake lard to the flour mixture. Using a pastry blender or two knives, cut the lard into the flour until the mixture resembles coarse crumbs with pea-sized pieces of lard remaining. It’s crucial to keep the lard cold; the cold fat creates steam during baking, which results in flaky layers. Avoid overworking the mixture, as this will develop the gluten in the flour and lead to a tough crust.
-
In a separate measuring cup, combine the slightly stirred egg and vinegar. The vinegar helps to relax the gluten in the dough, making it more tender.
-
Add enough cold water to the egg and vinegar mixture to bring the total liquid volume to one cup. The water must be cold. Again, cold ingredients are key to a flaky crust.
-
Gradually add the liquid mixture to the flour and lard mixture. Use a wooden spoon to stir the ingredients together, adding just enough liquid to make the dough cling together. Be careful not to overmix; the dough should be shaggy and slightly crumbly, not smooth.
-
Once the dough begins to come together, gather it into a ball. Divide the dough into six equal portions for single-crust pies, or three equal portions for double-crust pies.
-
Wrap each portion of dough tightly in plastic wrap and refrigerate for at least one hour, or preferably overnight. This allows the gluten to relax, making the dough easier to roll out and preventing it from shrinking during baking. If chilling overnight, let the dough sit at room temperature for about 15 minutes before rolling. This will make it more pliable and prevent cracking.
-
Before rolling, lightly flour a clean, flat surface. Place one portion of chilled dough on the floured surface and roll it out into a circle large enough to fit your pie pan.
-
Gently transfer the rolled dough to the pie pan. Press the dough lightly into the pan, being careful not to stretch it. Stretching the dough can cause it to shrink and become tough during baking.
-
Trim the excess dough from the edges of the pie pan. Crimp the edges of the crust decoratively using your fingers or a fork.
-
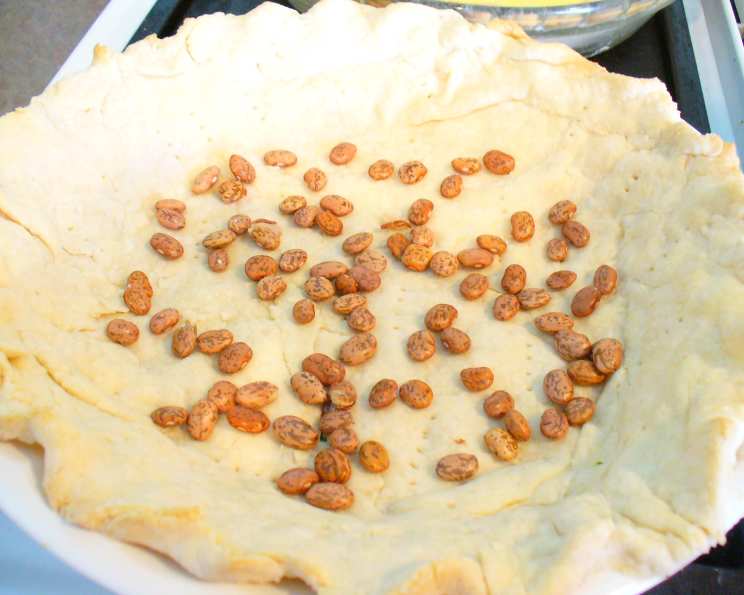
If blind baking the crust (baking it before adding the filling), prick the bottom of the crust several times with a fork to prevent it from puffing up during baking. Line the crust with parchment paper or aluminum foil and fill it with pie weights, dried beans, or rice.
-
Bake the crust in a preheated oven at 375°F (190°C) for 15-20 minutes, or until lightly golden brown. If blind baking, remove the pie weights and parchment paper during the last 5 minutes of baking to allow the crust to brown evenly.
Expert Tips & Tricks
- Keep it Cold: The most important secret to a flaky pie crust is to keep all the ingredients as cold as possible. Chill the flour, lard, water, and even your mixing bowl before starting.
- Don’t Overmix: Overmixing develops the gluten in the flour, resulting in a tough crust. Mix just until the dough comes together.
- Rest the Dough: Chilling the dough allows the gluten to relax, preventing shrinkage and making it easier to roll out.
- Blind Baking Perfection: For blind baking, use enough pie weights to completely cover the bottom and sides of the crust. This will prevent the crust from puffing up and losing its shape.
- Egg Wash for Shine: For a golden, glossy crust, brush the top of the crust with an egg wash (one egg beaten with a tablespoon of water) before baking.
Serving & Storage Suggestions
Serve your freshly baked pie warm or at room temperature, depending on the filling. A scoop of vanilla ice cream or a dollop of whipped cream is always a welcome addition.
Store leftover pie in the refrigerator, covered, for up to 3-4 days. For longer storage, freeze the baked pie (or unbaked pie crust) tightly wrapped in plastic wrap and aluminum foil for up to 2-3 months. Thaw the pie in the refrigerator overnight before serving. Reheat slices in a warm oven (300°F/150°C) for about 10-15 minutes to restore the crust’s crispness.
Nutritional Information
| Nutrient | Amount per Serving | % Daily Value |
|---|---|---|
| Calories | 1113.6 kcal | N/A |
| Calories from Fat | 699 kcal | 63% |
| Total Fat | 77.8 g | 119% |
| Saturated Fat | 30.2 g | 150% |
| Cholesterol | 103.1 mg | 34% |
| Sodium | 790.4 mg | 32% |
| Total Carbohydrate | 87.5 g | 29% |
| Dietary Fiber | 3.1 g | 12% |
| Sugars | 0.3 g | 1% |
| Protein | 12.9 g | 25% |
Note: These values are estimates and may vary based on specific ingredients and preparation methods.
Variations & Substitutions
- Vegan Pie Crust: Substitute the Tenderflake lard with a high-quality vegan shortening or a blend of coconut oil and vegetable shortening. Omit the egg and use 1 cup of ice water instead of the egg, vinegar, and water mixture.
- Gluten-Free Pie Crust: Use a gluten-free all-purpose flour blend. You may need to add a binder like xanthan gum to help the dough hold together.
- Herb-Infused Crust: Add a tablespoon of dried herbs, such as rosemary or thyme, to the flour mixture for a savory pie crust.
- Sweet Crust: Add 2-3 tablespoons of granulated sugar to the flour mixture for a sweeter crust, perfect for fruit pies.
FAQs (Frequently Asked Questions)
Q: Why is my pie crust tough?
A: Overmixing the dough is the most common cause of a tough pie crust. Avoid overworking the dough and use cold ingredients to prevent gluten development.
Q: How do I prevent my pie crust from shrinking?
A: Chill the dough thoroughly before rolling it out, and avoid stretching the dough when placing it in the pie pan.
Q: Can I make this pie crust ahead of time?
A: Yes, you can make the dough up to 2-3 days in advance and store it in the refrigerator, tightly wrapped. You can also freeze the dough for longer storage.
Q: What can I use if I don’t have pie weights for blind baking?
A: Dried beans, rice, or even sugar can be used as pie weights. Just be sure to line the crust with parchment paper or aluminum foil first.
Q: How can I tell if my pie crust is fully baked?
A: The crust should be golden brown and firm to the touch. If blind baking, the bottom of the crust should be dry and slightly browned.
Final Thoughts
There’s a certain magic in creating a pie from scratch, and it all starts with the crust. This Tenderflake pie crust recipe is a reliable foundation for countless sweet and savory creations. Don’t be afraid to experiment with variations and fillings to make it your own. So, grab your rolling pin, embrace the flour-dusted mess, and bake up a slice of happiness! Share your pie-making adventures and any delicious fillings you discover. Happy baking!