
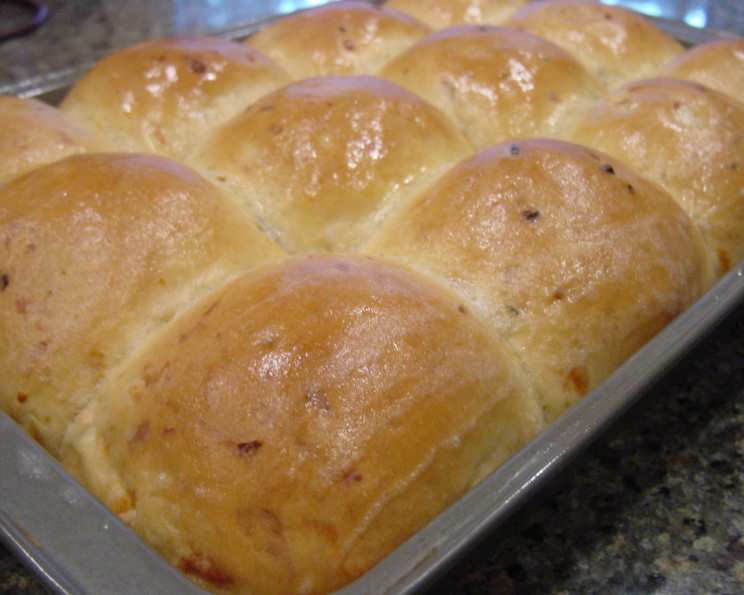
Texas Moppin’ Rolls: A Cheesy, Spicy Bread Adventure
I remember vividly the first time I tasted a truly great cheese bread. It was at a small-town Texas bakery, the kind with a screen door that always seemed to be slamming shut. The air hung thick with the aroma of yeast and melted butter, and these rolls – oh, these rolls! They were warm, slightly crusty on the outside, and gloriously cheesy with a subtle kick of spice that danced on my tongue. I’ve been chasing that flavor ever since, and these Texas Moppin’ Rolls come incredibly close to capturing that memory.
Recipe Overview
- Prep Time: 1 hour 15 minutes
- Cook Time: 35-40 minutes
- Total Time: 2 hours 20 minutes
- Servings: 24 rolls
- Yield: 24 rolls
- Dietary Type: Vegetarian
Ingredients
- 2 (1/4 ounce) packages active dry yeast
- 1 teaspoon honey
- 2 cups lukewarm water
- 1 teaspoon salt
- 1 1/2 teaspoons crushed red pepper flakes
- 1/2 cup minced onion
- 1 cup shredded Monterey Jack cheese
- 1/2 cup shredded Cheddar cheese
- 6 1/2 – 7 cups all-purpose flour, divided
Equipment Needed
- Large mixing bowl
- Measuring cups and spoons
- Lightly floured surface
- Clean, dry cloth
- 13x9x2-inch baking pan
- Cooling rack
Instructions
- In a large bowl, combine the yeast, honey, and lukewarm water. Stir until the yeast and honey are completely dissolved. This step is crucial for activating the yeast, ensuring a light and airy final product. If the water is too hot, it can kill the yeast; too cold, and it won’t activate properly. Aim for a temperature between 105-115°F.
- Add the salt, crushed red pepper flakes, minced onion, Monterey Jack cheese, and Cheddar cheese to the yeast mixture. Stir until all ingredients are thoroughly mixed and evenly distributed. Make sure the cheeses are shredded beforehand for even distribution throughout the dough.
- Gradually add 6 cups of the all-purpose flour, 2 cups at a time, mixing after each addition until the flour is completely incorporated. The dough will start to come together and form a shaggy mass.
- Turn out the dough onto a lightly floured surface. Knead for 6 to 8 minutes, adding enough of the remaining flour as needed to form a fairly stiff dough. The dough should be smooth and elastic, but not sticky. Proper kneading develops the gluten, which gives the rolls their structure.
- Rinse and dry the bowl, then lightly oil the surface of the dough. Place the dough in the bowl, turning to coat with oil. This prevents the dough from drying out during the rising process.
- Cover the bowl with a clean, dry cloth and let it rise in a warm, draft-free place for about 1 hour, or until doubled in size. This is where the yeast does its magic, creating air pockets and giving the rolls their characteristic fluffiness. A warm environment encourages the yeast to ferment and produce carbon dioxide.
- Punch down the risen dough to release the accumulated air. Knead it briefly to expel any large air bubbles. This helps to even out the texture of the dough.
- Divide the dough into 24 equal pieces (about 65 grams each). Using a kitchen scale ensures uniform size, which leads to even baking.
- Roll each piece into a fat oval. These don’t need to be perfect ovals; a rustic shape adds to their charm.
- Place the rolls in a lightly greased 13x9x2-inch baking pan (three rolls across, four down). The rolls will expand during the second rise and baking, so ensure they are spaced adequately.
- Let the rolls rise again for about 20 minutes, or until nearly doubled. This second rise contributes to the final texture of the rolls, making them even lighter and airier.
- While the rolls are rising for the second time, preheat the oven to 375 degrees Fahrenheit (190 degrees Celsius). Make sure the oven is fully preheated before baking to ensure even cooking.
- Place the pan on the middle rack of the preheated oven and bake for 35 to 40 minutes, or until the top crust is nicely browned. Keep an eye on them to prevent burning. The baking time may vary slightly depending on your oven.
- Remove the rolls from the pan and let them cool on a wire rack before serving. This allows excess moisture to escape, preventing the bottoms from becoming soggy.
Expert Tips & Tricks
- For a richer flavor, try using a combination of different cheeses, such as pepper jack or sharp cheddar.
- Brush the tops of the rolls with melted butter before baking for a golden-brown crust.
- If you want a softer crust, cover the rolls with a clean kitchen towel while they are cooling.
- If the rolls start to brown too quickly, tent the pan with foil during the last 10-15 minutes of baking.
- To add a glossy finish, brush the rolls with an egg wash (1 egg beaten with 1 tablespoon of water) before baking.
- Don’t over-knead the dough. Over-kneading can result in tough rolls.
- Make sure your yeast is fresh. Expired yeast will not activate properly, resulting in dense rolls.
- If you’re short on time, you can use rapid-rise yeast, which will reduce the rising time.
- If you want to make the dough ahead of time, you can refrigerate it after the first rise. Bring it to room temperature before shaping and baking.
Serving & Storage Suggestions
These Texas Moppin’ Rolls are best served warm, straight from the oven. They are a delicious accompaniment to soups, stews, chili, or any Tex-Mex meal. Store leftover rolls in an airtight container at room temperature for up to 2 days, or in the refrigerator for up to 5 days. For longer storage, freeze the rolls in a freezer-safe bag for up to 3 months. Reheat frozen rolls in a preheated oven at 350°F (175°C) for 10-15 minutes, or until warmed through.
Nutritional Information
| Nutrient | Amount per Serving | % Daily Value |
|---|---|---|
| Calories | 154.4 kcal | N/A |
| Calories from Fat | 23 g | 15% |
| Total Fat | 2.6 g | 3% |
| Saturated Fat | 1.4 g | 7% |
| Cholesterol | 6.7 mg | 2% |
| Sodium | 138.3 mg | 5% |
| Total Carbohydrate | 26.7 g | 8% |
| Dietary Fiber | 1.1 g | 4% |
| Sugars | 0.5 g | N/A |
| Protein | 5.5 g | 11% |
Variations & Substitutions
- Spice Level: Adjust the amount of crushed red pepper flakes to your liking. For a milder flavor, reduce the amount or omit them altogether. For a spicier kick, add more crushed red pepper flakes or substitute with minced jalapeños or cayenne pepper.
- Cheese: Experiment with different types of cheese, such as pepper jack, Colby jack, or a blend of your favorites.
- Herbs: Add fresh or dried herbs, such as rosemary, thyme, or oregano, for an extra layer of flavor.
- Garlic: Add a clove of minced garlic to the dough for a savory twist.
- Whole Wheat: Substitute some of the all-purpose flour with whole wheat flour for a nuttier flavor and added fiber. Start with 1/2 cup and adjust as needed.
- Sweetness: For a slightly sweeter roll, increase the amount of honey to 2 teaspoons.
FAQs (Frequently Asked Questions)
Q: Can I use instant yeast instead of active dry yeast?
A: Yes, you can substitute instant yeast for active dry yeast. You can add instant yeast directly to the flour without proofing it first. Use the same amount as specified in the recipe.
Q: Can I make these rolls ahead of time and freeze them?
A: Absolutely! These rolls freeze well. After baking and cooling, wrap them individually in plastic wrap and then place them in a freezer-safe bag. They can be stored in the freezer for up to 3 months.
Q: What if my dough doesn’t rise?
A: Several factors can prevent dough from rising, including using expired yeast, water that is too hot or too cold, or a room that is too cold. Make sure your yeast is fresh and that the water is lukewarm (between 105-115°F). Place the dough in a warm, draft-free place to rise.
Q: Can I use a stand mixer to make the dough?
A: Yes, you can use a stand mixer to make the dough. Use the dough hook attachment and mix on low speed until the dough comes together and is smooth and elastic.
Q: How do I know when the rolls are done baking?
A: The rolls are done when the top crust is golden brown and the internal temperature reaches 190-200°F (88-93°C). You can use a food thermometer to check the internal temperature.
Final Thoughts
I truly hope you give these Texas Moppin’ Rolls a try. They’re more than just bread; they’re a delicious way to bring a little bit of that small-town Texas bakery magic into your own kitchen. Don’t be afraid to experiment with the flavors and make them your own! And if you do, I’d love to hear about your experience – share your photos and feedback, and let me know what variations you come up with. Pair these rolls with a hearty bowl of chili or a creamy tomato soup for the ultimate comfort food experience. Happy baking!