
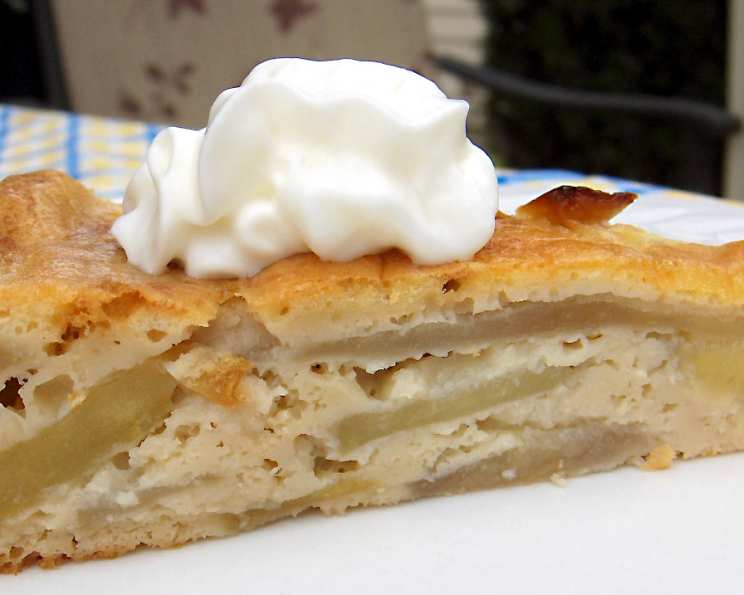
The Apple Lady’s Apple Cake: A Simple Slice of Autumn
The first time I tasted this cake, it was a crisp October afternoon at a local apple orchard. The “Apple Lady,” as everyone affectionately called her, had a small table set up near the entrance, offering slices of this unassuming cake. The aroma alone, a blend of warm apples, cinnamon, and baked sugar, drew me in. One bite, and I was hooked. It wasn’t fancy or overly sweet, but it was honest, comforting, and perfectly captured the essence of fall. This is a cake that tastes like coming home.
Recipe Overview
- Prep Time: 20 minutes
- Cook Time: 35 minutes
- Total Time: 55 minutes
- Servings: 8
- Yield: 1 cake
- Dietary Type: Vegetarian
Ingredients
- 1/2 cup all-purpose flour
- 1/3 cup sugar
- 1 tablespoon baking powder
- 1/8 teaspoon fine sea salt
- 1/2 teaspoon pure vanilla extract
- 2 large eggs, lightly beaten
- 2 tablespoons vegetable oil
- 1/3 cup whole milk
- 4 baking apples, cored, peeled, and cut into wedges (about 2 lbs. total)
For the Topping:
- 1/3 cup sugar
- 1 large egg, lightly beaten
- 3 tablespoons unsalted butter, melted
Equipment Needed
- 9-inch springform pan
- Large mixing bowl
- Small mixing bowl
- Whisk or fork
- Measuring cups and spoons
- Cooling rack
Instructions
-
Preheat your oven to 400 degrees F (200 degrees C). It’s crucial to have a properly heated oven for the cake to rise evenly.
-
Butter a 9-inch springform pan. This ensures the cake releases easily and maintains its shape. Use softened butter and coat the entire inside surface, including the sides. Set the pan aside.
-
In a large bowl, whisk together the flour, sugar, baking powder, and sea salt until well combined. This ensures that the baking powder is evenly distributed, leading to a consistent rise.
-
Add the vanilla extract, eggs, vegetable oil, and milk to the dry ingredients. Stir until just blended. Be careful not to overmix, as this can lead to a tough cake. A few small lumps are perfectly fine.
-
Add the apples to the batter and stir gently until they are thoroughly coated. Make sure the apples are evenly dispersed throughout the batter to ensure a consistent apple-to-cake ratio in every slice.
-
Spoon the apple mixture into the prepared springform pan, spreading it evenly. The apples should be somewhat submerged in the batter.
-
Place the pan in the center of the preheated oven and bake for about 25 minutes, or until the cake is fairly firm and golden brown around the edges. The center might still seem a little wobbly, but it will firm up during the second bake.
-
While the cake is baking, prepare the topping: In a small bowl, combine the sugar, egg, and melted butter. Stir with a whisk or fork until well blended and smooth.
-
After the initial 25 minutes of baking, remove the cake from the oven. Pour the topping mixture evenly over the surface of the cake.
-
Return the cake to the oven and bake for an additional 10 minutes, or until the top is a deep golden brown and the cake feels quite firm when pressed lightly with a fingertip. The topping should be bubbly and slightly caramelized. Keep a close eye on the cake during this final bake to prevent burning.
-
Transfer the cake pan to a wire rack and allow it to cool for 10 minutes. This allows the cake to settle and makes it easier to release from the pan.
-
After 10 minutes, run a thin knife around the sides of the pan to loosen the cake. Then, release and remove the springform side, leaving the cake on the pan base. This prevents the cake from sticking and breaking.
-
Serve the cake at room temperature, cut into thin wedges. A slightly warm cake is also delicious.
Expert Tips & Tricks
- Apple Variety: The type of apple you use can greatly impact the flavor of the cake. I prefer a mix of tart and sweet apples, such as Granny Smith and Honeycrisp. Feel free to experiment with your favorite varieties.
- Preventing a Soggy Bottom: Make sure your apples aren’t overly juicy. Pat them dry with a paper towel after slicing to remove any excess moisture.
- Topping Variations: For a richer flavor, try adding a pinch of cinnamon or nutmeg to the topping mixture.
- Even Baking: Rotate the cake halfway through the baking time to ensure even browning.
- Make-Ahead Tip: The apple mixture can be prepared a few hours in advance and stored in the refrigerator. Just be sure to give it a good stir before pouring it into the pan.
Serving & Storage Suggestions
This apple cake is best served at room temperature, either plain or with a dollop of whipped cream or a scoop of vanilla ice cream. It pairs wonderfully with a warm cup of coffee or tea.
To store, wrap the cake tightly in plastic wrap or place it in an airtight container. It will keep at room temperature for up to 2 days or in the refrigerator for up to 5 days. To reheat, warm individual slices in the microwave for a few seconds. The cake can also be frozen for up to 2 months. Thaw it overnight in the refrigerator before serving.
Nutritional Information
| Nutrient | Amount per Serving | % Daily Value |
|---|---|---|
| Calories | 232 kcal | N/A |
| Total Fat | 10.1g | 15% |
| Saturated Fat | 4g | 19% |
| Cholesterol | 91.8mg | 30% |
| Sodium | 204.3mg | 8% |
| Total Carbohydrate | 33.2g | 11% |
| Dietary Fiber | 1.9g | 7% |
| Sugars | 24.5g | N/A |
| Protein | 3.7g | 7% |
Note: Nutritional information is an estimate and may vary based on specific ingredients and serving sizes.
Variations & Substitutions
- Gluten-Free: Substitute the all-purpose flour with a gluten-free blend. Be sure to add a teaspoon of xanthan gum to help bind the ingredients.
- Dairy-Free: Replace the whole milk with almond milk, soy milk, or oat milk. Use a dairy-free butter substitute for the topping.
- Spiced Apple Cake: Add 1 teaspoon of ground cinnamon and 1/2 teaspoon of ground nutmeg to the dry ingredients for a warmer, spicier flavor.
- Pear Cake: Substitute the apples with pears for a slightly different, equally delicious flavor profile.
- Nutty Topping: Add 1/4 cup of chopped walnuts or pecans to the topping mixture for extra crunch and flavor.
FAQs (Frequently Asked Questions)
Q: Can I use a different size pan?
A: While a 9-inch springform pan is ideal, you can use a regular cake pan of similar size. Just be sure to grease and flour the pan well to prevent sticking.
Q: How do I know when the cake is done?
A: The cake is done when the top is golden brown and firm to the touch. A toothpick inserted into the center should come out clean, though it may have a bit of melted topping on it.
Q: Can I make this cake without peeling the apples?
A: Yes, you can leave the peels on if you prefer. Just be sure to wash the apples thoroughly. The peels will add a bit of texture and fiber to the cake.
Q: What if I don’t have vegetable oil?
A: You can substitute vegetable oil with canola oil, melted coconut oil, or even unsalted butter.
Q: Can I add more apples?
A: Adding more apples than the recipe specifies might make the cake too moist. Stick to the recommended amount for the best results.
Final Thoughts
This Apple Lady’s Apple Cake is more than just a recipe; it’s a celebration of simplicity and the comforting flavors of autumn. It’s the kind of cake that fills your kitchen with a warm, inviting aroma and brings smiles to the faces of everyone who tastes it. I encourage you to try this recipe and experience the magic for yourself. Whether you’re an experienced baker or a novice in the kitchen, this cake is sure to be a success. Share your creations with friends and family, and don’t hesitate to add your own personal touch. After all, the best recipes are the ones that are made with love. Pair it with a scoop of vanilla ice cream and a glass of chilled hard cider for the perfect fall treat!