
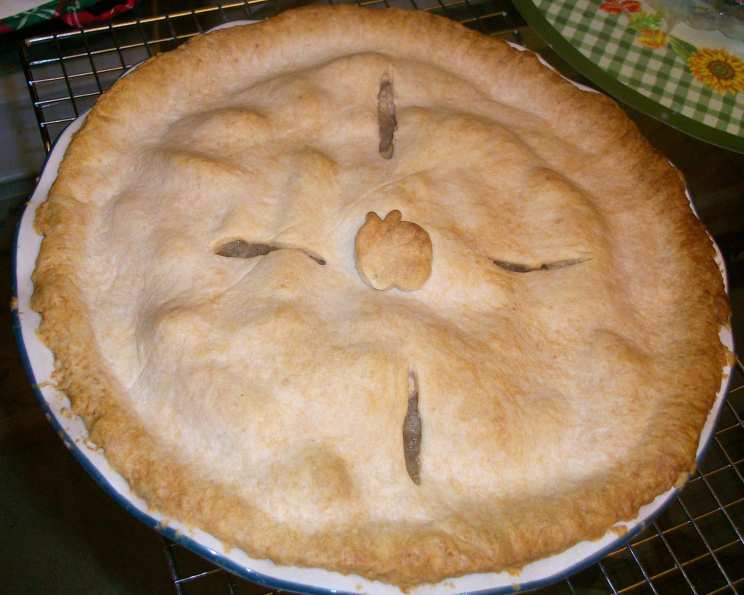
The Best Apple Pie You Will Ever Eat!
My grandmother, Nana Elsie, wasn’t much for fancy cooking, but she had a knack for apple pie. The aroma alone could transport you back to simpler times, and one bite was enough to make you forget all your troubles. I remember sitting at her kitchen table, watching her nimble fingers peel apples, a symphony of comforting sounds filling the air. This recipe, a blend of her simple wisdom and a few modern touches, is my humble attempt to capture that magic in every slice.
Recipe Overview
- Prep Time: 45 minutes
- Cook Time: 1 hour
- Total Time: 1 hour 45 minutes
- Servings: 8
- Yield: 1 pie
- Dietary Type: Vegetarian
Ingredients
For the Crust:
- 2 cups all-purpose flour
- 1/4 cup self-raising flour
- 150g unsalted butter, chilled and cubed
- 2 tablespoons sugar
- 4-5 tablespoons ice water
For the Filling:
- 6 cups Granny Smith apples, thinly sliced and peeled
- 3/4 cup sugar
- 2 tablespoons all-purpose flour
- 1/2 teaspoon ground cinnamon
- 1/8 teaspoon ground nutmeg
Equipment Needed
- 9-inch pie plate
- Large mixing bowl
- Measuring cups and spoons
- Pastry blender or food processor (optional)
- Rolling pin
- Baking paper or parchment paper
- Wire rack
Instructions
-
Prepare the Pie Plate: Lightly grease a 9-inch pie plate. This ensures the pie doesn’t stick and releases cleanly once baked.
-
Make the Crust: Sift together the all-purpose flour and self-raising flour into a large bowl. Sifting ensures a light and flaky crust.
-
Incorporate the Butter: Add the chilled, cubed unsalted butter to the flour mixture. Using your fingertips or a pastry blender, rub the butter into the flour until the mixture resembles fine breadcrumbs. The colder the butter, the flakier the crust will be. If you have warm hands, work quickly!
-
Add Sweetness: Stir in the sugar. This adds a touch of sweetness to the crust, balancing the tartness of the apples.
-
Introduce the Water: Make a well in the center of the flour mixture. Add almost all of the ice water and mix with a flat-bladed knife, using a cutting action, until the mixture comes together in beads. The ice water keeps the butter cold and prevents gluten development, resulting in a tender crust.
-
Adjust Consistency: Add more water, a tablespoon at a time, if the dough is too dry. You want the dough to be moist enough to hold together but not sticky.
-
Form and Divide the Dough: Gather the dough together and lift it out onto a lightly floured surface. Gently press it into a ball and divide it into two pieces, making one half slightly larger than the other. The larger piece will be for the bottom crust.
-
Chill the Dough: Cover both pieces of dough with plastic wrap and refrigerate for at least 20 minutes. This chilling period allows the gluten to relax and the butter to firm up, making the dough easier to roll out.
-
Preheat the Oven: Preheat your oven to 375 degrees F (190 degrees C).
-
Prepare the Apples: While the dough is chilling, peel and thinly slice the Granny Smith apples. Thin slices ensure even cooking.
-
Combine the Filling Ingredients: In a large bowl, stir together the sugar, all-purpose flour, cinnamon, and nutmeg. The flour helps to thicken the apple juices as the pie bakes, while the spices add warmth and complexity.
-
Coat the Apples: Add the apple slices to the sugar mixture and gently toss until they are evenly coated.
-
Roll Out the Bottom Crust: Roll out the larger piece of pastry between two sheets of baking paper or parchment paper to a circle large enough to line the base and sides of the pie plate. Using baking paper prevents the dough from sticking to the rolling surface and makes it easy to transfer to the pie plate.
-
Line the Pie Plate: Carefully transfer the rolled-out pastry to the pie plate and gently press it into the bottom and sides.
-
Trim Excess Pastry: Use a small, sharp knife to trim any excess pastry from the edge of the pie plate. Leave about an inch overhang for crimping.
-
Fill the Pie: Transfer the apple mixture to the pastry-lined pie plate, arranging the slices evenly.
-
Roll Out the Top Crust: Roll out the remaining piece of pastry between two sheets of baking paper until it is large enough to cover the pie. Alternatively, you can cut the dough into strips for a lattice top.
-
Assemble the Top Crust: Place the rolled-out pastry over the filling and seal the edges to the bottom crust. If doing a lattice pattern, weave the pastry strips on top of the pie.
-
Trim and Crimp the Edges: Trim any excess pastry from the top crust and crimp the edges decoratively. You can use a fork or your fingers to create a sealed and attractive edge.
-
Vent the Pie: Cut a few slits in the top crust to allow steam to escape during baking. This prevents the crust from puffing up and cracking.
-
Add a Finishing Touch (Optional): If desired, sprinkle the top of the pie with sugar for a sparkling finish.
-
Protect the Edges: To prevent over-browning, cover the edge of the pie with foil. You can use pie shields or simply wrap strips of foil around the crust.
-
Bake the Pie: Bake in the preheated oven at 375 degrees F (190 degrees C) for 40 minutes.
-
Remove the Foil: Remove the foil from the edges of the pie.
-
Continue Baking: Bake for an additional 20 minutes, or until the fruit is tender and the filling is bubbly. If you used a lattice pattern, bake for 30 minutes instead of 20 minutes.
-
Adjust Baking Time for Lattice Crust (If Applicable): After the 30 minutes, cover the whole pie with foil and bake for an additional 10 minutes, or until the fruit is tender and the filling is bubbly.
-
Cool Completely: Cool the pie on a wire rack before slicing and serving. Cooling allows the filling to set and prevents it from being too runny.
-
Serve and Enjoy: If desired, serve warm with a scoop of vanilla ice cream.
Expert Tips & Tricks
- Use a combination of flours: The combination of all-purpose and self-raising flour creates a perfect balance of tenderness and structure in the crust. If you don’t have self-raising flour, you can substitute it with all-purpose flour and a pinch of baking powder (about 1/4 teaspoon).
- Keep everything cold: The key to a flaky crust is keeping the butter and water as cold as possible. You can even chill the flour before starting.
- Blind bake the bottom crust: For an extra-crisp bottom crust, blind bake it before adding the filling. Line the crust with parchment paper, fill it with pie weights or dried beans, and bake for 15 minutes before removing the weights and adding the filling.
- Apple varieties: While Granny Smiths are the classic choice, feel free to experiment with other apple varieties like Honeycrisp, Braeburn, or Gala. A mix of tart and sweet apples can create a more complex flavor.
- Brush with egg wash: For a golden-brown, glossy crust, brush the top with an egg wash (one egg beaten with a tablespoon of water) before baking.
- Don’t overmix the dough: Overmixing develops the gluten in the flour, resulting in a tough crust. Mix the dough just until it comes together.
- Adjust baking time: Every oven is different, so adjust the baking time as needed. The pie is done when the crust is golden brown and the filling is bubbly.
- Let the pie cool completely: This is the hardest part, but it’s essential! Letting the pie cool completely allows the filling to set and prevents it from being runny.
Serving & Storage Suggestions
Serve this apple pie warm, at room temperature, or even cold, depending on your preference. A scoop of vanilla ice cream, a dollop of whipped cream, or a drizzle of caramel sauce makes a wonderful addition.
- Room Temperature: The pie can be stored at room temperature for up to 2 days. Cover loosely with plastic wrap or foil.
- Refrigerator: For longer storage, keep the pie in the refrigerator for up to 5 days.
- Freezer: To freeze the pie, wrap it tightly in plastic wrap and then in foil. It can be frozen for up to 3 months. Thaw overnight in the refrigerator before reheating.
To reheat, bake in a preheated oven at 350 degrees F (175 degrees C) for about 15-20 minutes, or until warmed through. You can also reheat individual slices in the microwave.
Nutritional Information
| Nutrient | Amount per Serving | % Daily Value |
|---|---|---|
| Calories | 403 kcal | – |
| Calories from Fat | 141g | 35% |
| Total Fat | 15.8g | 24% |
| Saturated Fat | 9.7g | 48% |
| Cholesterol | 40.3mg | 13% |
| Sodium | 3.9mg | 0% |
| Total Carbohydrate | 63.2g | 21% |
| Dietary Fiber | 3.3g | 13% |
| Sugars | 31.8g | – |
| Protein | 4.2g | 8% |
Note: Nutritional information is an estimate and may vary based on specific ingredients and preparation methods.
Variations & Substitutions
- Gluten-Free Crust: Substitute the all-purpose flour with a gluten-free all-purpose flour blend. You may need to add a binder like xanthan gum to help with the structure.
- Different Apples: Use a mix of different apple varieties for a more complex flavor. Honeycrisp, Gala, and Fuji are all good choices.
- Spiced Apple Pie: Add a pinch of ground ginger, cloves, or allspice to the filling for a more spiced flavor.
- Caramel Apple Pie: Drizzle caramel sauce over the apples before adding the top crust for a decadent caramel apple pie.
- Apple Crumble Pie: Instead of a top crust, top the pie with a crumble topping made from flour, butter, sugar, and oats.
FAQs (Frequently Asked Questions)
Q: Can I make the dough ahead of time?
A: Absolutely! The dough can be made up to 2 days in advance and stored in the refrigerator, wrapped tightly in plastic wrap. You can also freeze the dough for up to 3 months.
Q: How do I prevent the bottom crust from getting soggy?
A: Blind baking the bottom crust and ensuring the apple filling isn’t too wet can help prevent a soggy bottom crust.
Q: Can I use pre-made pie crust?
A: Yes, you can use pre-made pie crust to save time, but homemade crust will always taste better.
Q: My pie crust is browning too quickly. What should I do?
A: Cover the edges of the pie with foil to prevent over-browning. If the whole pie is browning too quickly, you can tent the entire pie with foil.
Q: How do I know when the pie is done?
A: The pie is done when the crust is golden brown and the filling is bubbly. You can also insert a knife into the center of the pie to check the apples for tenderness.
Final Thoughts
This apple pie is more than just a recipe; it’s a slice of nostalgia, a taste of home, and a testament to the simple joys of baking. I encourage you to try it, make it your own, and share it with the people you love. Don’t be afraid to experiment with different apple varieties, spices, or crust designs. Baking is all about creativity and making something delicious that brings joy to yourself and others. And if you happen to have a scoop of vanilla ice cream on hand, well, that’s just the icing on the… pie! Let me know how it turns out!