
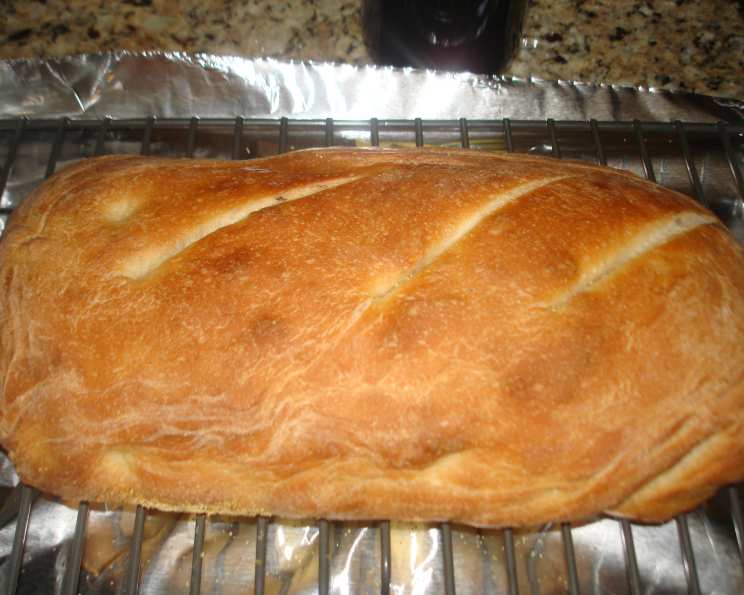
The Best Bread Ever 😉
The aroma of freshly baked bread… it’s a time machine, isn’t it? For me, it instantly transports me back to my grandmother’s kitchen. She never used fancy gadgets or complicated techniques, just simple ingredients and a whole lot of love. The crust, always a perfect golden brown, would crackle invitingly as she sliced it, and the steamy, soft interior practically melted in your mouth. This recipe, while not hers exactly, captures that same essence of warmth, simplicity, and utter deliciousness.
Recipe Overview
- Prep Time: 35 minutes
- Cook Time: 35 minutes
- Total Time: 2 hours 45 minutes
- Yields: 2 loaves
- Serves: 6
- Dietary Type: Vegetarian
Ingredients
- 3 1/2 cups bread flour
- 1/4 cup sugar
- 1/4 cup salt
- 1 3/4 teaspoons dry active yeast
- 1 1/2 cups warm water (divided)
- 1/4 cup cornmeal
- 1/8 cup olive oil (extra virgin)
- 1/2 cup flour (for kneading)
Equipment Needed
- Large mixing bowl
- Measuring cups and spoons
- Whisk
- Measuring cup
- Spatula (plastic recommended)
- Cutting board
- Wax paper
- Non-stick cooking spray
- Large bowl
- Warm, damp cloth
- Kitchen towel
- Baking stone
- Shallow oven-safe pan
- Cooling rack
Instructions
-
Begin by preparing your flour mixture. In a large bowl, combine the bread flour, sugar, and salt. Use a whisk to blend these dry ingredients thoroughly for about one minute, ensuring even distribution of the salt and sugar. This step is crucial for consistent flavor throughout the bread.
-
Next, activate the yeast. In a measuring cup, add the dry active yeast to 1/2 cup of warm water (slightly warmer than lukewarm, but not hot – hot water will kill the yeast). Stir gently to dissolve the yeast. Cover the cup and set aside for 2 minutes.
-
To the yeast mixture, add the remaining 1 cup of warm water, then cover the cup again.
-
Create a well in the center of your flour mixture. Pour the yeast and water mixture into the well.
-
Cover the bowl with a warm damp cloth and a kitchen towel. Set aside for 10 minutes. This allows the yeast to further activate and begin working its magic. You’ll know it’s ready when you see bubbles forming in the water mixture, indicating that the yeast is alive and well.
-
Now it’s time to start mixing the dough. Using a spatula (a plastic one tends to be less sticky), begin blending the flour mixture with the water, working from the center outwards. Continue mixing until a very sticky dough forms. Don’t be tempted to add more flour at this stage; the stickiness is key to a light and airy bread.
-
Prepare a cutting board for kneading by dusting it generously with the 1/2 cup of flour.
-
Dump the sticky dough onto the floured cutting board. Dust your hands with flour as well.
-
Begin kneading the dough for about ten minutes. I like to start by pressing the dough into a pizza shape, folding it over, and pressing again, repeating this action for the first five minutes. This helps to develop the gluten structure. Then, switch to a traditional kneading action, pushing and folding the dough.
-
During kneading, be careful not to dry out the dough too much with flour. Add flour sparingly, only when the dough becomes unmanageably sticky. The goal is a smooth, elastic texture, not a dry one.
-
Once the dough has reached a smooth texture, shape it into a round ball.
-
Coat the ball with about 2 tablespoons of extra virgin olive oil, ensuring that the entire surface is lightly oiled. This will prevent the dough from drying out during the first rise.
-
Line a large bowl with wax paper and spray the wax paper with non-stick cooking spray. This will prevent the dough from sticking to the bowl as it rises.
-
Place the dough into the prepared bowl to rise.
-
Cover the bowl with the same warm damp cloth and kitchen towel, and place in a room temperature location for 1 1/2 hours (up to 3 hours) for the first rise. The warmer the room, the faster the dough will rise.
-
Once the dough has doubled in size, prepare your cutting board with wax paper coated with cooking spray.
-
Remove the dough from the bowl onto the prepared board.
-
Using your hands (not a knife), pull apart the dough into two equal pieces.
-
Shape each piece into a loaf. I like to make the loaves about 8-10 inches long and about 4 inches wide, but this is not critical. Feel free to get creative with the shape – you could even braid them!
-
Place another piece of wax paper sprayed with cooking spray over the top of both loaves. Cover with a towel and place in room temperature for 1 hour for the second rise.
-
Now it’s time to prepare your oven. Preheat the oven to 425°F (220°C).
-
Cover your baking stone with about 1/4 cup of cornmeal and place it in the oven on the middle rack. The cornmeal will prevent the bread from sticking to the baking stone and add a nice texture to the bottom crust.
-
On a lower rack, place a pan with about 1 cup of water. This creates steam in the oven, which helps to create a crispier crust.
-
You want your baking stone to be really hot when it’s time to put the bread in. Once the hour is up, your bread will have grown a bit.
-
Remove the towels and wax paper. With one hand, gently place it on one loaf. Using your other hand, take the wax paper and turn the loaf upside down into your hand, being careful not to disturb the shape and air in your loaf.
-
Open the oven, pull out your rack with the baking stone, and place your loaf directly onto the cornmeal-covered baking stone. Close the oven.
-
Set a timer for 10 minutes. After 10 minutes, turn down the oven to 400°F (200°C) and bake for 20 more minutes.
-
Watch that your crust isn’t getting too brown. I like mine golden brown, think of the color of honey! If your crust is how you like it, cover it with a double fold of foil just over the top to prevent further browning.
-
Turn the oven off and let stand in the oven for 5 more minutes. This allows the bread to finish baking and helps to prevent the crust from becoming soggy.
-
Remove the bread to a cooling rack.
-
Slice after 10 minutes and serve.
-
Repeat the baking process with the second loaf.
-
ENJOY!
Expert Tips & Tricks
- The water temperature is crucial for activating the yeast. It should be warm to the touch, but not hot. If it’s too hot, it will kill the yeast.
- Don’t over-knead the dough. Over-kneading can result in a tough bread.
- If your dough is too sticky to handle, lightly flour your hands and the work surface.
- For a richer flavor, try using a combination of bread flour and whole wheat flour.
- To add some extra flavor and texture, try adding seeds, nuts, or herbs to the dough.
- If your oven tends to brown bread too quickly, try tenting the loaf with foil during the last 10 minutes of baking.
Serving & Storage Suggestions
Serve this bread warm, sliced, and with a pat of butter or a drizzle of olive oil. It’s also delicious toasted and served with jam or honey.
Store leftover bread in an airtight container at room temperature for up to 3 days. For longer storage, freeze the bread in a freezer-safe bag for up to 2 months. To reheat, thaw the bread completely and then bake in a preheated oven at 350°F (175°C) for 10-15 minutes, or until warmed through.
Nutritional Information
| Nutrient | Amount per Serving | % Daily Value |
|---|---|---|
| Calories | 397.2 kcal | N/A |
| Calories from Fat | N/A | 49 g |
| Total Fat | 5.5 g | 8% |
| Saturated Fat | 0.8 g | 3% |
| Cholesterol | 0 mg | 0% |
| Sodium | 4720.9 mg | 196% |
| Total Carbohydrate | 76.3 g | 25% |
| Dietary Fiber | 2.9 g | 11% |
| Sugars | 8.6 g | 34% |
| Protein | 9.5 g | 18% |
Note: Nutritional information is an estimate and may vary based on specific ingredients and preparation methods.
Variations & Substitutions
- Herb Bread: Add 1-2 tablespoons of chopped fresh herbs (such as rosemary, thyme, or oregano) to the dough during kneading.
- Seed Bread: Add 1/4 cup of seeds (such as sesame, poppy, or sunflower seeds) to the dough during kneading.
- Cheese Bread: Add 1/2 cup of shredded cheese (such as cheddar, parmesan, or mozzarella) to the dough during kneading.
- Sweet Bread: Increase the amount of sugar to 1/2 cup and add 1/4 cup of dried fruit (such as raisins, cranberries, or apricots) to the dough during kneading.
- Gluten-Free Bread: Substitute the bread flour with a gluten-free bread flour blend. You may need to adjust the amount of water depending on the blend you use.
FAQs (Frequently Asked Questions)
Q: Why is my dough so sticky?
A: This dough is meant to be sticky! The stickiness helps to create a light and airy bread. Just be sure to flour your hands and work surface well when kneading.
Q: Can I use a stand mixer to make this bread?
A: Yes, you can use a stand mixer with a dough hook attachment to knead the dough. Knead on low speed for about 8-10 minutes, or until the dough is smooth and elastic.
Q: How do I know when the bread is done baking?
A: The bread is done when it is golden brown and sounds hollow when tapped on the bottom. You can also use a thermometer to check the internal temperature of the bread; it should be around 200-210°F (93-99°C).
Q: Can I freeze the dough?
A: Yes, you can freeze the dough after the first rise. Shape the dough into loaves, wrap them tightly in plastic wrap, and then place them in a freezer-safe bag. Thaw the dough in the refrigerator overnight before baking.
Q: Why is there water in a pan on the lower rack of the oven?
A: The water creates steam in the oven, which helps to create a crispier crust.
Final Thoughts
Don’t be intimidated by the length of this recipe; it’s truly easier than it looks! The satisfaction of pulling a warm, fragrant loaf of homemade bread from the oven is simply unmatched. I urge you to give this recipe a try and experience the joy of baking your own “Best Bread Ever ;).” Share your creations and feedback – I’d love to hear how it turns out! This bread pairs perfectly with a simple soup, a hearty stew, or even just a slather of good butter and a cup of tea. Happy baking!