
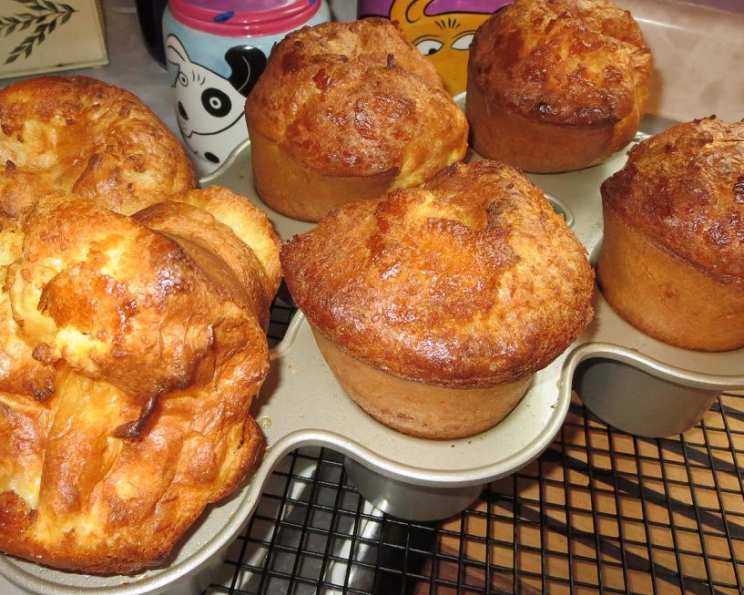
The Oak Grill Popover: A Minneapolis Classic
I remember as a child, my grandmother would take me to Dayton’s in downtown Minneapolis during the holiday season. After marveling at the animated window displays, we’d always head up to the 12th floor for lunch at the Oak Grill. The star of every meal was undoubtedly the popovers—those towering, golden-brown delights, impossibly light and airy, arriving in a basket still steaming from the oven. The simple act of tearing off a piece and slathering it with butter was pure bliss, a memory I cherish to this day. Now, I’m thrilled to share the recipe for these iconic popovers, so you can recreate a taste of Minneapolis history in your own kitchen.
Recipe Overview
- Prep Time: 20 minutes
- Cook Time: 30-40 minutes
- Total Time: 50-60 minutes
- Servings: 6-12 (depending on pan size)
- Yield: 6-12 popovers
- Dietary Type: Not Gluten-Free
Ingredients
- Nonstick cooking spray, for pans
- 5 large eggs
- 1 2/3 cups whole milk
- 5 tablespoons unsalted butter, melted and cooled
- 1 2/3 cups all-purpose flour
- 1/2 teaspoon salt
Equipment Needed
- Popover pan or deep muffin tin
- Large bowl
- Electric mixer
- Measuring cups and spoons
- Wire rack
Instructions
-
Begin by preheating your oven to 400 degrees Fahrenheit (200 degrees Celsius). This high heat is crucial for creating the steam that allows the popovers to rise dramatically.
-
Prepare your popover pans or deep muffin tins. Generously coat each cup with nonstick cooking spray. This step is essential to prevent sticking and ensure easy removal of the popovers after baking. Place the prepared pans in the preheated oven for at least 15 minutes. Heating the pans is another key step – it helps the batter to immediately begin cooking and rising upon contact.
-
While the pans are heating, prepare the batter. In a large bowl, using an electric mixer on medium speed, beat the 5 large eggs until frothy. This usually takes about 2-3 minutes. The goal is to incorporate air into the eggs, which will contribute to the light and airy texture of the popovers.
-
Add the 1 2/3 cups of whole milk and 5 tablespoons of melted and cooled unsalted butter to the beaten eggs. Mix well until all the ingredients are fully combined. Make sure the butter is cooled so it doesn’t cook the eggs.
-
In the same bowl, add the 1 2/3 cups of all-purpose flour and 1/2 teaspoon of salt. Mix on low speed until just combined. Be careful not to overmix the batter, as this can develop the gluten in the flour and result in tough popovers. A few lumps are okay.
-
Carefully remove the hot popover pans from the oven. Working quickly, divide the batter evenly among the preheated cups, filling each cup just under half full. It’s important not to overfill the cups, as the popovers will expand considerably during baking.
-
Return the filled pans to the oven and bake for 30 to 40 minutes, or until the popovers are puffy and well-browned. The finished popovers should pull away from the sides of the pan easily and feel light to the touch. Avoid opening the oven door during the first 20 minutes of baking, as this can cause the popovers to deflate. If you find the tops are browning too quickly, you can carefully tent the pan with foil after about 25 minutes.
-
Once baked, remove the popovers from the oven and immediately remove them from the pan. Place them on a wire rack to cool slightly. This prevents them from becoming soggy.
-
Serve the popovers warm.
Expert Tips & Tricks
- Hot Pans, Hot Batter: The key to tall popovers is a screaming hot pan and a batter that’s not too cold. Ensure your pans are thoroughly heated in the oven for at least 15 minutes before filling.
- Don’t Open the Oven Door! Resist the urge to peek! Opening the oven door during the first half of baking releases heat and steam, which are essential for the popovers to rise properly.
- Room Temperature Ingredients: While the milk and eggs don’t need to be hot, avoid using ice-cold ingredients straight from the fridge. Letting them sit at room temperature for 15-20 minutes can help with the overall texture.
- Popover Pan vs. Muffin Tin: A true popover pan with deep, straight sides is ideal. However, a deep muffin tin can work well as a substitute. The deeper the cups, the taller your popovers will be.
- Prick for Steam: If your popovers seem to be getting too soft after baking, you can prick them with a skewer to release steam and help them crisp up.
Serving & Storage Suggestions
Serve the Oak Grill Popovers warm, straight from the oven for the best experience. They are delicious simply with butter, but also pair well with savory accompaniments such as cream cheese, jam, or even a drizzle of honey. For a truly Minneapolis-inspired meal, serve them alongside a bowl of wild rice soup.
Leftover popovers are best stored in an airtight container at room temperature. They will lose some of their crispness but can be enjoyed for up to 2 days. To reheat, place them in a preheated 350°F (175°C) oven for 5-7 minutes, or until warmed through. You can also crisp them up by splitting them open and toasting them lightly. Freezing is not recommended, as the texture will change significantly.
Nutritional Information
| Nutrient | Amount per Serving (approx.) | % Daily Value |
|---|---|---|
| Calories | 250 kcal | 13% |
| Total Fat | 15g | 23% |
| Saturated Fat | 8g | 40% |
| Cholesterol | 170mg | 57% |
| Sodium | 250mg | 10% |
| Total Carbohydrate | 20g | 7% |
| Dietary Fiber | 1g | 4% |
| Sugars | 4g | |
| Protein | 8g | 16% |
Nutritional information is an estimate and may vary based on specific ingredients and portion sizes.
Variations & Substitutions
- Gluten-Free Popovers: Substitute the all-purpose flour with a gluten-free all-purpose flour blend. You may need to experiment with the amount of liquid to achieve the correct batter consistency.
- Dairy-Free Popovers: Replace the whole milk with almond milk or soy milk. Use a dairy-free butter substitute or coconut oil for the melted butter.
- Savory Popovers: Add a pinch of garlic powder, onion powder, or dried herbs (such as thyme or rosemary) to the batter for a savory twist. You can also mix in grated cheese (cheddar, parmesan, or Gruyere) for an extra burst of flavor.
- Sweet Popovers: Add 1-2 tablespoons of sugar and a dash of vanilla extract to the batter for a sweeter popover. Serve with fresh fruit and whipped cream.
FAQs (Frequently Asked Questions)
Q: Why did my popovers not rise?
A: Common reasons include not preheating the pans sufficiently, opening the oven door during baking, or using a batter that was too cold or overmixed.
Q: Can I make the batter ahead of time?
A: It’s best to bake the popovers immediately after making the batter. If you must prepare it in advance, refrigerate for no more than an hour, and whisk gently before filling the pans.
Q: How do I prevent my popovers from collapsing after baking?
A: Ensure the popovers are fully baked and golden brown before removing them from the oven. Prick them with a skewer to release steam and allow them to cool slightly on a wire rack before serving.
Q: My popovers are browning too quickly. What should I do?
A: Carefully tent the pan with aluminum foil to shield the tops from the heat.
Q: Can I use a regular muffin tin instead of a popover pan?
A: Yes, you can, but the popovers won’t be as tall. Use a deep muffin tin if possible.
Final Thoughts
These Oak Grill Popovers are more than just a recipe; they’re a taste of nostalgia, a reminder of simpler times, and a celebration of classic comfort food. I encourage you to try this recipe and experience the joy of creating these towering, airy delights in your own kitchen. Share them with your loved ones, and perhaps even create your own memories around this iconic dish. Don’t be afraid to experiment with variations and make them your own! And please, let me know how they turn out – I love hearing your feedback! Enjoy!