
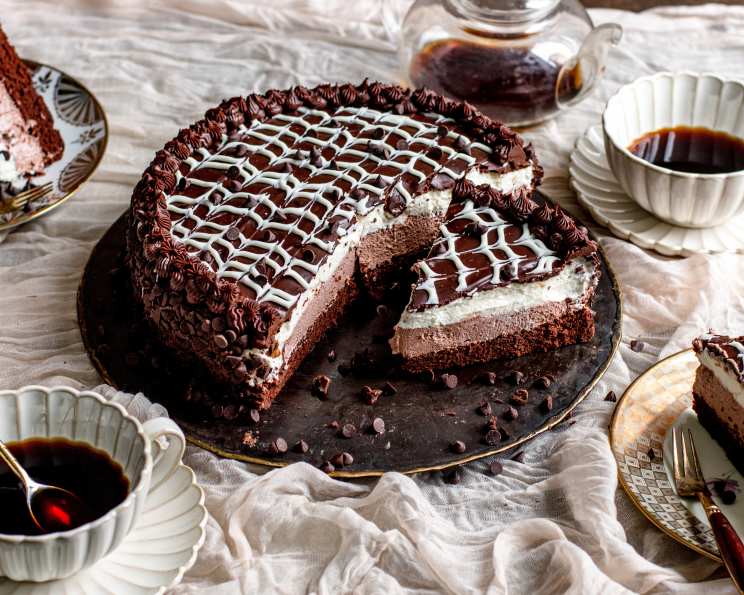
The Real Black Tie Mousse Cake by Olive Garden: A Decadent Delight
I still remember the first time I tasted the Black Tie Mousse Cake at Olive Garden. It was my college graduation dinner, and amidst the celebratory chatter, the arrival of this towering chocolate creation silenced the table. The layers, the richness, the perfect balance of textures – it was pure indulgence and the perfect ending to a momentous day. Now, after years of experimenting in my own kitchen, I’m thrilled to share a recipe that captures the magic of that iconic dessert.
Recipe Overview
- Prep Time: 1 hour
- Cook Time: 30 minutes
- Total Time: 3 hours
- Servings: 8-10
- Yield: 1 cake
- Dietary Type: Not Gluten-Free
Ingredients
BOTTOM LAYER
- 1 (18 ounce) box of Devil’s Food Cake Mix (ordinary cake mix)
SECOND LAYER (Chocolate Mousse)
- 1 teaspoon Knox Unflavored Gelatin
- 1 tablespoon cold water
- 2 tablespoons boiling water
- 4 ounces semi-sweet chocolate chips
- 4 ounces cream cheese, cubed
- ¾ cup heavy cream
- ½ teaspoon granulated sugar
THIRD LAYER (Custard)
- 3 egg yolks
- ¼ cup granulated sugar
- 3 tablespoons flour
- 1 teaspoon Knox Unflavored Gelatin
- 1 ¾ cups heavy cream
- 1 teaspoon vanilla extract
FOURTH LAYER (Chocolate Ganache)
- 1 ½ cups heavy cream
- 2 tablespoons butter
- 18 ounces semi-sweet chocolate chips
- ½ cup white chocolate chips (optional)
Equipment Needed
- 2 round cake pans
- Cheesecake pan (with removable sides)
- Mixer (stand or hand-held)
- Double boiler or microwave-safe bowl
- Whisk
- Rubber spatula
- Strainer
Instructions
-
Prepare the Cake Layer: Bake the Devil’s Food Cake mix according to the directions on the box, using two round cake pans. Once baked, let the cakes cool completely. You will only need one of the cakes for this recipe. Reserve the second cake for another use (or enjoy a sneak peek!).
-
Assemble the Base: Place one of the cooled round cakes at the bottom of a cheesecake pan. Gently press down on the cake with your fingers to flatten it slightly and ensure it fits snugly in the pan. This forms the foundation for your decadent creation.
-
Create the Chocolate Mousse: In a double boiler or microwave-safe bowl, melt the semi-sweet chocolate chips and cubed cream cheese together until smooth. Stir frequently to prevent burning. Set aside to cool.
-
Bloom the Gelatin: In a small bowl, soften the unflavored gelatin with cold water for 1 minute. Then, add the boiling water and stir until the gelatin is completely dissolved and clear. Allow this mixture to cool slightly.
-
Whip the Cream: In a mixing bowl, whip the heavy cream and granulated sugar together until soft peaks begin to form. Gradually add the cooled gelatin mixture to the whipped cream, continuing to whip until stiff peaks form. Be careful not to overwhip.
-
Combine and Layer: Gently fold approximately ¼ of the whipped cream into the cooled chocolate mixture to lighten it. Then, carefully fold the chocolate mixture into the remaining whipped cream until evenly combined.
-
Spread the Mousse: Spread the chocolate mousse evenly over the cake layer in the cheesecake pan. Refrigerate the cake to allow the mousse to set.
-
Prepare the Custard Layer: In a mixing bowl, beat the egg yolks until they are pale in color. Add the granulated sugar, flour, and unflavored gelatin, and beat until well combined.
-
Infuse the Cream: In a saucepan, bring the heavy cream and vanilla extract to a boil over medium heat.
-
Temper the Egg Yolks: Gradually temper the egg yolk mixture by slowly drizzling a small amount of the hot cream into the egg mixture while continuously stirring. This prevents the eggs from scrambling. Continue adding the cream gradually until all of it has been incorporated.
-
Cook the Custard: Pour the entire mixture back into the saucepan and cook over medium heat, stirring constantly, until the custard begins to thicken. It should be thick enough to coat the back of a spoon.
-
Strain and Cool: Pour the custard through a strainer into a clean bowl to remove any lumps. Allow the custard to cool slightly.
-
Layer and Freeze: Pour the slightly cooled custard layer on top of the set chocolate mousse layer. Freeze the cake until the custard layer is firm. This will help prevent the layers from mixing when you add the final ganache layer.
-
Prepare the Chocolate Ganache: In a saucepan, bring the heavy cream and butter to a boil. Remove from heat and pour the hot cream mixture over the semi-sweet chocolate chips. Let it sit for 5 minutes to allow the chocolate to melt.
-
Stir Until Smooth: Stir the chocolate and cream mixture until smooth and glossy.
-
Cool the Ganache: Let the ganache cool until it starts to thicken slightly, but is still pourable. This will prevent it from melting the frozen custard layer too quickly.
-
Assemble the Final Layer: Remove the cake from the freezer and carefully remove the cheesecake pan collar. Pour some of the ganache over the top of the cake, using a spatula to spread it evenly across the top and sides.
-
Add Chocolate Chips (Optional): While the ganache is still wet, gently press semi-sweet chocolate chips onto the sides of the cake for decoration.
-
Create a Swirl (Optional): If desired, melt the white chocolate chips in the microwave and swirl them into the ganache for a visually appealing design.
-
Chill and Serve: Refrigerate the cake for at least several hours, or preferably overnight, to allow all the layers to set completely. Serve cold.
Expert Tips & Tricks
- Cake Mix Variation: While the recipe calls for Devil’s Food Cake mix, you can experiment with other chocolate cake mixes for different flavor profiles.
- Gelatin is Key: Don’t skip the gelatin! It’s essential for setting both the mousse and custard layers, ensuring a clean slice.
- Tempering Technique: Tempering the egg yolks properly is crucial to prevent scrambled eggs in your custard. Go slow and steady!
- Ganache Consistency: The ganache should be thick enough to coat the cake but pourable enough to spread evenly. Adjust the cooling time accordingly.
- Presentation Matters: For a professional look, use an offset spatula to create a smooth, even ganache layer.
Serving & Storage Suggestions
Serve the Black Tie Mousse Cake chilled. A small scoop of vanilla ice cream or a few fresh berries can complement the rich chocolate flavors.
Store leftover cake in an airtight container in the refrigerator for up to 3-4 days. While freezing is possible, it may slightly alter the texture of the mousse and custard layers. It’s best enjoyed fresh.
Nutritional Information
| Nutrient | Amount per Serving | % Daily Value |
|---|---|---|
| Calories | 1191 kcal | N/A |
| Calories from Fat | 753 g | 63% |
| Total Fat | 83.8 g | 128% |
| Saturated Fat | 47.4 g | 237% |
| Cholesterol | 248.5 mg | 82% |
| Sodium | 555.8 mg | 23% |
| Total Carbohydrate | 113 g | 37% |
| Dietary Fiber | 5.3 g | 21% |
| Sugars | 84.8 g | N/A |
| Protein | 11.2 g | 22% |
Note: Nutritional information is an estimate and may vary based on specific ingredients used.
Variations & Substitutions
- Gluten-Free Option: Substitute the Devil’s Food Cake mix with a gluten-free chocolate cake mix.
- Dark Chocolate Decadence: Use dark chocolate chips instead of semi-sweet for a more intense chocolate flavor.
- Coffee Infusion: Add a tablespoon of instant coffee granules to the hot cream when making the ganache for a mocha twist.
- Peanut Butter Delight: Swirl peanut butter into the mousse layer for a Reese’s-inspired version.
- Liqueur Boost: Add a tablespoon of your favorite liqueur (such as Kahlua or Baileys) to the mousse or ganache for an extra layer of flavor.
FAQs (Frequently Asked Questions)
Q: Can I make this cake ahead of time?
A: Absolutely! In fact, it’s recommended to make it at least a day in advance to allow all the layers to set properly.
Q: Can I use a different size cake pan?
A: Yes, but you may need to adjust the baking time and the thickness of the layers accordingly. An 8-inch pan is ideal.
Q: What if my mousse or custard layer is not setting?
A: Ensure you’ve used the correct amount of gelatin and that it’s been dissolved properly. Also, make sure the layers are adequately chilled or frozen before adding the next layer.
Q: Can I skip the ganache layer?
A: While the ganache adds a beautiful finish and rich flavor, you can substitute it with whipped cream or a dusting of cocoa powder if desired.
Q: Why is my ganache grainy?
A: This can happen if the chocolate overheats or comes into contact with water. Make sure to melt the chocolate gently and use a dry bowl and utensils.
Final Thoughts
This Black Tie Mousse Cake is more than just a dessert; it’s an experience. It’s a testament to the power of layered flavors, textures, and a little bit of patience. Don’t be intimidated by the number of steps – each one is simple and straightforward. So, roll up your sleeves, gather your ingredients, and embark on this culinary adventure. I promise, the final result will be well worth the effort. And when you take that first bite, remember to savor every layer and share the joy with those you love. Bon appétit!