
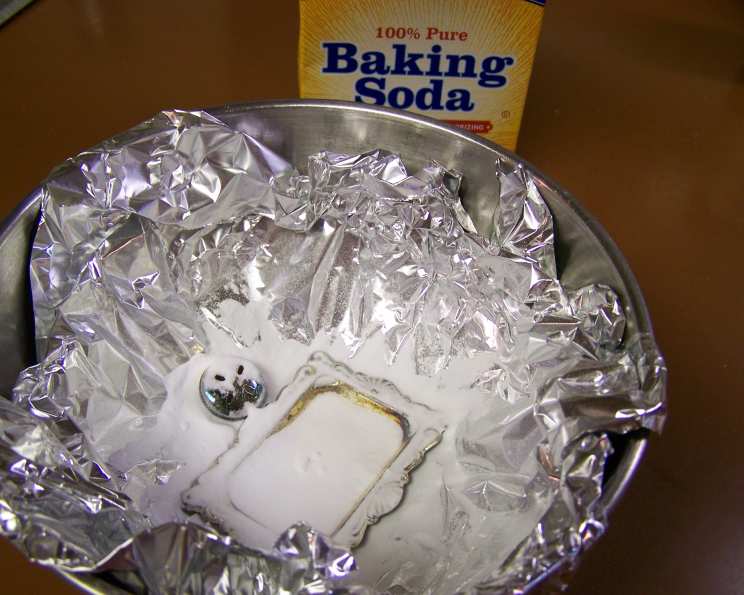
The Smart Girl’s Way to Clean Silver
I remember inheriting my grandmother’s silver tea set. The intricate designs were beautiful, but the tarnished surface made it look more like a collection of dusty relics than cherished heirlooms. I tried every silver cleaner I could find, scrubbing until my arms ached, but the results were always disappointing and temporary. Then, a chemist friend shared a simple, almost magical trick – a method so easy and effective, it felt like unlocking a closely guarded secret. Now, my grandmother’s tea set gleams, and I smile every time I use it, remembering the ingenuity and simplicity of this clever solution.
Recipe Overview
- Prep Time: 2 minutes
- Cook Time: 3 minutes
- Total Time: 5 minutes
- Servings: Varies based on pot size
- Yields: 1 pot
- Dietary Type: Vegan, Gluten-Free, Dairy-Free, Allergen-Free
Ingredients
- Baking soda (generous amount)
- Aluminum foil (enough to line the pot)
- Boiling water (enough to cover the silver)
Equipment Needed
- Pot (stainless steel or enamel is recommended)
- Tongs (optional, for removing hot silver)
Instructions
-
Begin by lining the pot with aluminum foil. Ensure the foil covers the entire bottom and sides of the pot, creating a barrier between the pot and the silver. This is crucial for the chemical reaction to work effectively.
-
Next, carefully place your silver items inside the pot. Make sure that each piece of silver is in direct contact with the aluminum foil. This contact is essential for the tarnish removal process. You can layer the silver items, but ensure maximum contact with the foil for optimal results.
-
Now, generously sprinkle baking soda over the silver items. There’s no need to be precise; a good coating is all you need. The baking soda acts as an electrolyte, facilitating the transfer of tarnish from the silver to the aluminum.
-
Slowly and carefully pour boiling water into the pot, ensuring that all the silver items are completely submerged. The hot water accelerates the chemical reaction. Be cautious when handling boiling water to avoid burns.
-
Let the silver soak in the solution for about 3 minutes, or until the tarnish disappears. You’ll notice the water turning a yellowish or brownish color as the tarnish is transferred to the aluminum foil. For heavily tarnished items, you may need to let them soak a bit longer, up to 5-10 minutes.
-
Using tongs (optional, but recommended for safety), carefully remove the silver items from the pot. Rinse them thoroughly with warm water to remove any residual baking soda.
-
Finally, gently dry the silver items with a soft, clean cloth. You’ll be amazed at how easily the tarnish wipes away, leaving your silver sparkling clean.
Expert Tips & Tricks
-
Maximize Foil Contact: The key to this method is direct contact between the silver and the aluminum foil. Crumple up extra foil and place it around the silver pieces to ensure they are touching the foil.
-
Water Temperature: Boiling water significantly speeds up the process. Make sure the water is at a rolling boil before pouring it into the pot.
-
Baking Soda Quantity: Don’t skimp on the baking soda. A generous amount ensures a strong enough electrolytic reaction.
-
For Stubborn Tarnish: If some tarnish remains, repeat the process with fresh foil, baking soda, and boiling water. Alternatively, make a paste of baking soda and water and gently rub it onto the stubborn areas with a soft cloth.
-
Prevention is Key: To prevent future tarnishing, store your clean silver in airtight bags or containers, preferably with anti-tarnish strips.
Serving & Storage Suggestions
This method is all about cleaning, not serving! Once your silver is sparkling, display it proudly. Store cleaned silver in a cool, dry place, ideally in a tarnish-preventive bag or wrapped in acid-free tissue paper. Do not store silver in direct sunlight or near heat sources. Regularly polishing your silver (even with this easy method) will keep it looking its best.
Nutritional Information
This method involves cleaning silver, not food preparation, so there are no nutritional values to report.
Variations & Substitutions
-
Washing Soda (Sodium Carbonate): For extra cleaning power, you can substitute washing soda for baking soda. Washing soda is more alkaline and can remove tarnish more effectively, but be sure to handle it with care, as it can be more irritating to the skin.
-
Salt: Add a tablespoon of salt to the baking soda and water mixture for added cleaning boost.
-
Lemon Juice: A splash of lemon juice can help brighten the silver further. Add it to the boiling water along with the baking soda.
FAQs (Frequently Asked Questions):
Q: Why does this method work?
A: The process is a chemical reaction. The aluminum foil attracts the sulfur that causes tarnish on the silver, effectively reversing the tarnishing process without abrasive scrubbing.
Q: Can I use this method on all types of silver?
A: It’s generally safe for most sterling silver and silver-plated items. However, avoid using it on items with delicate stones or enamel, as the hot water and baking soda may damage them.
Q: How often should I clean my silver using this method?
A: It depends on how often you use your silver and how quickly it tarnishes. Generally, cleaning it every few months or as needed should be sufficient.
Q: Is it safe to reuse the baking soda and aluminum foil?
A: No, it’s best to use fresh baking soda and aluminum foil each time. The used baking soda will be saturated with tarnish, and the aluminum foil will have lost its effectiveness.
Q: Will this method scratch my silver?
A: No, this method is non-abrasive and will not scratch your silver, unlike traditional silver polishes that require scrubbing.
Final Thoughts
This simple yet effective method for cleaning silver is a game-changer. It’s quick, easy, and requires minimal effort, leaving you with sparkling clean silver without the harsh chemicals or endless scrubbing. Embrace this smart girl’s secret and rediscover the beauty of your silver collection. Share this trick with your friends and family, and together, let’s banish tarnish forever!