
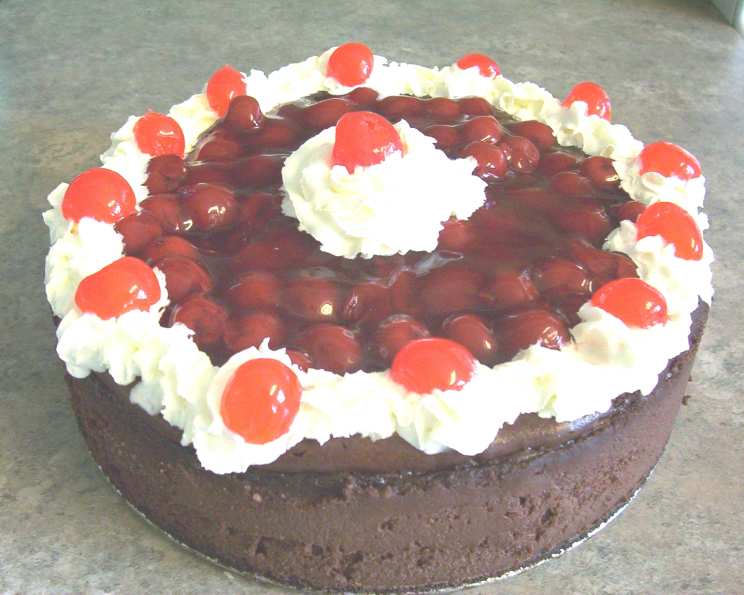
The Ultimate Black Forest Cheesecake
There are some desserts that just evoke pure nostalgia, and for me, Black Forest anything is firmly in that category. I remember my grandmother always having some iteration of Black Forest cake at her summer parties – the combination of rich chocolate, tangy cherries, and fluffy cream just screamed celebration. This Black Forest Cheesecake takes all of those classic flavors and elevates them into an even more decadent, creamy, and unforgettable dessert. Each bite is a journey back to those sunny afternoons, filled with laughter and the sweet taste of family.
Recipe Overview
- Prep Time: 30 minutes
- Cook Time: 75 minutes
- Total Time: 2 hours 45 minutes (including chilling time)
- Servings: 16
- Yield: 1 Cheesecake
- Dietary Type: Not Gluten-Free
Ingredients
For the Chocolate Wafer Crust:
- 1/3 cup (5 1/3 tablespoons) butter or margarine, melted
- 1 1/2 cups chocolate wafer crumbs
- 2 tablespoons sugar
For the Filling:
- 4 (8 ounce) packages cream cheese, softened
- 1 1/2 cups sugar
- 1 cup cocoa, sifted
- 4 large eggs
- 1 cup whipping cream
- 1 teaspoon vanilla
- 1/2 cup maraschino cherries, well drained and finely chopped
For the Topping:
- 1 (19 ounce) can cherry pie filling
- 2 cups frozen light whipped dessert topping or 2 cups whipped cream
Equipment Needed
- 10-inch springform pan
- Large mixing bowl
- Electric mixer (handheld or stand mixer)
- Sifter
- Measuring cups and spoons
- Paring knife
Instructions
-
Prepare the Crust: In a medium bowl, combine the melted butter or margarine, chocolate wafer crumbs, and sugar. Mix thoroughly until all ingredients are well combined and the mixture resembles wet sand.
-
Press the Crust: Press the chocolate wafer crumb mixture evenly into the bottom of an ungreased 10-inch springform pan. Make sure the crust is firmly packed.
-
Chill the Crust: Place the springform pan with the crust into the refrigerator and chill while you prepare the filling. This will help the crust set.
-
Cream Cheese Mixture: In a large mixing bowl, beat the softened cream cheese and sugar together using an electric mixer on medium speed for 5 minutes, or until light and fluffy. It’s crucial that the cream cheese is properly softened to avoid lumps in the final product.
-
Incorporate Cocoa: Sift the cocoa powder into the cream cheese mixture. This prevents lumps and ensures an even distribution of the chocolate flavor throughout the cheesecake. Mix on low speed until well combined.
-
Add Eggs: Beat in the eggs one at a time, making sure each egg is fully incorporated before adding the next. Continue to beat the mixture for another 5 minutes on medium speed. This extra beating time helps to create a light and airy texture in the cheesecake.
-
Combine Wet Ingredients: Slowly add the whipping cream and vanilla extract to the cream cheese mixture. Mix on low speed until everything is well blended and the batter is smooth. Avoid overmixing at this stage, as it can introduce too much air into the batter, potentially causing cracks during baking.
-
Fold in Cherries: Gently fold in the well-drained and finely chopped maraschino cherries into the batter. Distribute them evenly throughout the mixture.
-
Pour Filling into Crust: Pour the cream cheese filling over the cooled chocolate wafer crust in the springform pan. Spread the filling evenly to ensure a consistent baking result.
-
Bake the Cheesecake: Bake in a preheated 325°F (160°C) oven for 75 minutes, or until the center is almost set. The cheesecake should still have a slight wobble in the center when gently shaken.
-
Prevent Cracking: After baking, turn off the oven and slightly open the oven door. Allow the cheesecake to cool gradually inside the oven for about an hour. Then, run a paring knife around the edges of the cheesecake to separate it from the sides of the springform pan. This step helps prevent the cheesecake from cracking as it cools and settles.
-
Cool Completely: Remove the cheesecake from the oven and let it cool completely at room temperature.
-
Add Cherry Topping: Once the cheesecake is completely cool, spread the cherry pie filling evenly over the top.
-
Decorate with Whipped Topping: Spoon or pipe the frozen light whipped dessert topping (thawed) or freshly whipped cream around the edges of the cheesecake as desired for a decorative touch.
-
Chill: Cover the cheesecake loosely with plastic wrap and chill in the refrigerator for at least 4 hours, or preferably overnight, before serving. This allows the flavors to meld and the cheesecake to fully set.
Expert Tips & Tricks
- Preventing Cracks: To further minimize the risk of cracks, you can bake the cheesecake in a water bath. Wrap the bottom of the springform pan tightly in aluminum foil and place it inside a larger baking pan. Pour hot water into the larger pan until it reaches about halfway up the sides of the springform pan.
- Cream Cheese Temperature: Ensure the cream cheese is at room temperature for a smoother filling.
- Chocolate Intensity: For an even richer chocolate flavor, you can add a few tablespoons of melted dark chocolate to the filling.
- Crust Variation: If you prefer a graham cracker crust, you can substitute the chocolate wafers with graham crackers and adjust the sugar accordingly.
- Even Baking: Use an oven thermometer to ensure your oven temperature is accurate for even baking.
Serving & Storage Suggestions
To serve, carefully release the cheesecake from the springform pan by unlatching the sides. Slice the cheesecake with a sharp knife, wiping the blade clean between each cut for neat slices.
Store any leftover cheesecake in the refrigerator, covered tightly with plastic wrap, for up to 3-4 days. For longer storage, you can freeze individual slices wrapped in plastic wrap and then placed in a freezer-safe container for up to 2-3 months. Thaw in the refrigerator overnight before serving. Note that the texture of the topping may change slightly after freezing.
Nutritional Information
(Estimated per serving)
| Nutrient | Amount per Serving | % Daily Value |
|---|---|---|
| Calories | 477 kcal | N/A |
| Total Fat | 32.6g | 50% |
| Saturated Fat | 19.6g | 97% |
| Cholesterol | 146mg | 48% |
| Sodium | 286.3mg | 11% |
| Total Carbohydrate | 42.3g | 14% |
| Dietary Fiber | 2.3g | 9% |
| Sugars | 23.8g | N/A |
| Protein | 8.1g | 16% |
Please note that these values are estimates and can vary based on specific ingredients and portion sizes.
Variations & Substitutions
- Gluten-Free Version: Substitute the chocolate wafer crumbs with gluten-free chocolate cookie crumbs or a gluten-free graham cracker crust.
- Lighter Cheesecake: Use reduced-fat cream cheese and light whipped topping to reduce the calorie content.
- Alcohol Infusion: Add a tablespoon or two of Kirsch (cherry liqueur) to the filling for an authentic Black Forest flavor.
- Chocolate Shavings: Garnish the top with chocolate shavings for an extra touch of elegance.
- Seasonal Fruit: Substitute the cherry pie filling with other seasonal fruit compotes, such as raspberry or blueberry.
FAQs (Frequently Asked Questions)
Q: Why did my cheesecake crack?
A: Cheesecakes often crack due to rapid temperature changes or overbaking. Cooling the cheesecake slowly and avoiding overbaking can help prevent cracks.
Q: Can I make this cheesecake ahead of time?
A: Absolutely! In fact, chilling it overnight is recommended to allow the flavors to meld and the texture to set properly.
Q: Can I use regular whipped cream instead of whipped topping?
A: Yes, you can use freshly whipped cream. Just make sure to whip it to stiff peaks and sweeten it to your liking.
Q: How do I know when the cheesecake is done?
A: The center of the cheesecake should still have a slight wobble when gently shaken, but the edges should be set. It will continue to set as it cools.
Q: Can I freeze the cheesecake?
A: Yes, you can freeze the cheesecake for longer storage. Wrap it tightly in plastic wrap and then in foil, or place it in a freezer-safe container. Thaw in the refrigerator overnight before serving.
Final Thoughts
This Black Forest Cheesecake is more than just a dessert; it’s a celebration of flavors and textures that come together in perfect harmony. The rich chocolate crust, the creamy, tangy filling, and the sweet-tart cherry topping create an unforgettable experience. Whether you’re making it for a special occasion or simply to treat yourself, I encourage you to give this recipe a try. Don’t be afraid to experiment with variations and make it your own! And, of course, I’d love to hear your feedback, see your creations, and know what you think. Enjoy every decadent bite!