
Mastering the Art of Thin Crust Pizza: A Chef’s Guide
There’s something truly special about a perfectly thin and crispy pizza crust. I remember back in culinary school, during our Italian cuisine module, I spent hours trying to replicate the paper-thin crusts I had tasted in Rome. One particular evening, after countless attempts and a kitchen covered in flour, I finally achieved that perfect balance of crispness and chew. The simple satisfaction of that first bite—the snap of the crust, the burst of fresh tomato, the creamy mozzarella—is a memory that fuels my passion for pizza to this day.
Recipe Overview
- Prep Time: 15 minutes
- Cook Time: 8-12 minutes
- Total Time: 23-27 minutes
- Servings: Variable, based on toppings
- Yield: 1 (12-14 inch) pizza
- Dietary Type: Vegetarian (can be made vegan with vegan cheese)
Ingredients
- 2 ¼ teaspoons yeast
- ¼ teaspoon sugar
- ¾ cup hot water
- 1 ¾ cups flour, plus more for dusting
- ½ teaspoon salt
- 1 (14 ounce) jar pizza sauce
- Your choice of pizza toppings:
- Pepperoni
- Precooked bacon
- Tomatoes, sliced
- Green pepper
- Mozzarella cheese, shredded (or vegan mozzarella alternative)
- Chopped garlic
Equipment Needed
- Large mixing bowl
- Measuring cups and spoons
- Heavy spoon or dough whisk
- Floured surface
- Rolling pin (preferably marble)
- Pizza stone or greased pizza pan
Instructions
-
Activate the Yeast: In a small bowl, dissolve the yeast and sugar in the hot water. Make sure the water isn’t too hot, or it will kill the yeast. Let this mixture sit for about 8 minutes, or until it becomes foamy. This step ensures that the yeast is alive and active, crucial for a good rise.
-
Combine Dry Ingredients: While the yeast is proofing, in a large mixing bowl, combine the flour and salt. Whisk or stir well to evenly distribute the salt throughout the flour. This prevents pockets of saltiness in the final crust.
-
Form the Dough: Pour the yeast mixture into the flour mixture. Using a heavy spoon or a dough whisk, mix the ingredients together until a shaggy dough forms. The dough will be slightly sticky at this stage, which is perfectly normal.
-
Knead the Dough: Turn the dough out onto a lightly floured surface. Knead the dough for about 2 minutes, until it becomes smooth and elastic. If the dough is too sticky, add a little more flour, a tablespoon at a time, until it becomes manageable. Be careful not to add too much flour, or the crust will be tough.
-
Shape the Dough: On the floured surface, use a rolling pin to spread the dough into a 12-14 inch circle. For an ultra-thin crust, roll it out as thinly as possible without tearing it. If you’re using a pizza stone, you can roll the dough directly onto a piece of parchment paper, then transfer the paper and dough to the stone.
-
Prepare the Pan (If Necessary): If you don’t have a pizza stone, you can roll the dough out on a countertop and carefully transfer it to a greased pizza pan. Gently stretch the dough to the edges of the pan. Make sure to prick the dough all over with a fork to prevent it from puffing up too much during baking.
-
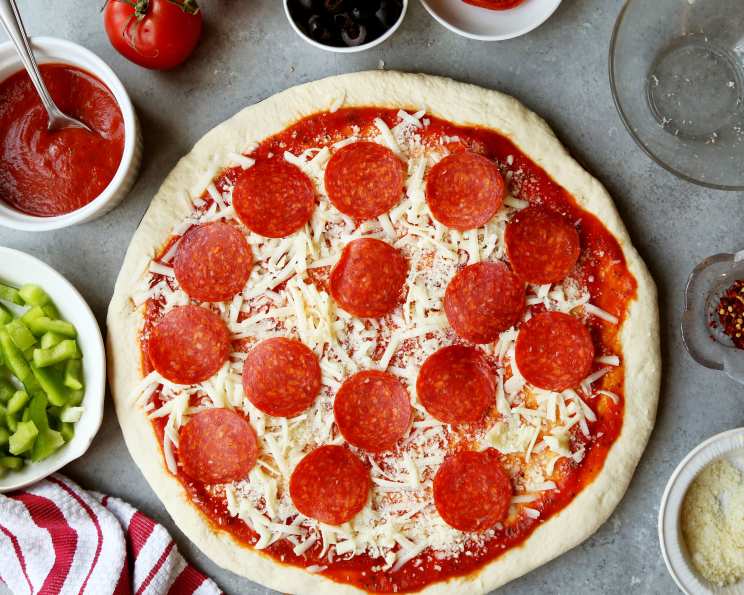
Add Toppings: Spread the pizza sauce evenly over the dough, leaving a small border for the crust. Then, add your desired toppings. Start with shredded mozzarella cheese, then add your other toppings like pepperoni, precooked bacon, sliced tomatoes, green pepper, and chopped garlic. Don’t overload the pizza with toppings, or the crust will become soggy.
-
Bake the Pizza: Preheat your oven to 500 degrees Fahrenheit (260 degrees Celsius). If you’re using a pizza stone, make sure it’s preheated as well. Carefully transfer the pizza to the oven. Bake for 8-12 minutes, or until the edges of the crust are golden brown and the cheese is melted and bubbly. Keep a close eye on the pizza, as it can burn quickly at such a high temperature.
-
Cool and Serve: Remove the pizza from the oven and let it cool for a few minutes before slicing and serving. Enjoy!
Expert Tips & Tricks
-
Use high-quality flour: The type of flour you use can greatly affect the texture of your crust. Bread flour, with its higher protein content, will give you a chewier crust, while all-purpose flour will result in a slightly softer crust. Experiment to find your preference.
-
Don’t overwork the dough: Over-kneading the dough can develop too much gluten, resulting in a tough crust. Knead just until the dough is smooth and elastic.
-
Preheat your pizza stone: If you’re using a pizza stone, make sure to preheat it in the oven for at least 30 minutes before baking the pizza. This will help the crust to cook quickly and evenly, resulting in a crispier texture.
-
Par-bake the crust: For an extra-crispy crust, you can par-bake it before adding the toppings. Simply bake the plain crust for 5-7 minutes, then remove it from the oven, add the toppings, and bake for another 8-10 minutes, or until the cheese is melted and bubbly.
-
Experiment with toppings: Don’t be afraid to get creative with your toppings! Try using different cheeses, meats, vegetables, or even fruits.
Serving & Storage Suggestions
Serve your freshly baked thin crust pizza immediately for the best flavor and texture. Leftover pizza can be stored in an airtight container in the refrigerator for up to 3 days. Reheat in a preheated oven at 350 degrees Fahrenheit (175 degrees Celsius) for 5-10 minutes, or until heated through and the crust is crispy again.
For longer storage, you can freeze the pizza. Wrap individual slices tightly in plastic wrap and then place them in a freezer bag. Frozen pizza can be stored for up to 2 months. Reheat directly from frozen in a preheated oven at 375 degrees Fahrenheit (190 degrees Celsius) for 10-15 minutes, or until heated through and the crust is crispy.
Nutritional Information
| Nutrient | Amount per Serving | % Daily Value |
|---|---|---|
| Calories | 130.5 kcal | N/A |
| Total Fat | 8 g | 6% |
| Saturated Fat | 0.3 g | 1% |
| Cholesterol | 1.5 mg | 0% |
| Sodium | 238.9 mg | 9% |
| Total Carbohydrate | 25.8 g | 8% |
| Dietary Fiber | 2 g | 8% |
| Sugars | 1.1 g | 4% |
| Protein | 4.4 g | 8% |
Note: Nutritional information is an estimate and may vary depending on specific ingredients and portion sizes.
Variations & Substitutions
- Gluten-Free Crust: Substitute the all-purpose flour with a gluten-free pizza flour blend. You may need to adjust the amount of water, as gluten-free flours tend to absorb more liquid.
- Vegan Pizza: Use vegan mozzarella cheese and plant-based toppings. There are many delicious vegan cheeses and meat alternatives available these days.
- Whole Wheat Crust: Replace half of the all-purpose flour with whole wheat flour for a healthier and nuttier flavor.
- Herb-Infused Crust: Add dried herbs, such as oregano, basil, or thyme, to the flour mixture for an extra layer of flavor.
- Spicy Crust: Add a pinch of red pepper flakes to the dough for a little heat.
FAQs (Frequently Asked Questions)
Q: Can I use cold water instead of hot water to activate the yeast?
A: No, hot water (around 105-115°F or 40-46°C) is needed to properly activate the yeast. Cold water will not allow the yeast to thrive, resulting in a flat and dense crust.
Q: Can I make the dough ahead of time?
A: Yes, you can make the dough ahead of time. After kneading, place the dough in a lightly oiled bowl, cover it with plastic wrap, and refrigerate for up to 24 hours. When ready to use, let the dough sit at room temperature for 30 minutes before rolling it out.
Q: My pizza crust is too soggy. What can I do to fix it?
A: Soggy crust can be caused by too many toppings or not baking the pizza at a high enough temperature. Try using fewer toppings, par-baking the crust, or increasing the oven temperature to 500°F (260°C).
Q: Can I use a cast iron skillet instead of a pizza stone?
A: Yes, a cast iron skillet is a great alternative to a pizza stone. Preheat the skillet in the oven for at least 30 minutes before placing the dough in it.
Q: How do I prevent the pizza from sticking to the pizza stone?
A: To prevent sticking, dust the pizza stone with cornmeal or semolina before placing the dough on it. You can also use parchment paper, but it may make the crust less crispy.
Final Thoughts
Crafting a thin crust pizza is a rewarding culinary adventure that allows you to unleash your creativity and personalize every bite. Don’t be intimidated by the process – embrace the journey of experimentation. Gather your ingredients, follow these steps, and invite friends and family to share in the joy of homemade pizza. Pair it with a crisp Italian salad and a glass of Chianti for a truly authentic experience. I encourage you to try this recipe and make it your own. I’d love to hear your feedback and see your creations! Buon appetito!