
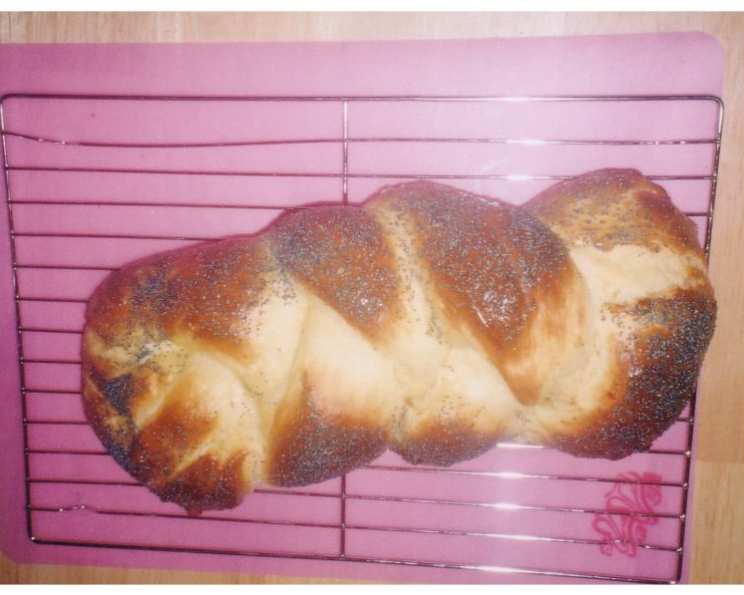
Three-Stranded Braided Challah Bread
My grandmother, Bubbe Rose, made the most incredible challah. Every Friday afternoon, the scent of yeast and warm bread would fill her tiny apartment, a beacon of love and tradition. I remember being mesmerized by the way she’d effortlessly braid the dough, her hands moving with a grace that only years of practice could instill. Her challah wasn’t just food; it was a symbol of family, of heritage, and of the love that bound us all together. This recipe, while adapted from a classic, always brings me back to those cherished Friday afternoons.
Recipe Overview
- Prep Time: 2 hours
- Cook Time: 30-35 minutes
- Total Time: 19 hours (including rising time)
- Yields: 1 loaf
- Dietary Type: Dairy Free
Ingredients
- 2 1/4 teaspoons active dry yeast (1 package)
- 1/2 cup warm water
- 1/2 cup all-purpose flour
- 2 large eggs, lightly beaten
- 2 egg yolks, lightly beaten
- 3 tablespoons vegetable oil
- 3 tablespoons sugar
- 1 1/4 teaspoons salt
- 2 1/2 cups bread flour
- 1 egg
- 1/4 teaspoon salt
- 1-3 tablespoons poppy seeds (preferred) or 1-3 tablespoons sesame seeds
Equipment Needed
- Large mixing bowl or stand mixer
- Plastic wrap
- Oiled bowl
- Baking sheet
- Cornmeal (optional: pizza stone and parchment paper)
- Cooling rack
Instructions
-
In a large mixing bowl or the bowl of a stand mixer, combine the yeast and warm water. Let it stand until the yeast is dissolved, about 5 minutes.
-
Add the all-purpose flour, 2 large eggs, 2 egg yolks, 3 tablespoons vegetable oil, sugar, and salt to the yeast mixture.
-
Mix by hand or on low speed until all ingredients are blended.
-
Gradually stir in the bread flour.
-
Knead the dough for about 8 minutes by hand or with the dough hook of a mixer on medium speed until the dough is smooth and elastic and doesn’t stick to your hands or the bowl.
-
Transfer the dough to an oiled bowl and turn it over once to coat it with oil.
-
Cover the bowl with plastic wrap.
-
Let the dough rise in a warm place until it has doubled in volume, about 1-1 1/2 hours.
-
Punch the dough down, knead it briefly, and refrigerate it, covered, until it has again nearly doubled in volume, 4-12 hours. This long, slow rise is key to developing the complex flavor of the challah.
-
To shape the dough, divide it into three pieces and weigh them to be sure that they are of equal size. Equal portions will ensure even baking.
-
On an unfloured work surface, roll each piece of dough into a ball and let them rest, covered loosely with plastic wrap, for about ten minutes. This allows the gluten to relax, making the dough easier to roll out.
-
Grease a baking sheet and sprinkle it with cornmeal. Alternatively, you can bake this on a pizza stone with cornmeal-covered parchment paper. The cornmeal helps prevent sticking and adds a slight texture to the bottom crust.
-
Roll each ball into a 13-14 inch-long rope, about 1.5 inches thick and slightly tapered at the ends.
-
Dust the three dough ropes with rye flour (all-purpose flour works, too). This will help them appear more distinctly separated after baking.
-
Place the three dough ropes side by side and pinch the top ends together.
-
Lift the left dough rope and place it between the right and middle ropes.
-
Lift the right dough rope and place it between the left and middle ropes.
-
Continue this braiding process until you reach the ends.
-
Tuck both ends of the braid underneath the loaf and set it on the prepared baking sheet.
-
In a small bowl, whisk together the remaining egg and 1/4 teaspoon salt. Brush this egg wash over the top of the loaf. This is crucial for a shiny, beautifully browned challah. Don’t skip it!
-
Loosely cover the braid with lightly oiled plastic wrap.
-
Let the braided loaf rise in a warm place until it has not quite doubled, about 45 minutes.
-
Preheat the oven to 375 degrees Fahrenheit (190 degrees Celsius).
-
Brush the loaf again with the egg wash.
-
If desired, sprinkle with poppy seeds or sesame seeds.
-
Bake until the crust is golden brown, and the bottom of the loaf sounds hollow when tapped, about 30-35 minutes.
-
Let the challah cool on a rack before slicing and serving.
-
To freeze, allow the challah to cool COMPLETELY and wrap it thickly with plastic wrap. To thaw, place it in a 200-250 degree Fahrenheit oven until thawed, about 35-40 minutes.
Expert Tips & Tricks
- The long, cold proof is your friend. Don’t skip the 4-12 hour refrigeration period. This allows the yeast to work slowly, developing a more complex flavor in the dough.
- Don’t over-knead. Over-kneading can result in a tough challah. Stop kneading when the dough is smooth and elastic.
- Use a thermometer to check the water temperature. The warm water should be between 105-115°F (40-46°C) to activate the yeast properly. If it’s too hot, it can kill the yeast.
- For an extra shiny crust, brush with egg wash twice: once before the final rise and again before baking.
- If the challah is browning too quickly, tent it with foil during the last 10-15 minutes of baking.
Serving & Storage Suggestions
Challah is best served fresh, warm from the oven. It’s delicious on its own, or toasted with butter, jam, or honey. It’s also fantastic for making French toast or sandwiches.
Store leftover challah at room temperature in a bread bag or airtight container for up to 2-3 days. You can also freeze it for up to 2 months. To freeze, slice the challah before wrapping it tightly in plastic wrap and placing it in a freezer bag. Thaw at room temperature or in a low oven.
Nutritional Information
| Nutrient | Amount per Serving | % Daily Value* |
|---|---|---|
| Calories | 226 kcal | 11% |
| Total Fat | 7.2 g | 11% |
| Saturated Fat | 1.4 g | 7% |
| Cholesterol | 101 mg | 34% |
| Sodium | 373 mg | 16% |
| Total Carbohydrate | 33.2 g | 11% |
| Dietary Fiber | 1.3 g | 5% |
| Sugars | 4.1 g | – |
| Protein | 6.8 g | 14% |
*Percent Daily Values are based on a 2,000 calorie diet. Your daily values may be higher or lower depending on your calorie needs.
Variations & Substitutions
- Sweet Challah: Increase the sugar to 1/4 cup for a sweeter loaf.
- Raisin Challah: Add 1/2 cup of raisins to the dough during the kneading process.
- Chocolate Chip Challah: Mix 1/2 cup of chocolate chips into the dough during kneading for a decadent treat.
- Savory Challah: Omit the sugar and add 1/4 cup of grated Parmesan cheese and 1 tablespoon of chopped fresh herbs (such as rosemary or thyme) to the dough.
- Gluten-Free Challah: Substitute the bread flour with a gluten-free bread flour blend. Note that the texture will be different, and you may need to adjust the liquid.
FAQs (Frequently Asked Questions)
Q: Why is my challah dense and not fluffy?
A: This can be due to several factors, including not enough yeast, using water that is too hot or too cold, not kneading the dough enough, or not allowing it to rise long enough. Make sure your yeast is fresh, your water is the correct temperature, and that you knead the dough until it’s smooth and elastic. Also, be patient and allow the dough to rise fully in a warm place.
Q: Can I use honey instead of sugar?
A: Yes, you can substitute honey for sugar in this recipe. Use the same amount of honey as sugar. Keep in mind that honey will add a slightly different flavor to the challah.
Q: How do I know when the challah is done baking?
A: The challah is done when the crust is golden brown and the bottom of the loaf sounds hollow when tapped. You can also use a thermometer; the internal temperature should be around 200-210°F (93-99°C).
Q: Can I make the dough ahead of time and bake it the next day?
A: Yes, you can make the dough ahead of time. After the first rise, punch down the dough, knead briefly, and refrigerate it, covered, for up to 24 hours. Allow the dough to come to room temperature for about 30 minutes before shaping and baking.
Q: What is the purpose of the egg wash?
A: The egg wash serves several purposes. It gives the challah a shiny, golden-brown crust. It also helps the seeds (if using) adhere to the surface of the loaf.
Final Thoughts
I hope this recipe brings as much joy to your kitchen as it does to mine. The aroma of baking challah is truly something special, and sharing this bread with loved ones is a tradition worth cherishing. Don’t be afraid to experiment with variations and make this recipe your own. Whether you’re a seasoned baker or just starting out, I encourage you to give this three-stranded braided challah a try. I’d love to hear how it turns out – please share your experiences and any modifications you make! Perhaps pair it with a comforting bowl of chicken soup for a truly unforgettable meal.