
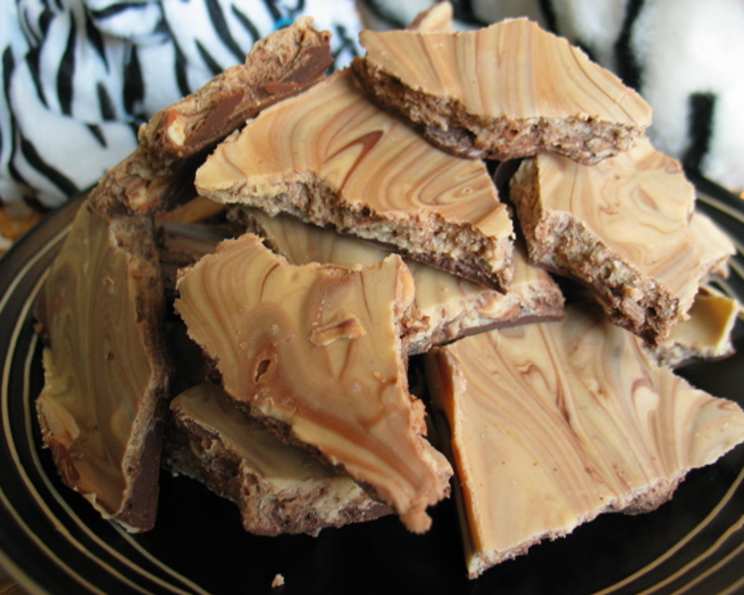
Tiger Butter: A Sweet Symphony of Chocolate and Peanut Butter
I can still remember the first time I tasted Tiger Butter. It was at a church bazaar, the air thick with the aroma of cinnamon and pine. Nestled among the cookies and fudge, this striking confection, with its bold stripes and rich, contrasting flavors, immediately caught my eye. One bite, and I was hooked. The creamy milk chocolate, the sweet white chocolate, and the salty peanut butter created an explosion of flavor that I knew I would never forget. It’s a taste of pure comfort and joy, a sweet treat that truly “roars.”
Recipe Overview
- Prep Time: 10 minutes
- Cook Time: 15 minutes
- Total Time: 25 minutes (plus setting time)
- Yields: 1 11×15 inch pan
- Dietary Type: Vegetarian
Ingredients
- 1 lb milk chocolate
- 1 lb white chocolate
- 1 cup peanut butter (creamy or chunky, your preference!)
Equipment Needed
- Double boiler (or heat-safe bowl and saucepan)
- 11×15 inch pan
- Parchment paper or aluminum foil
- Fork
- Sharp knife
Instructions
-
Prepare your pan: Line an 11×15-inch pan with parchment paper or aluminum foil. This will make it much easier to remove the Tiger Butter later. Make sure the lining extends over the edges of the pan for easy lifting.
-
Melt the milk chocolate: In a double boiler, gently melt the milk chocolate. If you don’t have a double boiler, you can create one by placing a heat-safe bowl over a simmering pot of water, ensuring the bottom of the bowl doesn’t touch the water. Stir frequently until the chocolate is completely smooth and melted. Avoid overheating the chocolate, as it can seize up and become grainy. Alternatively, you can melt the milk chocolate in the microwave in 30-second intervals, stirring between each interval, until smooth.
-
Melt the white chocolate: At the same time, in a separate double boiler or using the same method described above, melt the white chocolate. White chocolate is more prone to scorching, so it’s essential to keep a close eye on it and stir frequently. Again, microwave melting in short bursts is an option if you are cautious.
-
Pour and spread the milk chocolate: Once the milk chocolate is completely melted, pour it into the lined 11×15-inch pan. Use a spatula to spread the chocolate evenly to cover the entire bottom of the pan. Work quickly, as the chocolate will begin to set.
-
Combine white chocolate and peanut butter: Immediately after spreading the milk chocolate, combine the melted white chocolate with the peanut butter in the bowl. Stir until the peanut butter is fully incorporated and the mixture is smooth and creamy.
-
Pour and spread the white chocolate mixture: Pour the white chocolate and peanut butter mixture over the layer of milk chocolate in the pan.
-
Create the tiger stripes: Using a fork, swirl the two layers together in a way that creates a “tiger” stripe effect. Don’t over-mix, as you want to maintain distinct stripes of color. Drag the fork through both layers in a wavy motion, creating a marbled effect. You can experiment with different swirling patterns to achieve your desired look.
-
Let it set: Allow the Tiger Butter to set completely at room temperature. This can take several hours. To speed up the process, you can place the pan in the refrigerator.
-
Cut into squares: Once the Tiger Butter is firm and set, use a sharp knife to cut it into small squares. A warm knife will slice through the chocolate more easily, creating cleaner cuts. You can run the knife under hot water and dry it before each cut.
Expert Tips & Tricks
- Use high-quality chocolate: The better the quality of the chocolate, the richer and more flavorful the Tiger Butter will be. Splurge on your favorite brand for a truly decadent treat.
- Microwave Melting: If using a microwave, be sure to microwave in short intervals (30 seconds) and stir in between to avoid burning the chocolate.
- Peanut Butter Options: Experiment with different types of peanut butter. Creamy peanut butter will give you a smooth, even texture, while chunky peanut butter will add a bit of crunch. You can also use other nut butters, such as almond butter or cashew butter, for a unique twist.
- Temperature Matters: If the milk chocolate layer is too warm when you add the white chocolate mixture, the colors will blend together too much and you won’t get the desired tiger stripe effect. If the milk chocolate has already started to set before you add the white chocolate mixture, the layers might not adhere to each other properly.
- Add a sprinkle: Consider sprinkling the top with chopped peanuts, sea salt, or mini chocolate chips before the Tiger Butter sets for added flavor and texture.
Serving & Storage Suggestions
Serve the Tiger Butter squares as a sweet treat after a meal, at parties, or as a homemade gift. It’s best served chilled or at room temperature.
Store leftover Tiger Butter in an airtight container at room temperature for up to a week, in the refrigerator for up to two weeks, or in the freezer for up to three months. If freezing, wrap the squares individually in plastic wrap to prevent freezer burn.
Nutritional Information
Note: Nutritional information is an estimate and can vary based on specific ingredients used.
| Nutrient | Amount per Serving | % Daily Value |
|---|---|---|
| Calories | 350 kcal | 18% |
| Total Fat | 25g | 38% |
| Saturated Fat | 15g | 75% |
| Cholesterol | 10mg | 3% |
| Sodium | 50mg | 2% |
| Total Carbohydrate | 30g | 10% |
| Dietary Fiber | 1g | 4% |
| Sugars | 25g | |
| Protein | 5g | 10% |
Variations & Substitutions
- Nut-Free: For a nut-free version, substitute the peanut butter with sunflower seed butter (sunbutter) or tahini.
- Dark Chocolate: Use dark chocolate instead of milk chocolate for a richer, more intense flavor.
- Peppermint Twist: Add a few drops of peppermint extract to the white chocolate mixture for a festive holiday treat.
- Salted Caramel: Swirl in a layer of salted caramel sauce before the Tiger Butter sets.
- Vegan Tiger Butter: Vegan white chocolate alternatives are available (though may not melt as smoothly), along with vegan milk chocolate. Ensure your peanut butter is also vegan-friendly.
FAQs (Frequently Asked Questions)
Q: Can I use a different size pan?
A: Yes, but keep in mind that the thickness of the Tiger Butter will change. A smaller pan will result in thicker squares, while a larger pan will result in thinner squares. You may need to adjust the setting time accordingly.
Q: My chocolate seized up when I was melting it. What did I do wrong?
A: Chocolate can seize up if it comes into contact with even a small amount of water. Make sure your bowls and utensils are completely dry, and avoid getting any steam into the chocolate while melting it. If your chocolate does seize, try adding a teaspoon of vegetable oil and stirring vigorously.
Q: How do I get clean cuts when slicing the Tiger Butter?
A: Use a sharp knife that has been warmed under hot water and dried. Wipe the knife clean after each cut.
Q: Can I add other toppings to the Tiger Butter?
A: Absolutely! Feel free to sprinkle chopped nuts, pretzels, sprinkles, or sea salt on top before it sets.
Q: How long does Tiger Butter last?
A: When stored properly in an airtight container, Tiger Butter can last up to a week at room temperature, two weeks in the refrigerator, or three months in the freezer.
Final Thoughts
Tiger Butter is more than just a sweet treat; it’s a nostalgic reminder of community, celebration, and the simple joys of life. I encourage you to try this recipe and experience the “roar” for yourself. Don’t be afraid to experiment with variations and make it your own. And most importantly, share it with friends and family! Pair it with a glass of cold milk or a warm cup of coffee for the perfect indulgence. Happy baking!