
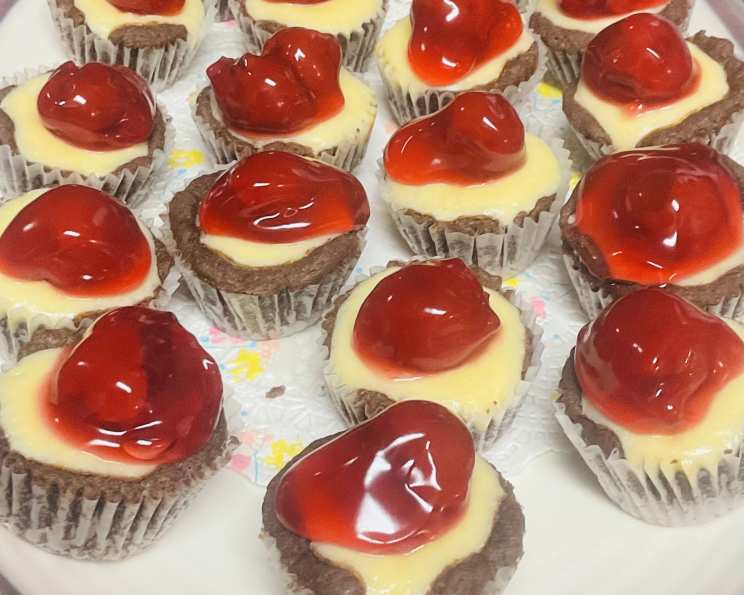
Tiny Cherry Cheesecakes (Chocolate Crust)
The aroma of cocoa and sweet cherries baking together always takes me back to my grandmother’s kitchen. She wasn’t much of a baker, preferring savory dishes, but around the holidays, she’d pull out a worn recipe card for these miniature chocolate-crusted cheesecakes. The tartness of the cherries perfectly balanced the rich chocolate, and I remember sneaking them off the cooling rack, one after another, until my fingers were stained crimson and my tummy ached with deliciousness. These little bites of heaven are a perfect way to spark those cherished memories.
Recipe Overview
- Prep Time: 30 minutes
- Cook Time: 18 minutes
- Total Time: Approximately 1 hour (plus cooling time)
- Servings: 24 mini cheesecakes
- Yield: 2 dozen
- Dietary Type: Not specified
Ingredients
For the Crust:
- 1 cup flour
- 1/3 cup sugar
- 1/4 cup unsweetened cocoa
- 1/2 cup (1 stick) cold butter or cold margarine
- 2 tablespoons cold water
For the Filling:
- 6 ounces cream cheese, softened
- 1/4 cup sugar
- 2 tablespoons milk
- 1 teaspoon vanilla extract
- 1 egg
- 1 (21 ounce) can cherry pie filling (you probably won’t need the whole can)
Equipment Needed
- Mini muffin tin (24 cups)
- Mixing bowls
- Electric mixer
- Measuring cups and spoons
- Fork
- Wire rack
Instructions
- Prepare the Crust: In a small bowl, combine the flour, sugar, and unsweetened cocoa.
- Cut in the Butter: Using a pastry blender or your fingertips, cut the cold butter (or margarine) into the dry ingredients until the mixture resembles coarse crumbs. The colder the butter, the flakier the crust will be.
- Form the Dough: Gradually add the cold water, tossing with a fork until the dough begins to come together and form a ball. Be careful not to overwork the dough.
- Shape the Crusts: Shape the dough into 24 equal-sized balls. Press each ball into the bottom and up the sides of a greased mini muffin cup. Make sure the crust is evenly distributed for consistent baking.
- Prepare the Filling: In a mixing bowl, beat the softened cream cheese and sugar together until smooth and creamy. This step is important for a lump-free cheesecake filling.
- Add the Liquid Ingredients: Beat in the milk and vanilla extract until well combined.
- Incorporate the Egg: Add the egg and beat on low speed just until combined. Be careful not to overmix, as this can cause the filling to crack during baking.
- Fill the Crusts: Spoon approximately 1 tablespoon of the cream cheese filling into each chocolate crust.
- Bake: Bake in a preheated oven at 325°F (160°C) for 15-18 minutes, or until the filling is set. The edges of the filling should be slightly firm, but the center may still jiggle slightly.
- Cool: Remove the mini cheesecakes from the oven and let them cool on a wire rack for 30 minutes. This allows the filling to set further and prevents the crust from becoming soggy.
- Remove from Pans: Carefully remove the cheesecakes from the mini muffin pans to cool completely. A thin knife or offset spatula can help with this.
- Top with Cherry Pie Filling: Once the cheesecakes are completely cool, top each one with a spoonful of cherry pie filling. You likely won’t need the entire can.
- Chill: Store the finished cheesecakes in the refrigerator until ready to serve.
Expert Tips & Tricks
- Cold Ingredients are Key: Using cold butter and cold water is crucial for a tender, flaky chocolate crust.
- Prevent Cracking: Avoid overmixing the filling, as this incorporates too much air and can lead to cracking during baking. Baking at a lower temperature also helps prevent cracking.
- Doneness Check: The cheesecakes are done when the edges of the filling are set but the center still jiggles slightly. They will continue to set as they cool.
- Even Crust Thickness: Try to make the crust as even as possible in each muffin cup to ensure consistent baking and prevent some crusts from being too thick or thin.
- Room Temperature Cream Cheese: Make sure the cream cheese is properly softened before beating. This will help avoid lumps in the cheesecake filling.
- Make Ahead: These cheesecakes can be made a day ahead of time. Store them in the refrigerator until ready to serve. Add the cherry pie filling just before serving to prevent the crust from getting soggy.
Serving & Storage Suggestions
These tiny cherry cheesecakes are perfect for parties, potlucks, or a sweet treat after dinner. Arrange them attractively on a platter or dessert stand. Store any leftovers in an airtight container in the refrigerator for up to 3 days. While you can technically freeze them, the cherry topping may become a bit watery upon thawing, so it’s best to consume them fresh. Avoid leaving them at room temperature for more than 2 hours to maintain food safety.
Nutritional Information
Here is an estimate of the nutritional information per serving:
| Nutrient | Amount per Serving | % Daily Value |
|---|---|---|
| Calories | 132 kcal | 7% |
| Total Fat | 7g | 9% |
| Saturated Fat | 4g | 20% |
| Cholesterol | 23mg | 8% |
| Sodium | 28mg | 1% |
| Total Carbohydrate | 16g | 6% |
| Dietary Fiber | 1g | 4% |
| Sugars | 8g | – |
| Protein | 2g | 4% |
Note: Nutritional information is an estimate and may vary based on specific ingredients and portion sizes.
Variations & Substitutions
- Gluten-Free Crust: Use a gluten-free flour blend in place of all-purpose flour for the crust.
- Different Fruit Topping: Substitute the cherry pie filling with other fruit fillings, such as blueberry, strawberry, or raspberry. Fresh berries can also be used.
- Chocolate Chips: Add chocolate chips to the cheesecake filling for an extra chocolatey treat.
- Extract Variations: Experiment with different extracts in the filling, such as almond extract or lemon extract, to add a unique flavor.
- Dairy-Free Option: Use dairy-free cream cheese and milk alternatives. Note that the texture will change.
FAQs (Frequently Asked Questions)
Q: Can I use a different type of crust for these cheesecakes?
A: Absolutely! A graham cracker crust or even a shortbread crust would work well. Just adjust the baking time as needed.
Q: Can I make these ahead of time and freeze them?
A: Yes, you can freeze the cheesecakes before adding the cherry pie filling. Wrap them individually in plastic wrap and then place them in a freezer-safe container. Thaw them in the refrigerator before serving and topping with the cherry filling.
Q: My cheesecakes cracked during baking. What did I do wrong?
A: Cracking is usually caused by overmixing the filling or baking at too high a temperature. Make sure to mix the filling on low speed and bake at the recommended temperature.
Q: Can I use a larger muffin tin for this recipe?
A: Yes, you can use a standard-sized muffin tin, but you will need to adjust the baking time accordingly. Keep an eye on them and bake until the filling is set.
Q: My crust is soggy. How can I prevent this?
A: Make sure to grease the muffin tin well and bake the crust until it is lightly golden brown. Cooling the cheesecakes completely before adding the cherry pie filling will also help prevent a soggy crust.
Final Thoughts
These tiny cherry cheesecakes are a delightful treat that are surprisingly simple to make. The combination of the rich chocolate crust and the creamy, tangy filling, topped with sweet cherries, is simply irresistible. Don’t be intimidated by the steps – each one is easy to follow, and the end result is well worth the effort. Gather your ingredients, preheat your oven, and get ready to create a batch of these delightful little cheesecakes. Feel free to experiment with different toppings or crust variations to make them your own. I’d love to hear how they turn out for you! These pair perfectly with a glass of chilled milk or a cup of strong coffee. Enjoy!