
The Sweet and Savory Symphony of Homemade Tocino (Version 6)
The scent of tocino sizzling in a pan…it’s a culinary time machine that instantly transports me back to countless weekend mornings spent in my lola’s (grandmother’s) kitchen. I remember standing on a wobbly stool, mesmerized as she transformed humble pork into glistening, caramelized ribbons of flavor. The sweet and savory aroma would fill the entire house, a delicious promise of the feast to come. Lola’s tocino was more than just breakfast; it was a warm hug, a symbol of family, and a taste of pure joy. This recipe, inspired by her wisdom and perfected over years, aims to recapture that magic.
Recipe Overview
- Prep Time: 72 hours 15 minutes
- Cook Time: 15-20 minutes
- Total Time: 3 days, 20 minutes
- Servings: 30
- Yield: About 5 pounds tocino
- Dietary Type: Not specified
Ingredients
- 1/3 cup brown sugar
- 1/3 cup white sugar
- 1 1/2 tablespoons kosher salt
- 1 tablespoon powdered beets
- 1 tablespoon anisette
- 3/4 teaspoon pink salt (aka InstaCure, Prague Powder)
- 4 lbs pork shoulder (cut into 1/4-inch slices) or 4 lbs boston butt (cut into 1/4-inch slices)
Ingredient Notes:
- Pork Shoulder or Boston Butt: These cuts offer a good balance of fat and meat, essential for authentic tocino. Ensure they are sliced thinly, about 1/4 inch, for proper curing and rendering.
- Powdered Beets: This provides the characteristic reddish hue to tocino. If unavailable, you can use a small amount of red food coloring, but the flavor will be slightly different.
- Anisette: This liqueur adds a subtle anise flavor that elevates the tocino. If you don’t have anisette, you can use a few drops of anise extract, but start sparingly and adjust to taste.
- Pink Salt (InstaCure, Prague Powder): Do not substitute this. It’s crucial for curing meats and preventing botulism. It’s different from Himalayan pink salt.
Equipment Needed
- Food Processor
- Large Skillet
- Airtight Container or Zip-Top Bags
- Refrigerator
Instructions
- Prepare the Curing Mixture: In a food processor, combine the brown sugar, white sugar, kosher salt, powdered beets, anisette, and pink salt. Process until the mixture is evenly combined and free of any lumps. This step ensures that all the curing ingredients are properly distributed, which is critical for effective curing and flavor development.
- Massage the Pork: Place the sliced pork shoulder or boston butt in a large bowl. Add the curing mixture from the food processor and, using your hands, thoroughly massage the mixture into the pork slices. Make sure that every piece is evenly coated with the curing mixture. This ensures uniform flavor and color throughout the tocino.
- Cure the Pork: Transfer the coated pork slices to an airtight container or zip-top bags. Press out any excess air, seal tightly, and refrigerate for 3 days (72 hours). This curing process is essential for developing the characteristic sweet and savory flavor and the signature red color of tocino. Turn the bag or container once or twice a day to ensure even curing.
- Freeze (Optional): After 3 days of curing, the tocino is ready to cook. If you’re not planning to cook it immediately, you can freeze it at this point. Properly packaged, it can last for several months in the freezer.
- Cook the Tocino: When ready to cook, take out the amount of tocino you plan to serve. In a large skillet, combine the tocino with 1/4 cup of water and 3 tablespoons of oil. The water helps to render some of the fat and prevent the sugars from burning too quickly.
- Render and Fry: Cook the tocino over medium-high heat. Initially, the water will evaporate, leaving only the oil. Continue to cook, stirring occasionally, until all the water has evaporated.
- Caramelize and Char: Once the water is gone, the tocino will start to fry in its own rendered fat and the added oil. Continue frying, turning the pieces frequently, until the pork turns a deep, dark red color and is slightly charred around the edges. This step is crucial for achieving the signature caramelized sweetness and slightly crispy texture of tocino. Be careful not to burn it.
- Remove from Heat: Once the tocino has reached its desired color and texture, remove it from the skillet and place it on a plate lined with paper towels to drain any excess oil.
Expert Tips & Tricks
- Thin Slicing is Key: Ensure the pork is sliced thinly (1/4 inch). This allows for better curing penetration and faster cooking, resulting in a more tender and flavorful tocino.
- Don’t Overcrowd the Pan: Cook the tocino in batches if necessary to avoid overcrowding the pan. Overcrowding lowers the temperature and prevents proper caramelization.
- Adjust Sweetness: The amount of sugar can be adjusted to your preference. If you prefer a less sweet tocino, reduce the amount of sugar slightly.
- Watch the Heat: Keep a close eye on the heat while frying. The sugars in the marinade can burn easily, so adjust the heat as needed to prevent burning.
- Using a Wok: A wok can also be used for cooking tocino, as its shape allows for even heat distribution and easier tossing of the meat.
Serving & Storage Suggestions
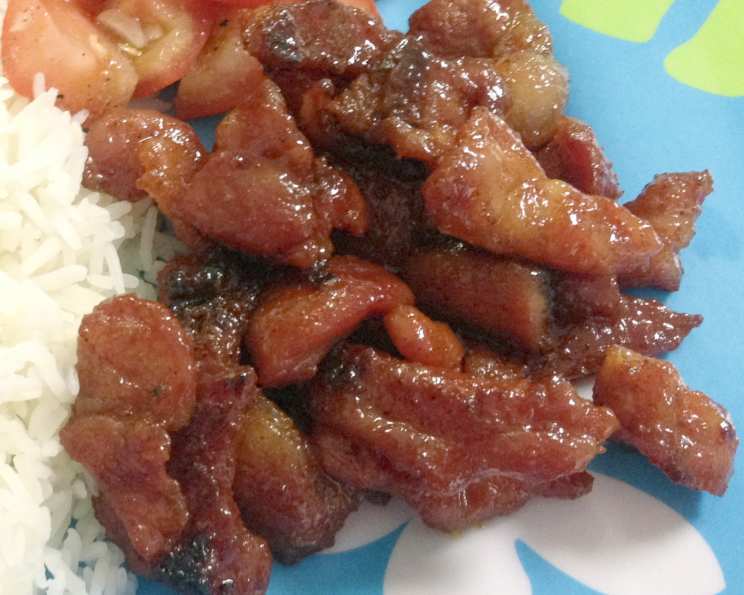
Serve tocino hot, ideally with garlic fried rice (sinangag) and a fried egg (itlog) for a classic Filipino breakfast. It’s also delicious served with steamed rice and a side of sliced tomatoes or pickled papaya (atchara).
Storage:
- Room Temperature: Cooked tocino can be left at room temperature for no more than 2 hours.
- Refrigerator: Store leftover cooked tocino in an airtight container in the refrigerator for up to 3-4 days.
- Freezer: Cooked tocino can be frozen for up to 2 months. Thaw overnight in the refrigerator before reheating.
Reheating:
- Skillet: Reheat leftover tocino in a skillet over medium heat until heated through and slightly crispy.
- Microwave: Reheat tocino in the microwave in short intervals, stirring in between, to prevent it from drying out.
Nutritional Information
| Nutrient | Amount per Serving | % Daily Value |
|---|---|---|
| Calories | 160.6 kcal | N/A |
| Calories from Fat | N/A | 61% |
| Total Fat | 10.9 g | 16% |
| Saturated Fat | 3.8 g | 18% |
| Cholesterol | 42.9 mg | 14% |
| Sodium | 447 mg | 18% |
| Total Carbohydrate | 4.6 g | 1% |
| Dietary Fiber | 0 g | 0% |
| Sugars | 4.6 g | N/A |
| Protein | 10.4 g | 20% |
Note: Nutritional information is an estimate and may vary based on specific ingredients and cooking methods.
Variations & Substitutions
- Spicy Tocino: Add a pinch of chili flakes or a dash of hot sauce to the curing mixture for a spicy kick.
- Pineapple Tocino: Add a tablespoon or two of pineapple juice to the curing mixture for a tropical twist.
- Chicken or Pork Belly Tocino: While pork shoulder is traditional, you can also use chicken thighs or pork belly for a different flavor and texture. Adjust cooking times accordingly.
- Sugar Alternatives: Experiment with using coconut sugar or other natural sweeteners in place of white or brown sugar. Be aware that this will alter the flavour.
- Smoked Tocino: Add 1 teaspoon of liquid smoke for a deeper flavour.
FAQs (Frequently Asked Questions)
Q: Can I skip the pink salt (InstaCure)?
A: No. Pink salt is essential for curing meat and preventing botulism. It cannot be omitted or substituted with regular salt or Himalayan pink salt.
Q: How long does tocino last in the freezer?
A: Properly packaged, uncooked tocino can last in the freezer for up to 2-3 months without significant loss of quality. Cooked tocino can also be frozen, but the texture may change slightly upon thawing.
Q: Why is my tocino not red enough?
A: The redness comes from the powdered beets and the pink salt. Ensure you’re using both in the correct amounts. If you’re still not getting the desired color, you can add a tiny amount of red food coloring, but be cautious not to overdo it.
Q: Can I use a different cut of pork?
A: While pork shoulder or boston butt are traditional, you can experiment with other cuts, such as pork belly, for a richer, fattier tocino. Trim any excess fat as needed.
Q: How do I prevent the tocino from burning while cooking?
A: Make sure to cook over medium heat and not high heat. Also, keep a close eye on the tocino and stir frequently to prevent the sugars from burning. Adding a little water at the beginning of cooking helps to render the fat and prevent burning.
Final Thoughts
This tocino recipe is a labor of love, a tribute to the flavors of my childhood and a celebration of Filipino cuisine. While it requires a bit of patience with the curing process, the end result is well worth the effort. Imagine the joy of waking up to the sweet and savory aroma of homemade tocino, ready to be enjoyed with all your favorite breakfast staples. So, gather your ingredients, channel your inner lola, and embark on this culinary adventure. And if you have any personal twists or family secrets for making tocino, I’d love to hear them! Don’t hesitate to share your experience and feedback – happy cooking!