
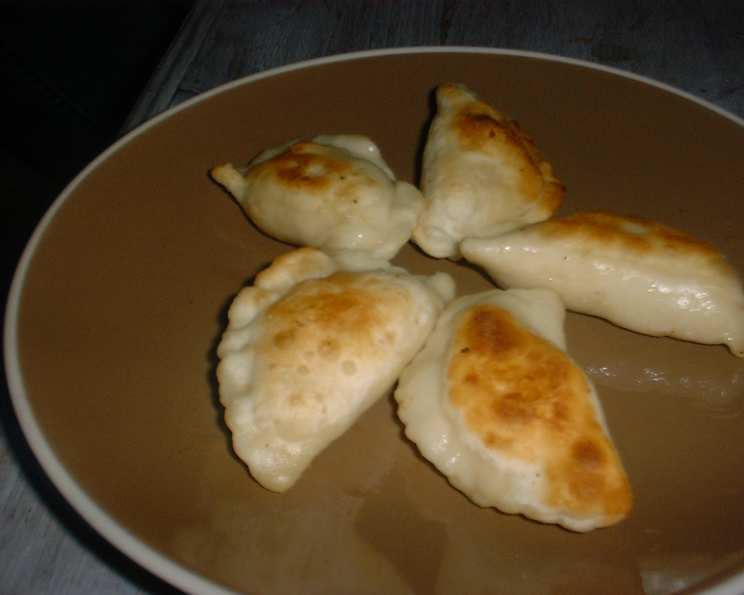
Vegan Tofu Pierogies: A Taste of Eastern Europe, Plant-Based
My memories of pierogies are always linked to laughter, shared tables, and the aroma of browned butter. Growing up, my best friend’s Polish grandmother, Babcia Anya, would spend days crafting these little dumplings. The entire house would fill with the comforting scent of dough and simmering potatoes. I remember being utterly fascinated watching her nimble fingers work, transforming simple ingredients into something magical. These vegan tofu pierogies are my attempt to capture that magic, honoring Babcia Anya’s legacy while embracing a plant-based lifestyle. I’ve worked hard to replicate the taste and texture I remember so fondly.
Recipe Overview
- Prep Time: 20 minutes
- Cook Time: 25 minutes
- Total Time: 45 minutes
- Servings: 6-8
- Yield: 32 pierogies
- Dietary Type: Vegan
Ingredients
For the Dough:
- 4 cups flour
- 1 teaspoon salt
- 2 teaspoons vegetable oil
- ¼ teaspoon baking powder
- 1 ¼ cups warm water
For the Filling:
- 16 ounces firm tofu, drained, pressed, and crumbled
- Sugar, to taste
- Salt, to taste
- Oil (for frying) or vegan margarine (for frying)
Equipment Needed
- Food processor
- Mixing bowl
- Saran wrap (or reusable wrap)
- Pasta roller (optional, but recommended)
- Pint glass or 4-inch cookie cutter
- Large pot
- Slotted spoon
- Large skillet
Instructions
-
Begin by preparing the dough. In a food processor, combine the flour, salt, and baking powder. Pulse the dry ingredients a few times to ensure they are well mixed.
-
With the food processor running on low, slowly drizzle in the vegetable oil and then gradually add the warm water. Continue pulsing until the dough comes together into a shaggy ball. Be careful not to overmix.
-
Turn the dough out onto a clean, lightly floured surface. Knead the dough for about 5 minutes, until it becomes smooth and elastic. If the dough is too sticky, add a little more flour, one tablespoon at a time.
-
Wrap the dough tightly in saran wrap (or a reusable alternative) and chill it in the refrigerator for at least 2 hours. This resting period allows the gluten to relax, making the dough easier to roll out.
-
While the dough is chilling, prepare the tofu filling. Crumble the drained and pressed tofu into a mixing bowl.
-
Season the crumbled tofu with salt and sugar to taste. The amount of sugar is subjective; I personally like my pierogies a bit on the sweeter side, so I add a generous pinch. Start with a small amount and adjust to your preference. Mix well to combine.
-
Once the dough has chilled, remove it from the refrigerator. Lightly flour your work surface. If using a pasta roller, divide the dough into smaller portions for easier handling. Otherwise, roll out the entire dough to a thickness of about 1/8 inch. This is crucial for achieving the right texture. Too thick, and the pierogies will be chewy; too thin, and they might tear.
-
Use a pint glass or a 4-inch cookie cutter to cut out circles from the rolled-out dough. Reroll the scraps to minimize waste.
-
Place about 1 tablespoon of the tofu filling in the center of each dough circle. Avoid overfilling, as this can make the pierogies difficult to seal.
-
Moisten the edges of the dough circles with a little water. This helps the edges stick together and creates a tight seal.
-
Fold the dough circles in half to form half-moons. Pinch the edges firmly to seal, ensuring no filling is exposed. You can crimp the edges with a fork for a decorative touch and to further secure the seal.
-
Bring a large pot of water to a rolling boil.
-
Gently slide the pierogies into the boiling water, being careful not to overcrowd the pot. Work in batches if necessary.
-
Cook the pierogies for about 5 minutes, or until they float to the surface. Once they float, cook for another minute to ensure they are heated through.
-
Use a slotted spoon to remove the cooked pierogies from the boiling water and place them on a plate lined with paper towels to drain.
-
Heat some oil or vegan margarine in a large skillet over medium heat.
-
Add the boiled pierogies to the skillet and sauté them until they are golden brown and crispy on both sides. This step is optional, but it adds a wonderful flavor and texture that I personally love.
-
Serve immediately and enjoy!
Expert Tips & Tricks
- Pressing the Tofu: Don’t skip pressing the tofu! This step is essential for removing excess water, resulting in a firmer, more flavorful filling. Wrap the tofu in paper towels and place a heavy object on top for at least 30 minutes.
- Dough Consistency: The dough should be smooth and elastic but not sticky. Adjust the flour or water as needed to achieve the right consistency.
- Rolling the Dough: Using a pasta roller makes rolling out the dough much easier and ensures even thickness. If you don’t have one, a rolling pin will work just fine, but take your time and be patient.
- Sealing the Pierogies: A tight seal is crucial to prevent the filling from leaking out during cooking. Make sure to moisten the edges of the dough with water and pinch them firmly together.
- Freezing Pierogies: Pierogies freeze beautifully! After boiling, let them cool completely and then arrange them in a single layer on a baking sheet lined with parchment paper. Freeze until solid, then transfer them to a freezer-safe bag or container. Cook frozen pierogies directly from the freezer, adding a few extra minutes to the boiling time.
Serving & Storage Suggestions
Serve these vegan tofu pierogies hot, preferably sautéed until golden and crispy. They are delicious on their own or with a dollop of vegan sour cream, apple sauce, or caramelized onions. Leftover pierogies can be stored in the refrigerator for up to 3 days in an airtight container. Reheat them in a skillet with a little oil or vegan margarine, or microwave them until heated through. For longer storage, freeze the cooked pierogies as described above.
Nutritional Information
Please note that these values are estimates and may vary based on specific ingredients and portion sizes.
| Nutrient | Amount per Serving | % Daily Value |
|---|---|---|
| Calories | 250 kcal | 13% |
| Total Fat | 8g | 10% |
| Saturated Fat | 1g | 5% |
| Cholesterol | 0mg | 0% |
| Sodium | 250mg | 11% |
| Total Carbohydrate | 35g | 13% |
| Dietary Fiber | 2g | 7% |
| Sugars | 2g | – |
| Protein | 10g | 20% |
Variations & Substitutions
- Gluten-Free Pierogies: Use a gluten-free flour blend designed for baking to make a gluten-free version of the dough.
- Potato & Tofu Filling: Combine mashed potatoes with the crumbled tofu for a heartier filling.
- Savory Filling: Omit the sugar from the tofu filling and add sautéed onions, garlic, and herbs for a savory twist.
- Spinach & Tofu Filling: Sauté some spinach with garlic and add it to the tofu filling for a boost of nutrients and flavor.
- Sweet Pierogies: Fill the pierogies with fruit preserves or sweetened vegan cream cheese for a dessert option.
FAQs (Frequently Asked Questions)
Q: Can I use a different type of tofu?
A: Firm or extra-firm tofu works best for this recipe because it holds its shape well and doesn’t release too much water.
Q: Can I make the dough ahead of time?
A: Absolutely! The dough can be made up to 24 hours in advance and stored in the refrigerator. Just be sure to wrap it tightly to prevent it from drying out.
Q: How do I prevent the pierogies from sticking together while boiling?
A: Make sure the water is at a rolling boil and don’t overcrowd the pot. Adding a tablespoon of oil to the water can also help prevent sticking.
Q: Can I bake these instead of boiling and sautéing?
A: While not traditional, you can bake them. Brush with oil, and bake at 375°F (190°C) for 20-25 minutes, or until golden brown. The texture will be different but still tasty.
Q: What is the best way to reheat leftover pierogies?
A: Sautéing them in a skillet with a little oil or vegan margarine is the best way to reheat leftover pierogies. This will restore their crispy texture. You can also microwave them, but they may become a bit soft.
Final Thoughts
These vegan tofu pierogies are a labor of love, but the effort is well worth it. The taste of homemade pierogies, especially when shared with friends and family, is truly special. I encourage you to try this recipe and experience the joy of creating your own vegan version of this classic dish. Don’t be afraid to experiment with different fillings and seasonings to create your own unique twist. And please, let me know what you think! Share your creations and feedback – I’m always eager to hear how others are enjoying this plant-based take on a cherished tradition. Pair these pierogies with a side of vegan sour cream and a crisp, cold apple cider for the ultimate comforting meal.