
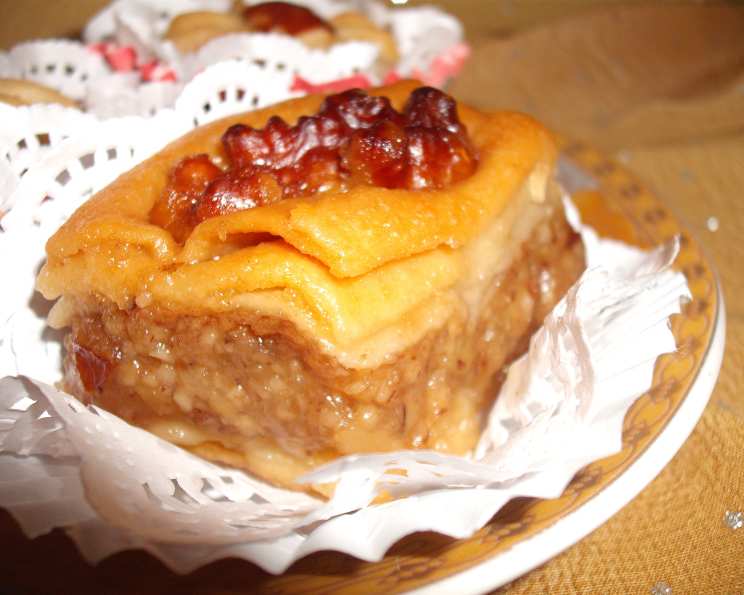
Traditional Algerian Baklawa: A Family Treasure
The scent of orange blossom water always takes me back to my grandmother’s kitchen in Algiers. It was a space filled with warmth, laughter, and the constant aroma of baking. One of her signature creations was baklawa, a labor of love that she would meticulously craft for every wedding, Eid celebration, and special occasion. The golden, diamond-shaped pastries, glistening with honey and adorned with nuts, were not just a dessert; they were a symbol of family, tradition, and the sweet moments shared together. I remember watching her, mesmerized, as she delicately layered the dough, each sheet thinner than paper, a skill passed down through generations. Today, I carry on that tradition, hoping to share a taste of my heritage with you.
Recipe Overview
- Prep Time: 2 hours
- Cook Time: 1 hour 10 minutes
- Total Time: 3 hours 10 minutes
- Yields: Approximately 40 diamonds
- Serves: 20
- Dietary Type: Not specified, but contains gluten, nuts, and dairy (ghee)
Ingredients
For the Dough:
- 24 ounces (680g) plain flour
- 310 ml water
- 200 ml melted ghee mixed with 110 ml sunflower oil or 110 ml vegetable oil
- ½ teaspoon salt
For the Filling:
- 18 ounces (510g) chopped nuts (use almonds, walnuts, pecans, peanuts – your choice)
- 128 g granulated sugar
- ¼ teaspoon ground cinnamon
- 1 teaspoon vanilla sugar
- 2 teaspoons melted ghee
- 155 ml orange flower water (mazhar)
For the Syrup:
- 310-620 ml honey (adjust to your desired sweetness)
- 155-310 ml orange flower water (mazhar) (adjust to your desired aroma)
Extra:
- 310 ml extra melted ghee, to brush the pastry with
- Enough whole nuts to decorate each piece of baklawa
- Cornflour for dusting
Equipment Needed
- Mixing bowls
- Pasta machine (optional, but highly recommended)
- Saucepan
- Pastry brush
- Food processor
- Baking tray (approximately 9×13 inches or similar)
- Sharp knife
Instructions
- Prepare the Dough: In a large mixing bowl, combine the flour and salt. Add the melted ghee/oil mixture and mix thoroughly. Gradually add the water, mixing until a smooth dough forms.
- Knead and Divide: Place the dough on a work surface generously dusted with cornflour. Knead briefly until smooth. Divide the dough in half. Then divide each half into smaller, golf ball-sized pieces. Keep the dough pieces covered with a damp tea towel to prevent them from drying out.
- Roll Out the Dough (Pasta Machine Method): Take one dough ball. If using a pasta machine, shape the ball into a small sausage. Gently flatten it with a rolling pin to approximately 3-4mm thickness. Begin passing the dough through the pasta machine, starting on the thickest setting and gradually decreasing the thickness until you reach the thinnest setting. If this is your first time, you can use the second to thinnest setting before going to the absolute thinnest.
- Roll Out the Dough (Rolling Pin Method): If you don’t have a pasta machine, you can roll out the dough by hand. Remember to generously dust your work surface, rolling pin, and dough with cornflour to prevent sticking. Aim to roll the dough as thinly as possible, almost translucent. This requires patience and practice.
- Prepare the Baking Tray: Melt the ghee in a saucepan over medium heat. Brush your baking tray generously with the melted ghee using a pastry brush. Ensure the entire surface is coated.
- Layer the First Sheets: Lay your first strip of phyllo pastry vertically in the center of the tray. Brush the pastry generously with the melted ghee.
- Continue Layering (Vertical): Repeat the dough rolling process. Cover the tray with phyllo strips, remembering to brush with ghee after each strip. You should be able to cover the surface with approximately 5 strips, but don’t worry if you use more or less.
- Criss-Cross Pattern: Turn the tray around so that you are now placing the phyllo strips horizontally over the vertical strips. This criss-cross pattern is crucial for creating the flaky texture of the baklawa. Remember to brush each layer with ghee.
- Repeat Layers: Continue rolling your pastry and layering the tray, alternating between vertical and horizontal strips. Remember to brush generously with ghee after each strip. Continue doing this until you have created 5 layers of pastry.
- Prepare the Nut Filling: Take your food processor and chop the nuts of your choice until finely ground.
- Mix the Filling: Place the chopped nuts in the second mixing bowl. Add the sugar, cinnamon, vanilla sugar, and orange flower water (mazhar). Add just enough mazhar to moisten the filling so that it holds together, but not so much that it becomes soggy.
- Add the Filling: Place the nut filling in the tray over the layered pastry, gently smoothing it out with your hands. Avoid pressing down too hard, as you want to maintain a light and airy texture.
- Repeat Pastry Layers: You now need to repeat the dough rolling and layering stage all over again, until you have created another 5 layers of pastry on top of the nut filling. You will need to use the second half of the dough by now. Divide it into golf ball-sized pieces as before. Don’t forget to brush each layer with ghee.
- Top Layer: When you’ve finished the 5th layer on top, you can choose how to do the final, top layer. Traditionally, one large sheet of pastry is used. You can try rolling out one large sheet by hand, remembering to COVER the dough, rolling pin, surface, and your hands with plenty of cornflour. Alternatively, you can continue using the pasta machine method for the final layer. Aim to roll out the dough to the size of the tray plus an extra 2cm on each side to allow for trimming.
- Cutting and Decorating: Now you need to cut the baklawa into shapes and decorate. Take your sharp knife and cut vertical straight lines all the way to the bottom of the tray, approximately 2cm apart. Then, spin the tray around and cut more lines, diagonally, to form diamond shapes. You can also make squares or triangles, but traditional Algerian baklawa is usually cut into diamonds. After cutting, push a whole nut (almond, walnut, or pecan) into the center of each diamond shape.
- Brush with Ghee: Brush the entire surface of the baklawa generously with the remaining melted ghee, ensuring it seeps into the cuts.
- Bake: Place the tray in a pre-heated oven at 180°C (350°F) for 1 hour to 1 hour 10 minutes. The baklawa should be golden brown and crispy.
- Prepare the Syrup: While the baklawa is baking, prepare the syrup. Warm the honey and orange flower water (mazhar) in a saucepan over low heat. Do not boil.
- Syruping: Once the baklawa is golden brown, remove it from the oven. Slowly pour the warm honey-mazhar syrup evenly over the hot baklawa, allowing it to soak into the layers.
- Rest and Serve: Allow the baklawa to sit and absorb the syrup for at least 10 minutes. Then, carefully cut out the pieces and place them in paper cases, preferably metallic ones, as they hold the syrup better.
Expert Tips & Tricks
- Achieving Thin Layers: The key to perfect baklawa is thin layers of dough. Don’t be afraid to use plenty of cornflour to prevent sticking.
- Ghee is Key: Don’t skimp on the ghee! It’s what gives the baklawa its richness and flaky texture.
- Nut Variations: Experiment with different nuts for the filling. A mix of almonds, walnuts, and pistachios is a classic combination.
- Make Ahead: You can prepare the dough and nut filling a day in advance and store them separately in the refrigerator.
- Preventing Soggy Baklawa: Ensure the baklawa is hot when you pour the syrup over it. This helps the syrup penetrate the layers without making them soggy.
Serving & Storage Suggestions
Serve the Algerian baklawa at room temperature. It’s best enjoyed with a cup of mint tea or strong coffee. The baklawa can be stored in an airtight container at room temperature for up to 5 days, or in the refrigerator for up to 2 weeks. It can also be frozen for up to 2 months. Thaw overnight in the refrigerator before serving. Reheating is not typically necessary.
Nutritional Information
| Nutrient | Amount per Serving | % Daily Value (Approximate) |
|---|---|---|
| Calories | 545 kcal | 27% |
| Total Fat | 36g | 55% |
| Saturated Fat | 12g | 60% |
| Cholesterol | 36mg | 12% |
| Sodium | 230mg | 10% |
| Total Carbohydrate | 51g | 17% |
| Dietary Fiber | 3g | 13% |
| Sugars | 20g | 40% |
| Protein | 8g | 16% |
Note: Nutritional information is an estimate and may vary based on specific ingredients and portion sizes.
Variations & Substitutions
- Vegan Baklawa: Substitute the ghee with a good quality vegan butter or coconut oil. Ensure your honey substitute is also vegan-friendly (e.g., maple syrup, agave nectar).
- Gluten-Free Baklawa: This is challenging but possible with gluten-free phyllo dough, which can be found in some specialty stores or online. The texture may be slightly different.
- Spice Variations: Add a pinch of cardamom or cloves to the nut filling for a different flavor profile.
- Citrus Zest: Grate some orange or lemon zest into the nut filling for a bright, citrusy note.
FAQs (Frequently Asked Questions)
Q: Why is it important to use ghee and not just butter?
A: Ghee has a higher smoke point than butter and contributes to the signature flaky texture and nutty flavor of the baklawa. It also has a lower moisture content.
Q: Can I use pre-made phyllo dough instead of making my own?
A: While you can use pre-made phyllo dough for convenience, homemade dough will result in a superior texture and flavor.
Q: How can I prevent the dough from tearing when rolling it out?
A: Generously dusting your work surface and dough with cornflour is crucial. Also, ensure your dough is properly hydrated and rested.
Q: My baklawa is soggy. What did I do wrong?
A: You likely added too much syrup or the baklawa wasn’t hot enough when you poured the syrup over it. Make sure the baklawa is straight from the oven when you add the syrup.
Q: Can I freeze the baklawa after it’s been syruped?
A: Yes, you can freeze the baklawa after it has been completely cooled and syruped. Wrap it tightly in plastic wrap and then foil to prevent freezer burn.
Final Thoughts
Making Algerian baklawa is a journey, a connection to generations past. It requires patience and a love for the process. Don’t be discouraged if your first attempt isn’t perfect; each batch will bring you closer to mastering this cherished family recipe. Gather your ingredients, embrace the aroma of orange blossom, and create a sweet memory of your own. I encourage you to try this recipe and share your experiences with me. Serve it with a steaming cup of mint tea and let the flavors transport you to the heart of Algeria.