
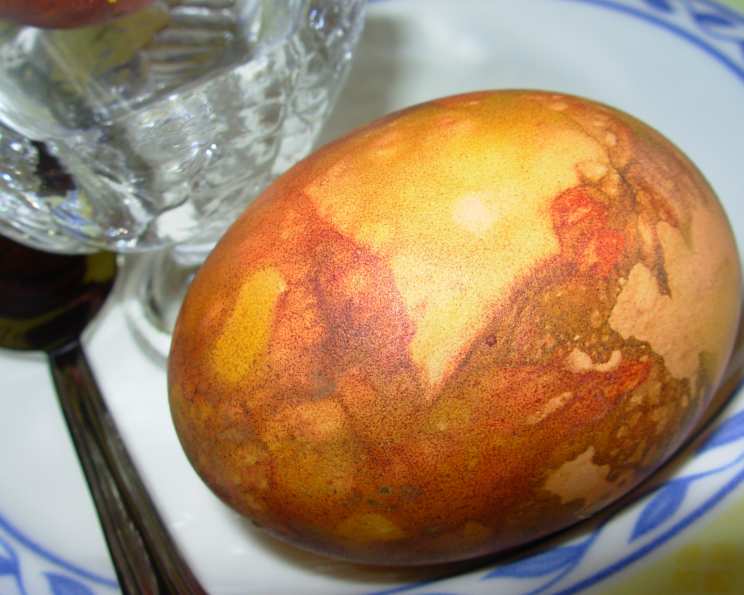
Traditional Easter Marbled Pace Eggs: A Culinary Heirloom
The scent of simmering onion skins always takes me back to my grandmother’s kitchen. Every Easter, she’d preside over a bubbling pot, transforming ordinary eggs into miniature works of art. The anticipation as we peeled away the layers, revealing the intricate, earthy patterns, was almost as exciting as the Easter egg hunt itself. These weren’t just eggs; they were edible treasures, imbued with the warmth of family tradition and the promise of spring.
Recipe Overview
- Prep Time: 20 minutes
- Cook Time: 12 minutes
- Total Time: 32 minutes
- Servings: 6-12
- Yields: 12 Pace Eggs
- Dietary Type: Gluten-Free
Ingredients
- 12 fresh organic eggs
- 6-8 onion skins (red and yellow)
- Aluminum foil
- Natural non-colored string
- Butter (optional)
- Beetroot water (optional) or spinach water (optional)
Equipment Needed
- Large saucepan
- Tongs or slotted spoon
- Small bowls (if using different dyes)
- Egg carton or serving platter
Instructions
- Begin by preparing your natural dyes. Gently peel the outer skins away from red and yellow onions, saving the papery layers. The more skins you use, the deeper the color will be.
- Next, prepare each egg individually. Wrap the onion skins tightly around the egg in a random pattern. You don’t need to cover the egg completely; the exposed areas will create interesting contrasts.
- To secure the onion skins, you have two options. Either encase the wrapped egg completely in a piece of aluminum foil, twisting the ends to seal, or tie pieces of non-colored string tightly around the egg, ensuring the skins stay in place.
- Place the wrapped eggs carefully into a large saucepan and cover them with cold water. Ensure that the water level is well above the eggs to promote even cooking.
- Bring the water to a rolling boil. Once boiling, reduce the heat slightly to prevent the eggs from cracking and continue to boil for approximately 5-7 minutes to ensure the eggs are hard-boiled. If you prefer a slightly softer yolk, reduce the cooking time by a minute or two.
- After boiling, carefully remove the pan from the heat. Allow the eggs to cool completely in the hot water. This gradual cooling process helps prevent cracking and allows the dye to further penetrate the shells.
- Once the eggs are cool enough to handle, gently peel away the string or aluminum foil and carefully remove the onion skins. The marbled patterns will now be revealed!
- Arrange the beautifully colored eggs in a basket or egg holder for a stunning centerpiece on your Easter breakfast, tea, or brunch table.
- For a deeper color and a glossy sheen, you can “polish” the eggs with a small amount of butter while they are still slightly warm. Gently rub the butter over the shells with a soft cloth or paper towel.
- For alternative color options, you can experiment with beetroot water for red hues or spinach water for green shades. Simply boil the eggs in these natural dyes instead of plain water, following the same wrapping and cooking procedures.
Expert Tips & Tricks
- Don’t overcrowd the pan: Make sure the eggs have enough space to move around during boiling to prevent cracking.
- Egg freshness: Older eggs tend to peel easier than very fresh ones. Using eggs that are a week or two old can help prevent the shells from sticking.
- Deepening the color: For more intense color, let the eggs sit in the dye bath (onion skin water, beetroot water, spinach water) for a longer period after boiling, even overnight in the refrigerator.
- Preventing cracks: Adding a tablespoon of vinegar to the boiling water can help prevent the eggs from cracking.
- Creative patterns: Experiment with different ways of arranging the onion skins around the eggs for unique and artistic patterns. Try layering different colored onion skins or adding small leaves or flowers under the skins for intricate designs.
Serving & Storage Suggestions
Serve your beautifully marbled Pace Eggs as a stunning centerpiece on your Easter table or pack them in a picnic basket for an outdoor celebration. They can be enjoyed as a simple snack or incorporated into more elaborate dishes like egg salad or deviled eggs.
Store hard-boiled eggs in the refrigerator within two hours of cooking to prevent bacterial growth. They will keep for up to one week. To maintain their quality, store them unpeeled in their original carton or a sealed container.
It is generally not recommended to freeze hard-boiled eggs, as the texture of the egg white can become rubbery and unpleasant upon thawing.
Nutritional Information
| Nutrient | Amount per Serving | % Daily Value |
|---|---|---|
| Calories | 143 kcal | 7% |
| Total Fat | 9.5 g | 14% |
| Saturated Fat | 3.1 g | 15% |
| Cholesterol | 372 mg | 124% |
| Sodium | 142 mg | 5% |
| Total Carbohydrate | 0.7 g | 0% |
| Dietary Fiber | 0 g | 0% |
| Sugars | 0.4 g | 1% |
| Protein | 12.6 g | 25% |
Note: Nutritional information is an estimate and may vary based on specific ingredients and preparation methods.
Variations & Substitutions
- Natural Dyes Galore: Beyond onion skins, beetroot, and spinach, explore other natural dyes. Red cabbage creates a beautiful blue, turmeric yields a vibrant yellow, and coffee grounds can produce a subtle brown hue.
- Pattern Play: Instead of random patterns, try creating specific designs using leaves, flowers, or even small cut-out shapes held in place by pantyhose or cheesecloth.
- Vegan “Pace Eggs”: While traditionally made with eggs, you can achieve a similar effect by using hard-boiled potatoes or even firm tofu. Follow the same dyeing process for a plant-based alternative.
- Spice it Up: Add a pinch of your favorite spices, like turmeric or paprika, directly to the onion skins for added flavor and color depth.
FAQs (Frequently Asked Questions)
Q: Why do my eggs sometimes crack during boiling?
A: Rapid temperature changes are the most common cause of cracking. Start with cold water, avoid overcrowding the pan, and consider adding a tablespoon of vinegar to the water to help strengthen the shells.
Q: How can I get really dark, vibrant colors on my Pace Eggs?
A: Use a generous amount of onion skins (or other natural dyes) and allow the eggs to sit in the dye bath for an extended period, even overnight in the refrigerator.
Q: Is it safe to eat eggs that have been dyed with onion skins?
A: Yes, onion skins are a natural and safe dye for coloring eggs. Just be sure to use clean, food-grade onion skins and thoroughly wash the eggs after dyeing.
Q: Can I use store-bought dyes for Pace Eggs instead of natural ones?
A: While store-bought dyes will certainly color your eggs, using natural dyes is a traditional and more eco-friendly approach. Plus, it imparts a subtle earthy aroma to the eggs.
Q: How long can I store Pace Eggs after they’ve been dyed?
A: Hard-boiled eggs, whether dyed or not, should be stored in the refrigerator and consumed within one week to ensure freshness and prevent bacterial growth.
Final Thoughts
Creating these Traditional Easter Marbled Pace Eggs is more than just cooking; it’s an act of preserving a cherished tradition. I urge you to gather your loved ones, experiment with different natural dyes, and create your own unique Easter masterpieces. Feel free to share your colorful creations and feedback with me – I’d love to see what you come up with! And why not serve these beautiful eggs alongside some freshly baked hot cross buns for the ultimate Easter brunch? Happy Easter!