
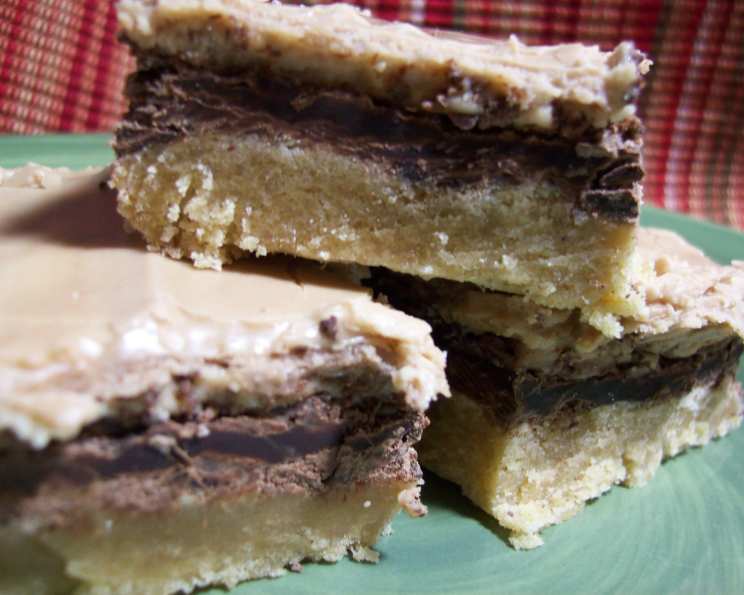
Triple Layer Peanut Butter Bars: A Sweet Symphony of Flavor
The memory is etched in my mind: a bustling church potluck, the air thick with the scent of simmering casseroles and freshly baked pies. But amidst the savory aromas, one dessert reigned supreme in my childhood estimation: these very peanut butter bars. The allure of the three distinct layers – a sturdy, buttery base, a creamy peanut butter filling, and a decadent chocolate topping – was irresistible. Each bite was a journey, a textural and flavorful rollercoaster that left me craving more. Now, years later, I’m thrilled to share this recipe with you, hoping it brings as much joy to your table as it did to mine.
Recipe Overview
- Prep Time: 30 minutes
- Cook Time: 20 minutes
- Total Time: 1 hour 30 minutes (includes chilling time)
- Servings: 24
- Yields: 24 Bars
- Dietary Type: None Specified
Ingredients
-
For the Crust:
- ½ cup (1 stick) butter, softened
- ½ cup smooth peanut butter
- ½ cup light brown sugar, packed
- ½ cup white sugar
- 1 large egg, lightly beaten
- ¼ teaspoon vanilla extract
- 2 ¼ cups all-purpose flour
- ½ teaspoon baking soda
- ¼ teaspoon salt
-
For the Chocolate Layer:
- 2 ½ cups semi-sweet chocolate chips
-
For the Peanut Butter Filling:
- 1 cup powdered sugar, sifted
- ½ cup smooth peanut butter
- 4 tablespoons milk
Equipment Needed
- 9×13 inch baking pan
- Mixing bowls
- Electric mixer (handheld or stand mixer)
- Rubber spatula
- Measuring cups and spoons
Instructions
-
Preheat your oven to 350°F (175°C). Ensure your oven rack is positioned in the center.
-
Cream together the softened butter and peanut butter in a large mixing bowl. This step is crucial for a tender crust, so take your time to fully combine the fats.
-
Add the light brown sugar and white sugar to the creamed mixture. Continue to mix until light and fluffy. The sugar crystals will help aerate the butter, creating a slightly raised crust.
-
Incorporate the egg and vanilla extract. Mix until just combined. Be careful not to overmix at this stage, as it can lead to a tough crust.
-
In a separate bowl, whisk together the all-purpose flour, salt, and baking soda. This ensures even distribution of the leavening agent, which is vital for a consistent texture.
-
Gradually add the dry ingredients to the wet ingredients, mixing on low speed. Mix until just combined. Avoid overmixing, as this can develop the gluten in the flour, resulting in a tough crust. It’s okay if there are still some streaks of flour; they will disappear as you pat the dough into the pan.
-
Pat the dough evenly into a 9×13 inch baking pan. Use your fingertips or the back of a spoon to ensure a uniform thickness across the entire pan. Uneven thickness can result in uneven baking.
-
Bake for approximately 20 minutes, or until the edges are lightly golden brown. The center may still appear slightly soft, but it will firm up as it cools.
-
Remove the pan from the oven and immediately sprinkle the semi-sweet chocolate chips evenly over the warm crust.
-
Allow the chocolate chips to melt for a few minutes from the residual heat of the crust. Then, using a rubber spatula, spread the melted chocolate evenly over the entire surface of the crust to create a smooth chocolate layer.
-
Cool the bars in the refrigerator for approximately 20 minutes to allow the chocolate to set and the crust to firm up. This chilling step helps prevent the peanut butter filling from melting into the chocolate.
-
While the bars are chilling, prepare the peanut butter filling. In a medium mixing bowl, beat together the powdered sugar, remaining peanut butter, and milk until the mixture reaches a smooth and creamy consistency. You may need to add an extra tablespoon of milk if the mixture is too thick.
-
Remove the chilled bars from the refrigerator and spread the peanut butter filling evenly over the cooled chocolate layer.
-
Return the bars to the refrigerator for another 15-20 minutes to allow the peanut butter filling to set. This will make cutting the bars easier and prevent them from being too sticky.
-
Once the bars are completely chilled and the filling has set, cut them into bars. A sharp knife dipped in warm water can help create clean cuts.
Expert Tips & Tricks
- For a richer chocolate flavor, use dark chocolate chips instead of semi-sweet.
- If you prefer a crunchier crust, add ½ cup of chopped nuts (such as peanuts or pecans) to the dough.
- To prevent the peanut butter filling from being too sweet, reduce the amount of powdered sugar slightly.
- If the chocolate layer is not melting evenly, you can place the pan back in the warm (but turned off) oven for a minute or two to help it soften. Watch it closely to prevent burning.
- For a neater presentation, dust the finished bars with a light coating of powdered sugar.
Serving & Storage Suggestions
These peanut butter bars are best served chilled or at room temperature. They are delicious on their own, but also pair well with a scoop of vanilla ice cream or a glass of cold milk.
To store, keep the bars in an airtight container in the refrigerator for up to a week. They can also be frozen for up to 2 months. To freeze, cut the bars into individual portions and wrap them tightly in plastic wrap before placing them in a freezer-safe container. Thaw in the refrigerator overnight before serving.
Nutritional Information
| Nutrient | Amount per Serving | % Daily Value* |
|---|---|---|
| Calories | 285.5 kcal | N/A |
| Calories from Fat | N/A | 47% |
| Total Fat | 14.9 g | 22% |
| Saturated Fat | 6.8 g | 33% |
| Cholesterol | 19.3 mg | 6% |
| Sodium | 135.4 mg | 5% |
| Total Carbohydrate | 36.9 g | 12% |
| Dietary Fiber | 2 g | 7% |
| Sugars | 25.1 g | N/A |
| Protein | 5 g | 10% |
*Percentage Daily Values are based on a 2,000 calorie diet.
Variations & Substitutions
- Gluten-Free: Substitute the all-purpose flour with a gluten-free all-purpose flour blend. Be sure to choose a blend that contains xanthan gum for best results.
- Vegan: Replace the butter with vegan butter, the egg with a flax egg (1 tablespoon flaxseed meal mixed with 3 tablespoons water, let sit for 5 minutes), and use dairy-free chocolate chips and milk.
- Different Nut Butters: Experiment with almond butter, cashew butter, or sunflower seed butter for a unique flavor twist.
- Add-ins: Incorporate chopped pretzels, toffee bits, or mini marshmallows into the crust or the peanut butter filling for added texture and flavor.
FAQs (Frequently Asked Questions)
Q: Can I use natural peanut butter for this recipe?
A: Yes, you can, but be aware that natural peanut butter tends to be oilier than processed peanut butter. You may need to adjust the amount of flour or milk to achieve the desired consistency.
Q: How do I prevent the chocolate from cracking when cutting the bars?
A: Ensure the bars are thoroughly chilled before cutting. Also, dipping a sharp knife in warm water and wiping it clean between each cut can help prevent cracking.
Q: Can I make these bars ahead of time?
A: Absolutely! These bars are perfect for making ahead. Simply store them in the refrigerator for up to a week or freeze them for longer storage.
Q: My peanut butter filling is too thick. What can I do?
A: Add a little more milk, one tablespoon at a time, until you reach the desired consistency.
Q: Can I use a different size pan?
A: Using a different size pan will affect the thickness of the bars and the baking time. If you use a smaller pan, you may need to increase the baking time slightly. If you use a larger pan, you may need to decrease the baking time.
Final Thoughts
I hope this recipe inspires you to create your own memories around these irresistible triple-layer peanut butter bars. Don’t be afraid to experiment with variations and substitutions to make them your own. And most importantly, enjoy the process of baking and sharing these sweet treats with your loved ones. Whether you’re baking for a special occasion or simply craving a comforting dessert, these bars are sure to be a crowd-pleaser. So, gather your ingredients, preheat your oven, and let the baking begin! I’d love to hear about your experience and any creative twists you add to the recipe, so feel free to share your feedback!