
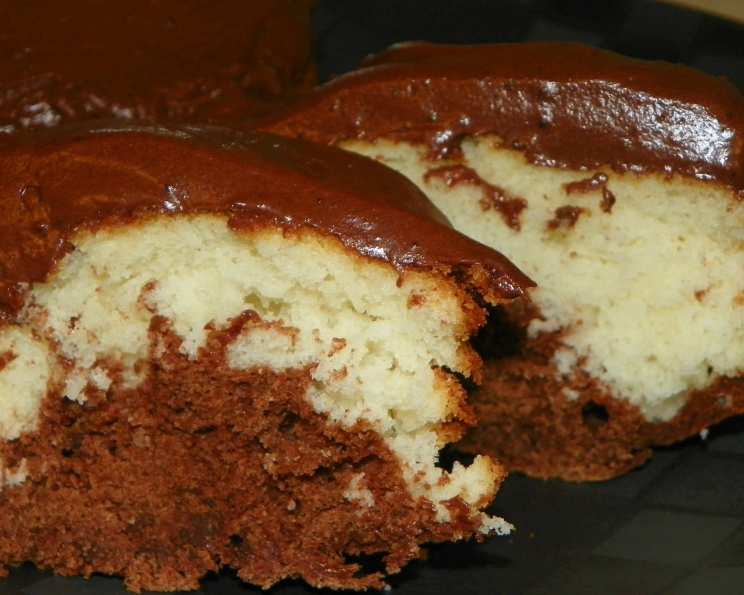
Tropic Aroma Cake: A Spice-Kissed Memory
The aroma alone transports me back to my childhood kitchen. It wasn’t just the sweet scent of baking, but a symphony of nutmeg and cinnamon that clung to the air. My mother, apron dusted with flour, would be humming as she frosted this very cake. Each slice was a celebration, the tender crumb yielding to a creamy, cocoa-kissed icing. This wasn’t just a cake; it was a hug in dessert form, a constant reminder of home and the comforting love of family.
Recipe Overview
- Prep Time: 20 minutes
- Cook Time: 15-20 minutes
- Total Time: 45 minutes
- Servings: 8
- Yield: 3 cake layers
- Dietary Type: Not specified
Ingredients
Cake Batter:
- ¾ cup shortening (or use butter)
- 1 ¼ cups sugar
- 2 eggs
- 2 ½ cups flour
- 4 teaspoons baking powder
- ¼ teaspoon salt
- 1 teaspoon nutmeg
- 1 teaspoon cinnamon
- 1 cup milk
- 1 tablespoon cocoa powder
- 1 tablespoon warm water
Filling and Icing:
- 3 tablespoons butter, softened
- 3 cups confectioners’ sugar (icing sugar)
- 5 tablespoons cocoa powder
- 2 teaspoons vanilla
- 5 tablespoons strong coffee (or use milk)
Equipment Needed
- 3 cake layer tins (greased)
- Mixing bowls
- Electric mixer or whisk
- Sifter
- Measuring cups and spoons
- Spatula or knife for frosting
Instructions
-
Preheat your oven to 375°F (190°C). Ensure your cake layer tins are well-greased to prevent sticking. Lightly flouring them after greasing provides extra insurance.
-
In a medium bowl, sift together the flour, baking powder, salt, nutmeg, and cinnamon. Sifting ensures the dry ingredients are evenly distributed and helps create a lighter, more tender cake. Do not include the cocoa powder in this step.
-
In a large mixing bowl, cream the shortening (or butter) until light and fluffy. This step is crucial for incorporating air into the batter, resulting in a softer crumb. An electric mixer makes this process easier, but you can also achieve good results with a sturdy whisk and some elbow grease.
-
In a separate small bowl, beat the eggs lightly. This helps break them up and allows them to incorporate more easily into the creamed shortening.
-
Gradually add the sugar to the creamed shortening, a little at a time, beating well after each addition. Continue beating until the mixture is light and fluffy. This process can take several minutes, but it’s essential for creating a smooth and well-integrated batter.
-
Add the beaten eggs to the creamed mixture and beat until well combined.
-
Add half of the sifted dry ingredients to the wet ingredients. Mix well until just combined. Be careful not to overmix at this stage, as overmixing can develop the gluten in the flour and result in a tougher cake.
-
Add the milk and mix well.
-
Add the remaining sifted dry ingredients and mix well until the batter is smooth and homogenous. Again, be mindful not to overmix.
-
Divide the batter: You’ll need approximately 1/3 of the batter to create the cocoa-flavored layer.
-
Fill the cake tins: Pour the unflavored batter into two of the greased cake layer tins, dividing it evenly. Tap the tins lightly on the counter to remove any trapped air bubbles. This will help prevent large holes from forming in your cake layers.
-
In a small bowl, mix the cocoa powder with the warm water until it forms a smooth paste.
-
Add the cocoa mixture to the remaining one-third of the batter and mix well until evenly incorporated.
-
Scrape the cocoa-flavored batter into the third greased cake tin.
-
Bake the layers in the preheated oven for 15-20 minutes. Start checking for doneness around the 15-minute mark. To test, insert a wooden skewer or toothpick into the center of each cake layer. If it comes out clean or with just a few moist crumbs attached, the cakes are done. If the skewer comes out with wet batter, continue baking for a few more minutes and test again. Oven temperatures can vary, so it’s always best to rely on visual and tactile cues.
-
Cool the cake layers in the tins for a few minutes before inverting them onto a wire rack to cool completely. Allow the cakes to cool completely before frosting.
-
While the cakes are cooling, prepare the filling and icing: In a large mixing bowl, cream the softened butter until smooth.
-
Gradually add the confectioners’ sugar, a little at a time, to the creamed butter, beating very well after each addition. Continue beating until the mixture is light and fluffy.
-
Add the cocoa powder and continue beating until well combined.
-
Add the vanilla extract and mix well.
-
Slowly add the strong coffee (or milk), one tablespoon at a time, beating after each addition, until the icing reaches a soft and spreadable consistency. You may not need all 5 tablespoons, so add it gradually and check the consistency frequently. If you prefer a milder flavor, use milk instead of coffee.
-
Assemble the cake: Place one of the plain cake layers on a serving plate. Spread a generous layer of frosting over the top. Place the cocoa-flavored cake layer on top of the frosting. Spread another generous layer of frosting over the cocoa layer. Top with the remaining plain cake layer.
-
Frost the entire cake with the remaining icing, creating a smooth and even coating.
Expert Tips & Tricks
-
For an even richer flavor, use brown butter instead of regular butter in the icing. Brown butter adds a nutty, caramel-like note that complements the cocoa beautifully.
-
If your icing becomes too thick, add a teaspoon of milk or coffee at a time until you reach the desired consistency. Conversely, if it’s too thin, add a tablespoon of confectioners’ sugar at a time.
-
To prevent the cake layers from sticking to the tins, line the bottoms with parchment paper before greasing.
-
For a more pronounced spice flavor, try adding a pinch of ground cloves or allspice to the cake batter.
Serving & Storage Suggestions
Serve the Tropic Aroma Cake chilled or at room temperature. A scoop of vanilla ice cream or a dollop of whipped cream makes a lovely accompaniment. Store leftover cake in an airtight container at room temperature for up to 3 days, or in the refrigerator for up to 5 days. For longer storage, you can freeze individual slices wrapped tightly in plastic wrap for up to 2 months. Thaw in the refrigerator before serving.
Nutritional Information
| Nutrient | Amount per Serving | % Daily Value |
|---|---|---|
| Calories | 700 kcal | 35% |
| Total Fat | 27 g | 41% |
| Saturated Fat | 9 g | 45% |
| Cholesterol | 62 mg | 20% |
| Sodium | 328 mg | 13% |
| Total Carbohydrate | 111 g | 36% |
| Dietary Fiber | 3 g | 10% |
| Sugars | 76 g | 302% |
| Protein | 8 g | 14% |
Note: Nutritional information is an estimate and may vary based on specific ingredients and portion sizes.
Variations & Substitutions
- Gluten-Free: Substitute the all-purpose flour with a gluten-free blend. Be sure to add a binder like xanthan gum to prevent the cake from being too crumbly.
- Dairy-Free: Replace the milk with almond milk, soy milk, or oat milk. Use a dairy-free butter substitute or coconut oil for the shortening and butter in the icing.
- Spice it up: Add a pinch of cayenne pepper to the cocoa layer for a subtle kick.
- Citrus Twist: Zest a lemon or orange into the batter for a brighter, more vibrant flavor.
FAQs (Frequently Asked Questions)
Q: Can I use salted butter instead of unsalted butter?
A: Yes, you can, but reduce the amount of salt added to the dry ingredients by half to avoid an overly salty cake.
Q: What can I use if I don’t have shortening?
A: Butter is a great substitute for shortening in this recipe, offering a richer flavor. Coconut oil can also be used for a unique tropical twist.
Q: My cake layers are sticking to the pan. What am I doing wrong?
A: Ensure the cake tins are thoroughly greased and consider using parchment paper rounds on the bottom. Allow the cakes to cool slightly in the tins before inverting them.
Q: Can I make this cake ahead of time?
A: Yes, you can bake the cake layers a day in advance and store them wrapped tightly in plastic wrap at room temperature. Frost the cake just before serving for the best results.
Q: How do I prevent the icing from being too sweet?
A: Gradually add the confectioners’ sugar to the butter, tasting as you go. Adjust the amount based on your personal preference. Using strong coffee instead of milk can also help balance the sweetness.
Final Thoughts
Don’t hesitate to try this Tropic Aroma Cake. It’s a delightful blend of familiar comfort and intriguing spice. Whether you’re baking it for a special occasion or simply to brighten a weekday, the aroma alone will fill your kitchen with warmth and nostalgia. And if you decide to give it a try, please share your creations and feedback. Happy Baking!