
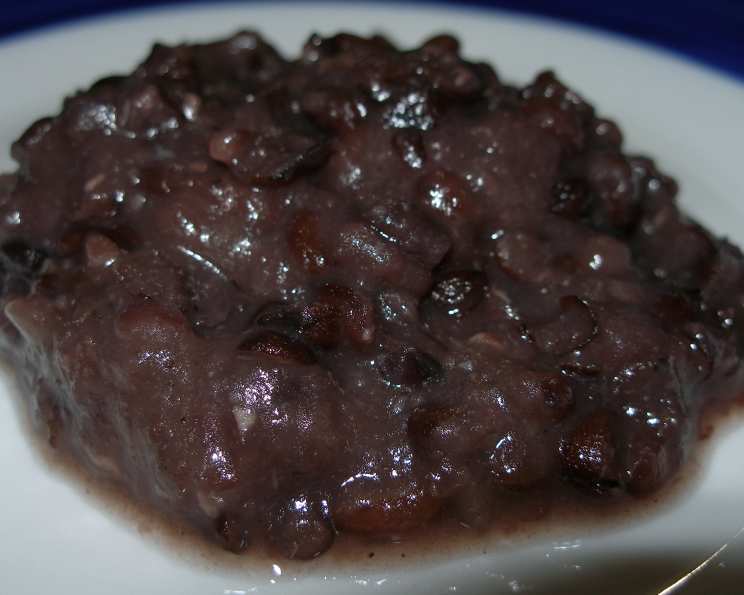
Tsubushi An: Crafting Exquisite Sweet Bean Paste for Japanese Delights
The first time I tasted tsubushi an, I was wandering through a small confectionery shop in Kyoto. The air was thick with the scent of sweet rice and roasted sesame, and the delicate sweets on display were miniature works of art. I chose a simple daifuku – a soft, pillowy mochi filled with this very bean paste. The slightly coarse texture of the beans, the deep, earthy sweetness, and the comforting warmth of the mochi created a symphony of flavors and textures that transported me. From that moment, I was determined to learn how to make this essential ingredient myself. It’s a taste of tradition, a glimpse into the heart of Japanese confectionery, and surprisingly satisfying to create at home.
Recipe Overview
- Prep Time: 8 hours 15 minutes
- Cook Time: 1-2 hours + 20 minutes
- Total Time: 9-10 hours
- Yields: 800 grams
- Serves: 25
- Dietary Type: Vegan
Ingredients
- 300 g azuki beans
- 350-420 g sugar (adjust to taste)
- 6-12 g salt (adjust to taste)
Equipment Needed
- Large saucepan
- Colander or sieve
- Cloth for lining the colander/sieve
- Large plate
Instructions
-
Begin by thoroughly rinsing the azuki beans. Place them in a large bowl and cover with plenty of water. Soak for 7 to 8 hours. This step is crucial for softening the beans and reducing cooking time.
-
After soaking, discard the soaking water. Transfer the softened azuki beans to a large saucepan. Add fresh water, ensuring the water level is approximately 3 cm above the surface of the beans.
-
Bring the water to a boil over high heat. Once boiling, add about 300 ml of cold water to the pot. This helps to control the cooking process and prevent the skins from bursting prematurely. Bring the mixture back to a boil.
-
Drain the azuki beans completely, discarding all the water. Return the drained beans to the saucepan. Cover the beans with plenty of fresh water. Bring the water just to a boil, then immediately reduce the heat to low.
-
Simmer the azuki beans over low heat until they are tender, stirring occasionally to prevent sticking and burning. This process can take anywhere from 1 to 2 hours, depending on the freshness and quality of the beans. Be vigilant; the beans will burn easily if the heat is too high or if they are not stirred frequently enough.
-
To check for doneness, carefully mash a bean between your fingers. The beans should be easily mashable but not completely falling apart. Once the beans reach this stage, turn off the heat, cover the saucepan, and let the beans stand for 20 minutes. This allows the residual heat to further tenderize the beans.
-
After standing, add enough room temperature water to the beans in the saucepan to cool them down slightly. Allow the beans to settle at the bottom of the pan. Carefully pour off the clearer liquid from the top without disturbing the darker liquid and sediment at the bottom.
-
Repeat the water-adding and pouring-off process three times to remove excess starch and achieve a cleaner flavor. After the final rinse, drain the azuki beans by pouring the contents of the saucepan into a colander or sieve that has been lined with cloth. This will help to further remove any remaining impurities.
-
Return approximately one half of the cooked azuki beans to the clean saucepan. Add the smaller amount of sugar (start with 350g), and cook over medium-high heat, stirring constantly, until the sugar has been completely incorporated and the mixture starts to thicken. Be careful, as this mixture burns easily. Lower the heat if necessary.
-
Add the remaining cooked azuki beans to the saucepan. Continue to cook, stirring constantly, and adding more sugar if needed, until you achieve a shiny, thick bean paste. Remember that the paste will continue to thicken as it cools, so it is not necessary to overcook it at this stage. Adjust the amount of sugar to your desired level of sweetness.
-
During the cooking process, you can mash some of the azuki beans with the back of your spoon or a potato masher to create a smoother texture. However, tsubushi an should retain some beans in their original shape, providing a delightful textural contrast.
-
Just before removing the bean paste from the heat, add the salt. Start with the smaller amount (6g) and taste, adding more to balance the sweetness if desired. The salt enhances the flavor and adds depth to the sweet paste.
-
Remove the tsubushi an from the heat and spread it out on a large plate to cool completely. Spreading it thinly helps it cool down faster and more evenly.
Expert Tips & Tricks
- Soaking Time is Key: Don’t skimp on the soaking time! It drastically reduces the cooking time and improves the texture of the beans.
- Adjusting Sweetness: The amount of sugar is a personal preference. Start with the lower end of the range and add more as you go, tasting frequently.
- Preventing Burning: Constant stirring is crucial, especially when the sugar is added. Use a spatula to scrape the bottom of the pan to prevent sticking and burning.
- Texture Control: For a smoother paste, mash more of the beans during cooking. For a chunkier paste, mash fewer.
- Water Quality: Using filtered water throughout the process can improve the flavor of the bean paste.
Serving & Storage Suggestions
Tsubushi an is incredibly versatile. It’s a classic filling for daifuku, dorayaki, anpan (sweet bread filled with bean paste), and other traditional Japanese sweets. It can also be used as a topping for shaved ice, a spread for toast, or even as an ingredient in baked goods.
To store, allow the tsubushi an to cool completely before transferring it to an airtight container. It can be stored in the refrigerator for up to 1 week or in the freezer for up to 3 months. To thaw frozen tsubushi an, transfer it to the refrigerator overnight.
Nutritional Information
| Nutrient | Amount per Serving (estimated) | % Daily Value |
|---|---|---|
| Calories | 120 kcal | 6% |
| Total Fat | 0.5g | 1% |
| Saturated Fat | 0g | 0% |
| Cholesterol | 0mg | 0% |
| Sodium | 15mg | 1% |
| Total Carbohydrate | 28g | 9% |
| Dietary Fiber | 3g | 12% |
| Sugars | 20g | 40% |
| Protein | 4g | 8% |
Variations & Substitutions
- Sweeteners: While granulated sugar is traditional, you can experiment with other sweeteners like brown sugar, maple syrup, or agave nectar for a different flavor profile. Keep in mind that these substitutions may affect the color and texture of the paste.
- Salt: A pinch of sea salt can add a more complex flavor.
- Aromatics: For a unique twist, try adding a small piece of kombu (dried kelp) to the beans during the initial soaking stage. This will impart a subtle umami flavor.
- Koshi An (Strained Bean Paste): If you prefer a smoother texture, you can strain the cooked bean paste through a fine-mesh sieve after cooking. This will remove the bean skins and create a silky-smooth paste.
FAQs (Frequently Asked Questions)
Q: Can I use canned azuki beans to make tsubushi an?
A: While it’s possible, the flavor and texture won’t be as good as using dried beans. Canned beans are often softer and may have a different flavor profile.
Q: Why is my tsubushi an too watery?
A: This usually means that the beans were not cooked long enough or that too much water was left in the pot after rinsing. Continue cooking the paste over low heat, stirring constantly, until it thickens to the desired consistency.
Q: Can I make this recipe in a slow cooker?
A: Yes, you can. Soak the beans as directed, then transfer them to a slow cooker with enough water to cover. Cook on low for 6-8 hours, or until the beans are tender. Proceed with the recipe as directed.
Q: How can I prevent the beans from burning?
A: The most important thing is to stir the beans frequently, especially when the sugar is added. Use a spatula to scrape the bottom of the pot and prevent sticking.
Q: Is it necessary to rinse the beans multiple times?
A: While not strictly necessary, rinsing the beans helps to remove excess starch and impurities, resulting in a cleaner flavor.
Final Thoughts
Making tsubushi an at home is a rewarding experience that connects you to the rich culinary traditions of Japan. Don’t be intimidated by the seemingly long process; each step is simple and contributes to the final flavor and texture. I encourage you to try this recipe and experiment with variations to find your perfect tsubushi an. Share your creations with friends and family, and let the sweet, comforting taste of this bean paste transport you to a world of culinary delight. I look forward to hearing about your experiences!