
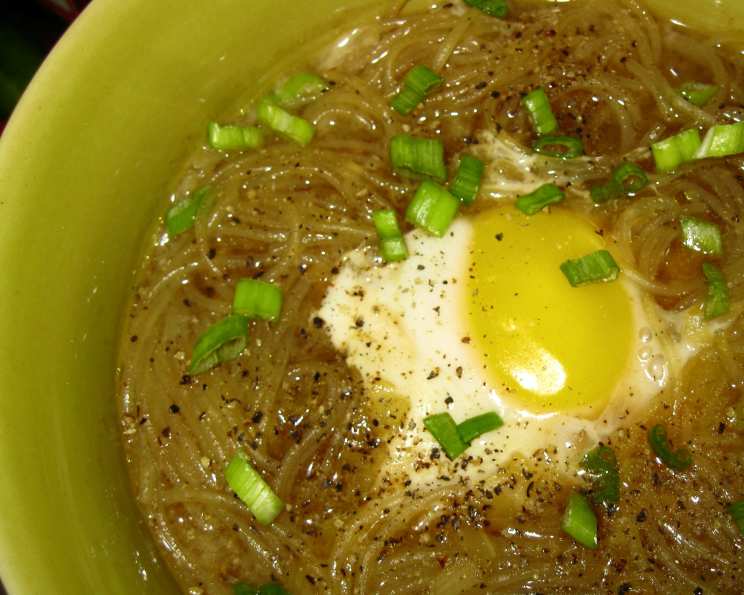
Tsukimi Udon: A Bowl of Moonlight and Comfort
The first time I had Tsukimi Udon, I was a young culinary student feeling a bit lost in the vast world of Japanese cuisine. A kind older woman, the mother of my host family in Kyoto, placed a steaming bowl before me. The glistening broth, the plump noodles, and the perfect yolk of the egg nestled in the center – it was a miniature landscape, a culinary poem. As I slurped the warm, savory broth and the yolk burst in my mouth, coating everything in rich umami, I felt a profound sense of comfort and belonging. It wasn’t just the taste; it was the simple beauty, the quiet elegance of the dish that resonated with me, reminding me that even the most humble ingredients can create something truly special.
Recipe Overview
- Prep Time: 15 minutes
- Cook Time: 25 minutes
- Total Time: 40 minutes
- Servings: 4
- Dietary Type: Varies (can be Vegetarian with vegetable broth)
Ingredients
- 10 ounces thin udon noodles
- Boiling water
- 1 cup cold water, divided
- 2 leeks
- 6 tablespoons soy sauce
- 2 tablespoons mirin
- ½ tablespoon sugar
- Salt to taste
- 3 ½ cups chicken broth (or vegetable broth for vegetarian option)
- 4 eggs
- Pepper to taste
Equipment Needed
- Large pot
- Sharp knife
- Cutting board
- 4 oven-safe bowls
- Oven
Instructions
- Begin by preparing the udon noodles. Bring a large pot of water to a rolling boil. Add the udon noodles to the boiling water.
- Stir the noodles gently to prevent sticking. As soon as the water returns to a boil, add ½ cup of the cold water. This helps to control the cooking process and ensures the noodles are cooked al dente.
- Bring the water back to a boil once more, and then add the remaining ½ cup of cold water. Continue to cook the noodles until they are al dente, which means they should be firm to the bite. The exact cooking time will depend on the type of udon noodles you are using, so taste them frequently.
- Once the noodles are cooked, immediately rinse them under lukewarm water to stop the cooking process and remove any excess starch. This will prevent the noodles from becoming sticky. Drain the noodles thoroughly and set aside.
- Prepare the leeks. Very thinly and diagonally slice enough of the leeks to equal approximately 2 tablespoons, using only the white part. Reserve the green part of the leeks for garnish.
- In the same pot (or a clean pot), combine the chicken broth (or vegetable broth), soy sauce, mirin, sugar, and salt. Bring the mixture to a boil over medium-high heat. Taste and adjust the seasoning as needed. The broth should be savory, slightly sweet, and well-balanced.
- Divide the cooked udon noodles evenly among the 4 oven-safe bowls.
- Add the thinly sliced white part of the leeks to the noodles in each bowl.
- Carefully pour the hot broth over the noodles in each bowl, ensuring that the noodles are well-covered.
- Gently break an egg into the center of each bowl, nestling it among the noodles. The egg represents the full moon in this dish, so try to keep the yolk intact.
- Preheat your oven to 350°F (180°C). Carefully place the bowls in the preheated oven and bake for a few minutes, just until the egg white is set but the yolk is still runny. This typically takes around 3-5 minutes, but keep a close eye on them to prevent overcooking the egg.
- Remove the bowls from the oven. Garnish with the sliced green part of the leeks and sprinkle with pepper to taste. Serve immediately.
Expert Tips & Tricks
- Noodle Perfection: For the best texture, use freshly made udon noodles. If using dried udon noodles, follow the package instructions carefully. Avoid overcooking the noodles, as they will become mushy. Rinsing them thoroughly is key.
- Broth Flavor: The broth is the soul of this dish. Adjust the soy sauce, mirin, and sugar to your liking. A touch of grated ginger or a dash of sesame oil can add extra depth of flavor.
- Egg-cellent Execution: The key to a perfect Tsukimi Udon is the runny egg yolk. Watch the eggs closely while baking to ensure they are cooked to your desired doneness. You can also poach the eggs separately and add them to the bowls just before serving if you prefer.
- Make-Ahead Prep: The broth can be made ahead of time and stored in the refrigerator for up to 3 days. The noodles can also be cooked and stored separately, but it’s best to add them to the hot broth just before serving to prevent them from becoming sticky.
Serving & Storage Suggestions
Tsukimi Udon is best served immediately while the broth is hot and the egg yolk is runny. Garnish with extra sliced leeks, a sprinkle of sesame seeds, or a pinch of shichimi togarashi (Japanese seven-spice blend) for added flavor.
Leftovers can be stored in the refrigerator for up to 24 hours. Reheat gently in a saucepan over low heat or in the microwave, being careful not to overcook the egg. Keep in mind that the noodles may absorb some of the broth during storage. The egg will be fully cooked during reheating.
Nutritional Information
Note: Nutritional information is an estimate and may vary based on specific ingredients and portion sizes.
| Nutrient | Amount per Serving | % Daily Value |
|---|---|---|
| Calories | 450 kcal | 23% |
| Total Fat | 18g | 28% |
| Saturated Fat | 5g | 25% |
| Cholesterol | 280mg | 93% |
| Sodium | 2400mg | 100% |
| Total Carbohydrate | 65g | 22% |
| Dietary Fiber | 4g | 16% |
| Sugars | 7g | – |
| Protein | 25g | 50% |
Variations & Substitutions
- Vegetarian Tsukimi Udon: Use vegetable broth instead of chicken broth. Consider adding tofu or shiitake mushrooms for extra flavor and protein.
- Spicy Tsukimi Udon: Add a spoonful of gochujang (Korean chili paste) or a pinch of shichimi togarashi to the broth for a spicy kick.
- Tsukimi Soba: Substitute soba noodles for udon noodles.
- Toppings: Experiment with different toppings such as tempura flakes (tenkasu), wakame seaweed, or kamaboko (fish cake).
FAQs (Frequently Asked Questions)
Q: Can I use pre-cooked udon noodles?
A: Yes, pre-cooked udon noodles are a convenient option. Simply add them to the broth at the end of the cooking process to heat through.
Q: Can I make this dish without an oven?
A: Absolutely! You can poach the eggs separately in simmering water and add them to the bowls just before serving.
Q: How can I prevent the egg yolk from breaking when adding it to the bowl?
A: Crack the egg into a small bowl first, then gently slide it into the center of the noodles.
Q: Is it possible to make this gluten-free?
A: Substitute gluten-free udon noodles and tamari (gluten-free soy sauce) for the traditional ingredients.
Q: Can I use a different type of broth?
A: Yes, dashi broth is a traditional choice and provides a lovely umami flavor. You can also use a combination of chicken and dashi broth.
Final Thoughts
Tsukimi Udon is more than just a recipe; it’s an experience. The warm, comforting broth, the satisfying noodles, and the perfectly cooked egg create a symphony of flavors and textures that will nourish your body and soul. I encourage you to try this recipe and share the joy of this simple yet elegant dish with your loved ones. Whether you enjoy it on a crisp autumn evening under the light of the full moon or any time of year, Tsukimi Udon is sure to become a new favorite. Please feel free to share your creations and feedback; I can’t wait to hear about your experiences.