
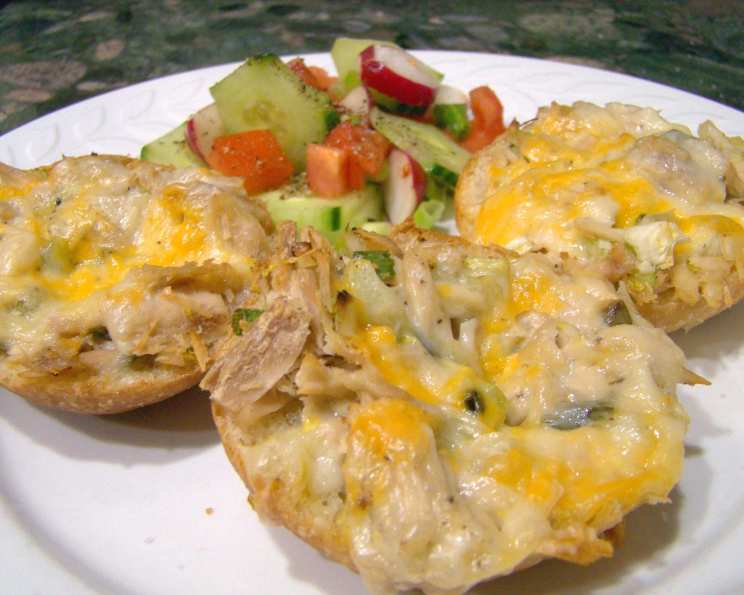
Tuna-Crunch Lunch: A Childhood Classic Revisited
The smell of warm bread and melted cheese always takes me back to my daycare days. It wasn’t fancy, but there was something so comforting about those simple, satisfying lunches. Among the predictable rotation of peanut butter and jelly sandwiches, one dish stood out: a tuna melt on a whole wheat bun, elevated with crunchy celery and sweet green onions. This isn’t just a recipe; it’s a little piece of my childhood, reinvented for a modern palate.
Recipe Overview
- Prep Time: 10 minutes
- Cook Time: 15 minutes
- Total Time: 25 minutes
- Servings: 4
- Yield: 4 sandwiches
- Dietary Type: Pescatarian
Ingredients
- 4 small whole wheat buns, cut in half
- 14 ounces tuna, drained
- 3 tablespoons celery, chopped
- 3 tablespoons green onions, chopped
- Salt and pepper to taste
- 1 cup cheddar cheese, grated
Equipment Needed
- Mixing bowl
- Baking sheet or oven-safe dish
- Oven
Instructions
-
Preheat your oven to 375°F (190°C). This ensures the buns get nice and toasty and the cheese melts evenly.
-
In a medium-sized mixing bowl, combine the drained tuna, chopped celery, and chopped green onions. The celery and green onions add a delightful crunch and freshness that perfectly complements the richness of the tuna.
-
Season the tuna mixture with salt and pepper to taste. Be mindful of the salt content, as tuna can sometimes be quite salty on its own. A little goes a long way!
-
Divide the tuna mixture evenly among the whole wheat bun halves, spreading it generously to cover each bun. Ensure the mixture is distributed evenly for a consistent flavor in every bite.
-
Top each tuna-covered bun with a generous amount of grated cheddar cheese. Don’t be shy! The melted cheese is what binds everything together and adds that irresistible cheesy goodness.
-
Place the assembled tuna melts on a baking sheet or in an oven-safe dish. Using a baking sheet lined with parchment paper makes cleanup a breeze.
-
Bake in the preheated oven for 15 minutes, or until the cheese is melted and bubbly and the buns are lightly toasted. Keep a close eye on them to prevent burning. The baking time may vary slightly depending on your oven.
-
Remove from the oven and let cool slightly before serving. This allows the cheese to set a bit and prevents you from burning your mouth.
Expert Tips & Tricks
- Maximize Flavor: For an extra layer of flavor, try adding a squeeze of fresh lemon juice or a dash of hot sauce to the tuna mixture.
- Cheese Choices: While cheddar is a classic choice, feel free to experiment with other cheeses such as Monterey Jack, Swiss, or even a sharp provolone.
- Bun Boost: Lightly toasting the buns before adding the tuna mixture can help prevent them from becoming soggy.
- Celery Crunch: If you prefer a milder celery flavor, blanch the chopped celery in boiling water for a minute before adding it to the tuna mixture.
- Make-Ahead Magic: You can prepare the tuna mixture ahead of time and store it in the refrigerator for up to 24 hours. This makes for a super quick and easy lunch option.
- Prevent Soggy Buns: To prevent the buns from getting soggy, especially if using a wetter tuna mixture, you can lightly toast them before adding the tuna salad.
- Even Melting: If you find the cheese isn’t melting evenly, you can broil the tuna melts for a minute or two at the end, but watch them carefully to prevent burning.
Serving & Storage Suggestions
Serve your Tuna-Crunch Lunch warm, straight from the oven. These are perfect with a side of crisp green salad, a bowl of tomato soup, or even just some crunchy potato chips.
Leftovers, if there are any, can be stored in an airtight container in the refrigerator for up to 2 days. Reheat in the oven or microwave until warmed through. Microwaving may result in a slightly softer bun.
These tuna melts are best enjoyed fresh, but they can also be frozen for longer storage. Wrap each melt individually in plastic wrap and then place them in a freezer-safe bag. Thaw overnight in the refrigerator before reheating.
Nutritional Information
Here’s an approximate nutritional breakdown per serving:
| Nutrient | Amount per Serving | % Daily Value |
|---|---|---|
| Calories | 320 kcal | 16% |
| Total Fat | 16g | 25% |
| Saturated Fat | 8g | 40% |
| Cholesterol | 70mg | 23% |
| Sodium | 400mg | 17% |
| Total Carbohydrate | 20g | 7% |
| Dietary Fiber | 3g | 12% |
| Sugars | 4g | N/A |
| Protein | 25g | 50% |
Please note that these values are estimates and may vary based on specific ingredients and portion sizes.
Variations & Substitutions
- Gluten-Free: Use gluten-free buns for a gluten-free version.
- Dairy-Free: Use dairy-free cheese alternative, such as a cheddar-style cashew cheese.
- Spicy Kick: Add a pinch of red pepper flakes or a dash of your favorite hot sauce to the tuna mixture for a spicy kick.
- Mediterranean Twist: Add chopped Kalamata olives, sun-dried tomatoes, and feta cheese for a Mediterranean-inspired version.
- Open-Faced: Leave the buns open-faced for a lighter, less carb-heavy option.
- Tuna Alternative: Try using canned salmon or shredded chicken instead of tuna.
- Bread Swap: If you don’t have whole wheat buns, you can use sliced bread, English muffins, or even croissants.
FAQs (Frequently Asked Questions)
Q: Can I use a different type of tuna?
A: Absolutely! While I prefer solid white tuna in water, you can use albacore, yellowfin, or even tuna packed in oil (just be sure to drain it well).
Q: Can I add other vegetables to the tuna mixture?
A: Definitely! Diced bell peppers, chopped pickles, or even some shredded carrots would be delicious additions.
Q: How can I make this recipe healthier?
A: Use light mayonnaise or Greek yogurt instead of mayonnaise, reduce the amount of cheese, and add more vegetables.
Q: Can I prepare this ahead of time and bake it later?
A: Yes, you can assemble the tuna melts ahead of time and store them in the refrigerator for up to 24 hours before baking.
Q: What’s the best way to reheat leftovers?
A: Reheating in the oven is the best way to preserve the texture of the bun and cheese. However, you can also microwave them for a quick and easy option.
Final Thoughts
This Tuna-Crunch Lunch is more than just a quick and easy meal; it’s a taste of nostalgia, a reminder of simpler times, and a testament to the power of simple ingredients done well. I encourage you to give this recipe a try and make it your own. Feel free to experiment with different variations and substitutions to create a tuna melt that perfectly suits your taste. And most importantly, share your creation with friends and family – because good food is always best enjoyed together! Let me know what you think and how you’ve personalized this childhood classic!