
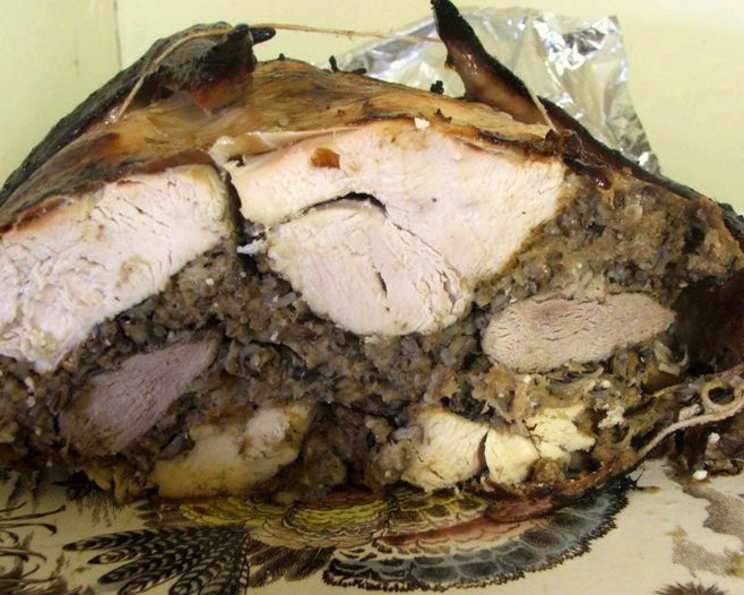
The Magnificent Turducken: A Culinary Symphony
The aroma still lingers in my memory, a complex blend of roasted poultry, savory herbs, and familial warmth. It was Thanksgiving at my Aunt Millie’s sprawling farmhouse, and the centerpiece wasn’t the usual roasted turkey, but a Turducken. My cousins and I, usually glued to our devices, were captivated as Uncle Joe, with a flourish, carved into the bird, revealing the layers of glistening meat and stuffing. It was a culinary revelation, a dish that transcended mere sustenance and became a symbol of abundance, creativity, and the joy of sharing. I knew right then, I needed to master this dish myself.
Recipe Overview
- Prep Time: 2-3 hours
- Cook Time: 9 hours
- Total Time: 11-12 hours
- Servings: 25
- Yield: 1 Turducken
- Dietary Type: Omnivore
Ingredients
- 16-20 lbs whole turkey
- 4-5 lbs whole ducklings
- 3-4 lbs whole chickens (or use a larger chicken and place the duckling inside it)
- 6-8 cups prepared stuffing (I like to use 2 kinds such as sausage and cornbread stuffing, but use your favorites or just one kind)
- 2 tablespoons salt
- 2 tablespoons paprika
- 1 tablespoon black pepper
- 1-2 teaspoon dried thyme
Equipment Needed
- Sharp knives
- Cutting board
- Large roasting pan with roasting rack
- Large pot or crock pot (for making stock)
- Meat thermometer
- Cotton string
- Cheesecloth (optional)
- Large bowl or dish
- Plastic wrap
- Sewing needle
- Cotton thread
Instructions
-
Deboning the Chicken (Practice Round): If this is your first time deboning poultry, practice on the chicken first. Mistakes will be hidden inside the bigger birds.
-
Preparing the Turkey: Rinse the turkey and remove the neck and any giblets. Save these for making stock.
-
Deboning the Turkey (Part 1): Place the turkey, breast side down, on a clean flat surface.
-
The Spinal Cut: Cut through the skin along the length of the spine.
-
Separating the Meat: Using the tip of a knife and starting from the neck end, gently separate the meat from the rib cage on one side.
-
Working Around the Shoulder: Toward the neck end, cut through the meat to expose the shoulder blade; cut meat away from and around the bone, severing the bone at the joint to remove the shoulder blade.
-
Wing Removal (Partial): Disjoint the wing between the second and third joints. Leave the wing bones and keep the wing attached to the meat.
-
Continuing the Deboning: Continue separating the meat from the frame, working toward the thighbone and being careful to keep the “oyster” (pocket of meat on the back) attached to the skin, rather than leaving it with the bone.
-
Releasing the Thigh: Cut through the ball-and-socket joint to release the thighbone from the carcass. The bird will now be open on one side. Keep the leg attached to the meat.
-
Repeating on the Other Side: Repeat the boning procedure on the other side of the bird.
-
Carcass Stock: Carefully remove the carcass and use it to make stock for your gravy and stuffing. To make stock, put the turkey carcass in a large pot and cover with water. Bring to a boil, then simmer on low heat. You can also place it in a large crock pot.
-
The Boneless Turkey: You should end up with a flat boneless (except for wings and legs) turkey with the skin intact in one large piece. Put the boned turkey in a large dish or bowl and cover with plastic wrap to keep it from drying out. Place it in the refrigerator.
-
Deboning Duck and Chicken: Repeat the deboning process on the duckling and the chicken, but debone both stumps of the wings and leg drumsticks. Cut through the flesh at the thinnest point and trim around these bones with a knife until they can be removed. Since they have little meat, you can cut off the entire wings and add them to the stock pot. The chicken and duck will be stuffed inside the turkey and need not be kept “perfectly” intact.
-
Trimming Excess Fat: Trim excess skin and fat from the birds. Ducks, in particular, have a lot of excess fatty skin that should be saved to render fat to be used later for making gravy. You can completely remove the skin from the chicken, but keep some duck skin which adds flavor.
-
Assembly Time: At least 10 to 11 hours before dinner, assemble the Turducken.
-
Spice Blending: Mix together the salt, paprika, black pepper, and dried thyme in a small dish.
-
Turkey Prep: Spread the turkey, skin down, on a flat surface, exposing as much meat as possible.
-
Seasoning the Turkey: Rub 3 tablespoons of the seasoning mix evenly on the meat.
-
First Stuffing Layer: Spread some of the stuffing over the turkey in an even layer approximately 3/4 inch thick.
-
Placing the Duck: Place the duck, skin down, on top of the stuffing.
-
Seasoning the Duck: Season the exposed duck meat with about 1 tablespoon of the seasoning mix.
-
Second Stuffing Layer: Spread more stuffing in an even layer (about 1/2 inch thick) over the duck.
-
Placing the Chicken: Arrange the chicken, skin down, evenly on top of the stuffing.
-
Seasoning the Chicken: Season the chicken meat with the seasoning mix.
-
Final Stuffing Layer: Spread the remainder of your stuffing on top of the chicken.
-
Folding the Birds: With another person’s help, carefully lift the sides of the layered birds, folding the sides of the turkey together.
-
Sewing the Turducken: Have a helper hold the bird while sewing the opening down the back of the turkey together using cotton thread. The bird may not close perfectly, and a strip of cheese cloth can be used to help close the “crack” in the back of the turkey so stuffing will not leak out when the bird is turned over.
-
Trussing for Support: Since the turducken has no skeleton, it must be trussed up or it may fall apart in cooking.
-
Tying the Bird: Tie 4-5 pieces of cotton string around the bird, widthwise to act as skeletal support.
-
Positioning for Roasting: Turn the bird over and place in a roasting rack inside a large roasting pan so it is breast side up and looks like a “normal” turkey.
-
Tying the Legs: Tie the legs together just above the tip bones.
-
Oven Temperature: Heat oven to 225 degrees F.
-
Baking: Place the bird in the center of the oven and bake until a meat thermometer inserted through to the center reads 165 degrees F, approximately 9 hours, though cooking times will vary depending on the size of the birds and amount of stuffing used. Rely on temperature and not time cooked for doneness.
-
Drippings Management: There will be no need to baste, but accumulated drippings may need to be removed from the pan every few hours so that the lower portion does not deep fry in the hot oil. Save pan drippings for gravy.
-
Resting Period: Remove the turducken from the oven and let cool in the pan for an hour before serving. Make gravy according to your favorite recipe.
-
Carving: To serve cut the bird in half. Carve crosswise so each slice reveals all 3 meats and stuffings.
Expert Tips & Tricks
- Deboning is the most challenging part. Watch online videos to familiarize yourself with the process beforehand.
- Prepare the stuffing the day before to save time.
- Don’t overstuff the Turducken. This can lead to uneven cooking and potential bursting.
- Use a high-quality meat thermometer for accurate temperature readings.
- If the skin starts to brown too quickly, tent it with foil.
- Rendering the duck fat separately and using it to baste the Turducken can enhance flavor and crispness.
- Letting the Turducken rest is crucial for juicy, tender meat.
Serving & Storage Suggestions
Serve the Turducken warm, accompanied by your favorite Thanksgiving sides like mashed potatoes, cranberry sauce, and gravy. Leftovers should be stored in an airtight container in the refrigerator for up to 3-4 days. You can also freeze leftovers for up to 2-3 months. To reheat, thaw in the refrigerator overnight and then warm in the oven or microwave until heated through. The slices are great in sandwiches as well.
Nutritional Information
| Nutrient | Amount per Serving | % Daily Value |
|---|---|---|
| Calories | 650 kcal | N/A |
| Calories from Fat | 312 kcal | 48% |
| Total Fat | 34.7 g | 53% |
| Saturated Fat | 9.4 g | 46% |
| Cholesterol | 268.9 mg | 89% |
| Sodium | 1033.1 mg | 43% |
| Total Carbohydrate | 10.9 g | 3% |
| Dietary Fiber | 1.7 g | 6% |
| Sugars | 1.1 g | 4% |
| Protein | 68.9 g | 137% |
Variations & Substitutions
- Spice it up: Add a pinch of cayenne pepper or some chopped jalapeños to the stuffing for a little heat.
- Different Stuffing: Experiment with different stuffing recipes, such as wild rice stuffing, mushroom stuffing, or even a fruit-based stuffing.
- Poultry Swap: Instead of chicken, try using a quail or cornish hen.
- Gluten-Free: Use gluten-free stuffing and ensure that your seasonings are also gluten-free.
- Vegetarian Twist: While not a true Turducken, you could create a layered vegetable dish using similar deboning and stuffing techniques.
FAQs (Frequently Asked Questions):
Q: Is it difficult to debone the birds?
A: It can be challenging the first time, but with patience and practice, it becomes easier. Watch videos for guidance and start with the chicken for practice.
Q: Can I make this ahead of time?
A: You can debone the birds and prepare the stuffing a day in advance. However, assemble and cook the Turducken on the same day for best results.
Q: What if I can’t find ducklings?
A: You can substitute with a larger chicken or omit the duck layer altogether, but the flavor will be different.
Q: How do I know when the Turducken is done?
A: The most reliable method is to use a meat thermometer. Insert it into the thickest part of the bird, ensuring it reaches the center. The internal temperature should reach 165°F (74°C).
Q: Can I use store-bought stuffing?
A: Absolutely! Using store-bought stuffing is a great time-saver. Just make sure you have enough to fill all the layers.
Final Thoughts
The Turducken might seem like a daunting culinary project, but the rewards are well worth the effort. Not only is it a delicious and impressive centerpiece for any feast, but it’s also a conversation starter and a testament to your culinary creativity. Don’t be afraid to experiment with different stuffings and seasonings to create your own signature Turducken. Gather your friends and family, put on some music, and turn the assembly into a fun and collaborative experience. Once you’ve tasted the magnificent combination of flavors, you’ll understand why the Turducken is more than just a dish – it’s an experience. So go ahead, take the plunge, and create a Turducken masterpiece of your own! And be sure to let me know how it turns out!