
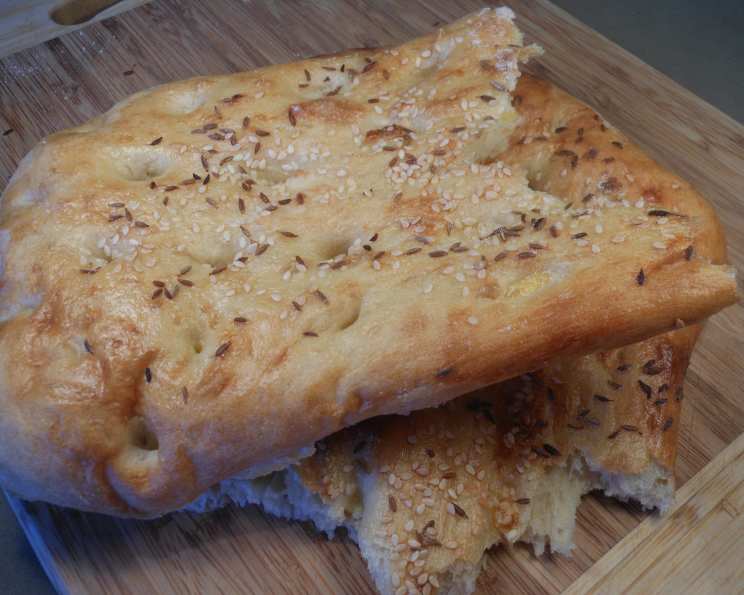
The Soul of Turkish Bread: Crafting Authentic Pide
The first time I tasted truly exceptional pide was in a tiny, family-run bakery nestled in the backstreets of Istanbul. The air, thick with the aroma of freshly baked bread, wrapped around me like a warm embrace. I watched, mesmerized, as the baker, his face etched with years of experience, expertly shaped the dough, creating those characteristic indentations that would soon cradle a medley of savory toppings. That first bite – the slightly crisp crust yielding to a soft, pillowy interior – transported me. I knew then that I needed to learn the secrets of this simple yet profoundly satisfying bread.
Recipe Overview
- Prep Time: 45 minutes (plus 1 hour resting)
- Cook Time: 8-10 minutes
- Total Time: 2 hours 10 minutes
- Yields: 2 breads
- Dietary Type: Vegetarian (can be made vegan by omitting egg wash)
Ingredients
- 2 (7g) sachets dried yeast (1 tablespoon)
- 1 pinch caster sugar
- 375 ml warm water
- 480 g strong bread flour, plus extra for dusting
- 1 teaspoon salt
- 60 ml extra-virgin olive oil
- 1 egg
- 2 tablespoons milk
- Nigella seeds or sesame seeds, for sprinkling
Equipment Needed
- Large bowl
- Electric mixer with dough hook (optional, but recommended)
- Tea towel
- Oiled bowl
- Pizza stones or baking sheets
- Work surface
Instructions
-
Activate the Yeast: In a small bowl, dissolve the yeast and sugar in 125 ml of the warm water. Set aside in a warm place for about 10 minutes, or until the mixture becomes frothy. This step ensures your yeast is active and will leaven the dough properly.
-
Create the Sponge: Use your fingers to work 90g of the flour into the yeast mixture to create a sloppy paste. Sprinkle the surface lightly with a little more flour. Cover the bowl with a tea towel and set aside in a warm place for 30 minutes. This “sponge” will form the base of your dough, giving it a wonderful depth of flavor and a light, airy texture.
-
Combine the Dough: In a large bowl, combine the remaining flour and the salt. Make a well in the center of the flour mixture. Add the sponge, olive oil, and the remaining water to the well. Use your fingers to work the ingredients together into a soft, sloppy dough. Don’t be alarmed if the dough is very sticky; that’s perfectly normal at this stage!
-
Knead the Dough: Transfer the dough to an electric mixer fitted with a dough hook. Knead on a low speed for 10–15 minutes, or until the dough becomes very smooth and springy. If you don’t have a mixer, you can knead the dough by hand on a lightly floured surface for about 20 minutes. The key is to develop the gluten, which gives the pide its structure.
-
First Rise: Transfer the kneaded dough to a lightly oiled bowl. Cover the bowl with a damp tea towel and leave to rest at room temperature for 1 hour, or until the dough has doubled in size. This first rise allows the yeast to work its magic, creating the airy texture that’s characteristic of pide.
-
Rest or Refrigerate: At this point, you can either proceed to bake the pide bread or filled pide boats. Alternatively, you can refrigerate the dough until you’re ready to use it. It will keep for around 24 hours. If you refrigerate the dough, be sure to take it out of the refrigerator a good 3 hours before you want to use it, allowing it time to return to room temperature slowly.
-
Preheat the Oven: When you’re ready to bake the bread, preheat the oven to its highest setting with two pizza stones or oiled baking sheets in it. This high heat is crucial for achieving a crisp crust and a soft interior.
-
Divide and Shape: Divide the dough in half. Form each half into a round and leave, covered, to rest for 30 minutes. This resting period allows the gluten to relax, making the dough easier to shape.
-
Prepare the Egg Wash: In a small bowl, whisk together the egg and milk to make an egg wash. This egg wash will give the pide a beautiful golden-brown color and a slightly glossy sheen.
-
Flatten and Indent: Place the dough on a lightly floured work surface. Use the heels of your hands to press and flatten each piece of dough out to a 20 cm oval. Brush the surface liberally with the egg wash. Dip your fingertips into the egg wash and mark rows of deep indentations across and down the length of the dough, leaving a narrow border. These indentations are not just for aesthetics; they also help to distribute the heat evenly during baking.
-
Bake the Pide: Lightly flour the hot pizza stones or trays. Lift the pides onto the prepared stones or trays, stretching them gently and evenly as you transfer them. Sprinkle with nigella or sesame seeds. Bake for 8–10 minutes, or until the pide is crisp and golden brown. The baking time may vary slightly depending on your oven, so keep a close eye on the pide.
Expert Tips & Tricks
- Warm Water is Key: Make sure the water you use to activate the yeast is warm, not hot. Hot water can kill the yeast.
- Don’t Overwork the Dough: While kneading is essential, over-kneading can result in a tough pide. Aim for a smooth and elastic dough.
- Get Creative with Toppings: While this recipe focuses on the plain pide, feel free to add toppings before baking. Popular choices include seasoned ground meat, spinach and feta, or vegetables.
- Steam is Your Friend: To achieve an even crispier crust, you can add a cup of hot water to a preheated oven-safe dish on the bottom rack of the oven during baking. The steam will help create a beautiful crust.
- Cool Slightly: Allow the pide to cool slightly on a wire rack before slicing and serving.
Serving & Storage Suggestions
Serve the freshly baked pide warm. It’s delicious on its own, or you can use it to scoop up dips like hummus or baba ghanoush. Leftover pide can be stored in an airtight container at room temperature for up to 2 days, or in the refrigerator for up to 4 days. To reheat, wrap the pide in foil and warm in a preheated oven at 350°F (175°C) for about 10 minutes. You can also freeze the pide for longer storage. Wrap it tightly in plastic wrap and then in foil. Thaw completely before reheating.
Nutritional Information
| Nutrient | Amount per Serving | % Daily Value |
|---|---|---|
| Calories | 695 kcal | N/A |
| Total Fat | 16g | 25% |
| Saturated Fat | 2.6g | 13% |
| Cholesterol | 48mg | 16% |
| Sodium | 611mg | 26% |
| Total Carbohydrate | 116g | 42% |
| Dietary Fiber | 5g | 20% |
| Sugars | 0.5g | N/A |
| Protein | 19g | 38% |
Note: Nutritional information is an estimate and may vary based on specific ingredients and portion sizes.
Variations & Substitutions
- Vegan Pide: Omit the egg wash and brush the surface with olive oil or a mixture of plant-based milk and maple syrup for a similar sheen.
- Gluten-Free Pide: Use a high-quality gluten-free bread flour blend. You may need to adjust the amount of water slightly to achieve the right consistency.
- Whole Wheat Pide: Substitute up to half of the strong bread flour with whole wheat flour for a nuttier flavor.
- Herbed Pide: Add chopped fresh herbs, such as rosemary, thyme, or oregano, to the dough for an extra layer of flavor.
- Filled Pide Boats: Instead of making round pides, shape the dough into boat-like forms and fill them with your favorite savory toppings before baking.
FAQs (Frequently Asked Questions)
Q: Why is my dough so sticky?
A: Pide dough is naturally quite sticky due to the high hydration level, which is essential for a soft and airy crumb. Lightly flouring your work surface and hands will help manage the stickiness.
Q: Can I make the dough ahead of time?
A: Absolutely! The dough can be refrigerated for up to 24 hours. Just make sure to bring it back to room temperature before shaping and baking.
Q: How do I get those signature indentations in the dough?
A: Use your fingertips to press deep rows of indentations across and down the length of the dough, leaving a narrow border. Dipping your fingertips in the egg wash can prevent the dough from sticking to your fingers.
Q: Can I bake the pide on a regular baking sheet if I don’t have a pizza stone?
A: Yes, you can. Just make sure to lightly oil the baking sheet to prevent the pide from sticking. The pizza stone helps to create a crispier crust, but a baking sheet will still work well.
Q: What if my pide is browning too quickly?
A: If the pide is browning too quickly, you can tent it with foil during the last few minutes of baking.
Final Thoughts
Crafting pide is more than just following a recipe; it’s about connecting with a rich culinary tradition and creating something truly special. Don’t be intimidated by the seemingly sticky dough – embrace it, and allow yourself to be transported to the bustling bakeries of Istanbul. I encourage you to try this recipe and share your creations with friends and family. Pair it with a simple salad or a flavorful mezze platter for a truly unforgettable meal. Afiyet olsun!