
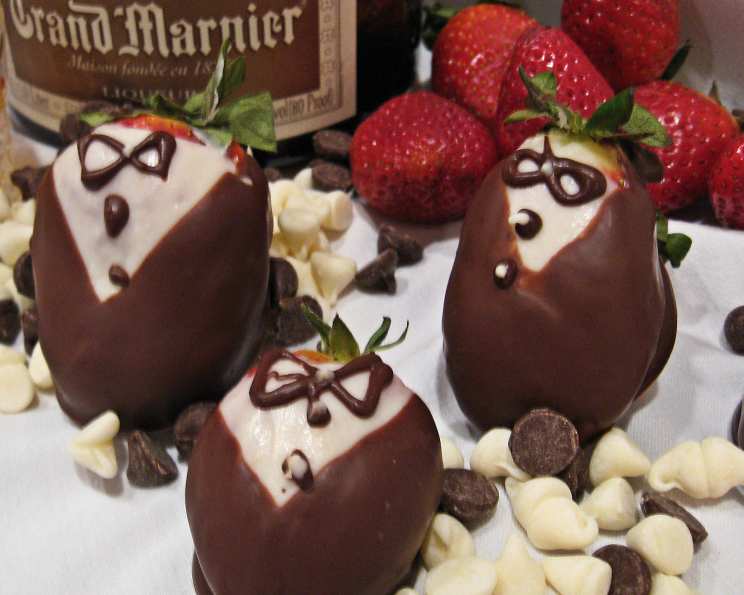
“Tuxedo” Chocolate Covered Strawberries: A Sweet Symphony
I’ll never forget the first time I saw “tuxedo” chocolate-covered strawberries. It was at a local bakery, and they sat regally in the display case, each one a perfect miniature gentleman in chocolate. I remember thinking they were far too fancy to attempt at home – a confection reserved for professionals only. Years later, armed with a little patience and a microwave, I discovered just how delightful and surprisingly easy these elegant treats are to create. Now, they’re my go-to for celebrations, bringing a touch of whimsy and sophistication to any occasion.
Recipe Overview
- Prep Time: 20 minutes
- Cook Time: 10 minutes
- Total Time: 30 minutes
- Servings: Varies
- Yield: 30-40 strawberries
- Dietary Type: Vegetarian, Gluten-Free (check chocolate ingredients)
Ingredients
- 2 quarts of firm, large strawberries
- 2 (12 ounce) bags semi-sweet chocolate chips
- 2 (6 ounce) boxes white chocolate or 2 (6 ounce) boxes almond bark
Equipment Needed
- Microwave-safe bowls (medium sized)
- Baking sheet
- Waxed paper
- Toothpicks
- Paper towels
Instructions
-
Begin by gently washing the strawberries. It’s crucial to handle them delicately to avoid bruising.
-
Thoroughly dry the strawberries using paper towels. Excess moisture can prevent the chocolate from adhering properly, so ensure they are completely dry.
-
Prepare a large baking sheet by lining it with waxed paper. This prevents the strawberries from sticking and makes for easy cleanup.
-
In a medium-sized, microwave-safe bowl, break up the white chocolate into smaller pieces. Smaller pieces help it melt more evenly.
-
Melt the white chocolate in the microwave on medium power (around 60% power) for approximately 4-6 minutes. It’s critical to check and stir the chocolate every 2 minutes to prevent burning. Remember, every microwave is different, so keep a close eye on it.
-
Remove the bowl from the microwave and stir until the chocolate is completely smooth. If there are still a few unmelted pieces, continue stirring; the residual heat should melt them.
-
Grasp a strawberry by the stem and gently dip it into the melted white chocolate. Dip the strawberry up to the base of the stem/leaves, ensuring it’s fully coated.
-
Lift the dipped strawberry and allow any excess chocolate to drip off. Then, carefully place it on the prepared baking sheet/waxed paper.
-
Repeat steps 7 and 8 for all the remaining strawberries.
-
Place the baking sheet with the white chocolate-covered strawberries in the refrigerator for about 15-20 minutes, or until the white chocolate is set and firm. This chilling step is important for creating a stable base for the second layer of chocolate.
-
In another medium-sized bowl, melt the semi-sweet chocolate chips using the same microwave technique as before: medium power (60%) for 4-6 minutes, checking and stirring every 2 minutes.
-
Once the white chocolate has set, grasp a strawberry by the stem again.
-
Dip one side of the strawberry into the melted semi-sweet chocolate, and then dip the other side, creating a “V” shape that reveals the white chocolate underneath. This is the signature “tuxedo” look.
-
Place the dipped strawberry back on the baking sheet/waxed paper.
-
Now, using a toothpick and a small amount of the melted semi-sweet chocolate, carefully “paint” on two or three small “buttons” down the front of the white chocolate part of the strawberry.
-
With the toothpick, also “paint” on a small bow tie at the top of the berry, near the stem, using the semi-sweet chocolate. This adds the final touch of elegance.
-
Cool the finished strawberries on the baking sheet/waxed paper in the refrigerator until the chocolate is fully set and firm. This usually takes another 15-20 minutes.
-
Once set, the tuxedo strawberries can be stored in the refrigerator for 2-3 days.
Expert Tips & Tricks
- Temperature is Key: Be extremely careful not to overheat the chocolate when melting. Burnt chocolate becomes grainy and unusable. Using short bursts of microwaving and frequent stirring is the best method.
- Use a Double Boiler (Optional): If you prefer not to use a microwave, you can melt the chocolate in a double boiler over simmering water. This provides more gentle and even heating.
- Chocolate Tempering: For a professional-looking, glossy finish, consider tempering the chocolate. This involves precisely heating and cooling the chocolate to stabilize the cocoa butter crystals.
- Add a Touch of Flavor: A tiny drop of peppermint extract in the dark chocolate or almond extract in the white chocolate can add a subtle and delicious flavor dimension.
- Get Creative with Decorations: Use edible glitter, sprinkles, or chopped nuts to further embellish the strawberries.
- Prevent Strawberries from Sliding: A small dab of melted chocolate on the bottom of each strawberry before dipping can help to create a “foot” that keeps them from sliding on the baking sheet while they set.
- Melting Chocolate Consistency: If you find your chocolate is too thick to dip easily, add a teaspoon of vegetable oil or shortening. Stir well until smooth.
- Use High-Quality Chocolate: Investing in good chocolate will dramatically improve the taste and appearance.
Serving & Storage Suggestions
These “tuxedo” chocolate-covered strawberries are best served chilled. Arrange them artfully on a platter or in a decorative box. They are a perfect dessert for parties, gifts, or special occasions.
To store, keep the strawberries in an airtight container in the refrigerator. They will last for 2-3 days, but the strawberries are best enjoyed fresh. They are not suitable for freezing, as the strawberries will become mushy.
Nutritional Information
Note: Nutritional information is an estimate and may vary based on specific ingredients used.
| Nutrient | Amount per Serving | % Daily Value |
|---|---|---|
| Calories | 183 kcal | 9% |
| Total Fat | 10.6g | 16% |
| Saturated Fat | 6.2g | 31% |
| Cholesterol | 2.4mg | 0% |
| Sodium | 13.1mg | 0% |
| Total Carbohydrate | 24.3g | 8% |
| Dietary Fiber | 2.2g | 8% |
| Sugars | 21.1g | 84% |
| Protein | 1.9g | 3% |
Variations & Substitutions
- Different Chocolate: Experiment with different types of chocolate, such as milk chocolate, dark chocolate, or even flavored chocolate.
- Vegan Option: Use vegan chocolate chips and almond bark to make this recipe vegan-friendly.
- Nut-Free: Be careful to choose almond bark that is truly almond-free if there are allergy concerns, as some brands may have cross-contamination.
- Drizzled Decorations: Instead of painting on buttons and bow ties, drizzle white chocolate over dark chocolate-covered strawberries, or vice versa, for a more abstract design.
- Edible Decorations: Roll the dipped strawberries in finely chopped nuts, sprinkles, or shredded coconut before the chocolate sets.
FAQs (Frequently Asked Questions)
Q: Why is my chocolate seizing up when I melt it?
A: Chocolate seizes when even a small amount of water gets into it. Make sure your bowl and utensils are completely dry. If it seizes, you can sometimes rescue it by adding a teaspoon of vegetable oil and stirring vigorously.
Q: How do I keep my strawberries from getting soggy?
A: Thoroughly dry the strawberries before dipping them in chocolate. This helps the chocolate adhere better and prevents the strawberries from becoming soggy.
Q: Can I use frozen strawberries?
A: No, frozen strawberries will release too much moisture when thawed, making them unsuitable for dipping in chocolate. Use fresh, firm strawberries only.
Q: My chocolate is too thick to dip easily. What can I do?
A: Add a teaspoon of vegetable oil or shortening to the chocolate and stir well until it becomes smoother. Be careful not to add too much, as this can affect the chocolate’s setting properties.
Q: How long will these strawberries last?
A: These strawberries are best enjoyed within 1-2 days. Store them in the refrigerator in an airtight container to maintain their freshness.
Final Thoughts
Creating these “tuxedo” chocolate-covered strawberries is more than just making a dessert; it’s about crafting little moments of joy and elegance. Don’t be intimidated by the fancy appearance – with a little practice, you’ll be able to whip these up for any occasion. So, gather your ingredients, put on some music, and let the chocolate-covered fun begin! I encourage you to experiment, add your personal touch, and most importantly, enjoy the process. And, of course, I’d love to hear about your experience and any variations you come up with! These pair wonderfully with a glass of chilled champagne or sparkling cider for a truly celebratory treat.