
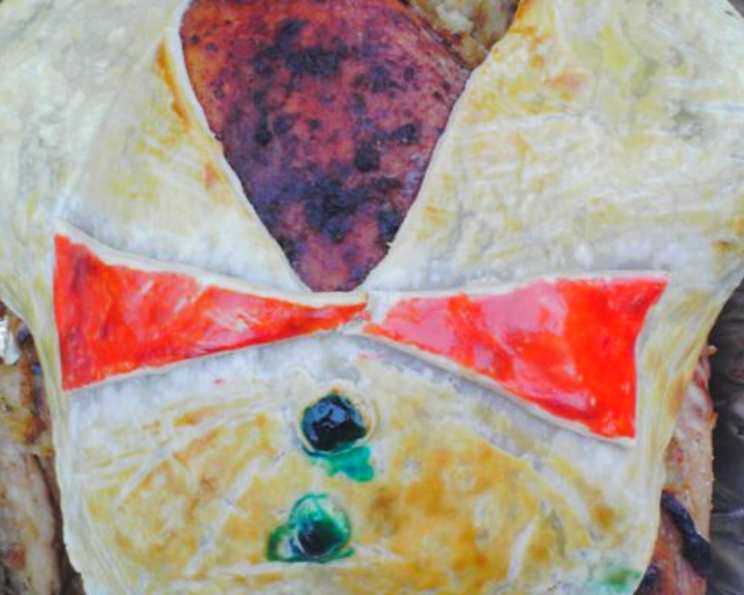
Tuxedo Turkey: A Feast for the Eyes and the Palate
Thanksgiving at my grandmother’s house was always a boisterous, joyous affair. The centerpiece, of course, was the turkey, but it wasn’t just any roasted bird. One year, she decided to get creative, inspired by a magazine clipping. What emerged from the oven was a turkey adorned with a pie-crust tuxedo, complete with a jaunty red bow tie. The laughter and awe it inspired that day made it a holiday tradition we never forgot. Seeing that pie-crust suit – a delicious, edible craft – brought smiles and turned an ordinary turkey into a showstopping centerpiece.
Recipe Overview
- Prep Time: 30 minutes
- Cook Time: 15-17 minutes (for the crust)
- Total Time: 45-47 minutes (for the crust)
- Servings: Varies with turkey size
- Yield: 1 decorated turkey
- Dietary Type: Not specified – varies with turkey preparation
Ingredients
- 1 (14-18 lb) whole turkey
- 1 (14.1 oz) refrigerated pie crust
- 1 egg yolk
- 1 teaspoon water
- Red food coloring
- Black food coloring
Equipment Needed
- Oven
- Baking sheet
- Small bowls
- Pastry brush
- Floured surface (optional)
- Pizza cutter or sharp knife
Instructions
-
Cook the turkey: Prepare your turkey according to your favorite recipe. This recipe focuses solely on the decorative pie-crust tuxedo. Be sure the turkey is fully cooked and ready to be served before you begin decorating.
-
Preheat oven: Preheat your oven to 425°F (220°C).
-
Prepare the pie crust: If needed, lightly flour a surface and gently roll out the pie crust to obtain a 12-inch circle. This step is essential if the crust is too thick or uneven.
-
Cut the bow tie: Cut a small wedge out of what you will consider the “top” of the pie crust circle. Now, cut this wedge in half to make two smaller wedges. These two smaller wedges will form the bow tie.
-
Trim the edges: Along the sides of the remaining large pie crust piece, trim the edges about an inch deep along the bottom third of the crust.
-
Create the cummerbund and buttons: From these trimmings, you should be able to make one rectangle and two circles. The circles are the buttons, and the rectangle will mark the bottom line of the cummerbund.
-
Position the main crust: Carefully place the large piece of crust on the cooked turkey. It may fit best if you put the “neck” of the tuxedo (where you cut the wedge) between the legs of the turkey. While it appears “upside down,” it often looks better this way. You may need to trim the crust a bit to fit the specific shape of your turkey.
-
Attach the smaller pieces: Place the smaller pieces (bow tie, buttons, and cummerbund) on the turkey as shown in the picture above (refer to the photos). Moisten the back of each piece with water before applying them to the turkey. Press lightly so they stick to the turkey’s skin. The moisture helps the crust adhere during baking.
-
Prepare the egg wash: In a small bowl, combine the egg yolk and water. Divide this mixture between two small bowls.
-
Add the food coloring: Add red food coloring to one bowl and black food coloring to the other.
-
Paint the tuxedo: Using a small pastry brush, paint the bow tie pieces red. Then, paint the buttons and cummerbund black. Carefully paint the edges of the large piece of crust black as well, creating the tuxedo’s lapels.
-
Bake the crust: Bake for 15 to 17 minutes, or until the pie crust is golden brown and cooked through. Keep a close eye on the crust to prevent burning, especially the smaller pieces.
Expert Tips & Tricks
- Turkey Temperature: Make sure your turkey is completely cooled before applying the pie crust. This will prevent the crust from melting before it bakes.
- Pie Crust Perfection: For a flakier crust, use very cold butter or shortening when making the pie crust from scratch. However, the recipe specifies store-bought crust for convenience.
- Adhesion: If the pie crust pieces aren’t sticking well, try using a slightly thicker egg wash or even a dab of corn syrup as an adhesive.
- Color Intensity: For more vibrant colors, use gel food coloring instead of liquid food coloring.
- Prevent Burning: If the edges of the crust start to brown too quickly, gently cover them with strips of aluminum foil during the last few minutes of baking.
- Make Ahead Option: The pie crust decorations can be prepared ahead of time and stored in the refrigerator for a day or two. However, bake them immediately before serving for the best texture.
- Alternative to Store-Bought: For a homemade touch, use your favorite pie crust recipe instead of store-bought. Just make sure you have enough dough!
Serving & Storage Suggestions
Serve the Tuxedo Turkey immediately after baking the pie-crust decorations. The warm, golden crust adds a delightful textural contrast to the turkey. For a visually stunning presentation, arrange the turkey on a large platter surrounded by colorful side dishes.
Leftover pie crust decorations can be stored in an airtight container at room temperature for a day or two. They are best enjoyed fresh, as they may become slightly soggy over time. Reheating is not recommended, as it can dry out the crust. If you have leftover turkey, store it separately in the refrigerator in an airtight container and consume it within 3-4 days.
Nutritional Information
(Estimated, based on added crust only. Does not include turkey.)
| Nutrient | Amount per Serving | % Daily Value |
|---|---|---|
| Calories | 150 kcal | 8% |
| Total Fat | 8g | 12% |
| Saturated Fat | 3g | 15% |
| Cholesterol | 25mg | 8% |
| Sodium | 150mg | 7% |
| Total Carbohydrate | 18g | 6% |
| Dietary Fiber | 1g | 4% |
| Sugars | 2g | |
| Protein | 2g | 4% |
Variations & Substitutions
- Gluten-Free Tuxedo: Use a gluten-free pie crust for those with gluten sensitivities.
- Vegetarian Tuxedo: Decorate a vegetarian roast or a large stuffed squash instead of a turkey.
- Vegan Tuxedo: Use a vegan pie crust recipe and replace the egg wash with plant-based milk.
- Different Colors: Experiment with different food coloring colors for a more whimsical look.
- Spice It Up: Add a pinch of cayenne pepper to the black food coloring for a slightly spicy kick.
- Herb Infusion: Brush the pie crust with garlic-infused oil before baking for extra flavor.
FAQs (Frequently Asked Questions)
Q: Can I prepare the pie crust tuxedo ahead of time?
A: Yes, you can prepare the individual pie crust pieces ahead of time and store them in the refrigerator. However, bake them right before serving for the best texture.
Q: Can I use a different type of crust?
A: While refrigerated pie crust is convenient, you can use any pie crust recipe you prefer, including puff pastry for a flakier result.
Q: What if the pie crust pieces don’t stick to the turkey?
A: Make sure to moisten the back of the pie crust pieces with water before attaching them to the turkey. You can also use a slightly thicker egg wash as an adhesive.
Q: Can I use air fryer instead of the oven?
A: Yes, you can bake the crust pieces in an air fryer at 375°F for about 8-10 minutes, or until golden brown. Monitor closely to prevent burning.
Q: How do I prevent the pie crust from browning too quickly?
A: If the edges of the crust start to brown too quickly, gently cover them with strips of aluminum foil during the last few minutes of baking.
Final Thoughts
The Tuxedo Turkey is more than just a recipe; it’s a delightful conversation starter and a guaranteed centerpiece that will bring smiles to your Thanksgiving table. Don’t be intimidated by the decoration. It’s a fun, creative project that even novice cooks can tackle. So, gather your ingredients, unleash your inner artist, and create a Thanksgiving memory that will last for years to come. I encourage you to try it this year! And please, share your photos and feedback – I’d love to see your own Tuxedo Turkey masterpieces! Perhaps pair it with a cranberry sauce that also uses unusual techniques.