
Twice-Baked Jumbo Mini Cheesecakes: A Culinary Adventure
I remember the first time I made mini cheesecakes. It was for a bake sale in elementary school, and I was so nervous I nearly burned the graham cracker crusts. But the moment I took them out of the oven, their delicate aroma filled the kitchen, and I knew I’d created something special. These Twice-Baked Jumbo Mini Cheesecakes are a delicious evolution of that initial experiment, offering a delightfully creamy texture and the perfect canvas for endless flavor combinations. Get ready for the taste of pure joy.
Recipe Overview
- Prep Time: 20 minutes
- Cook Time: 20 minutes
- Total Time: 40 minutes + chilling
- Servings: 24
- Yield: 24 jumbo mini cheesecakes
- Dietary Type: Not specified (can be adapted, see variations)
Ingredients
- 5 ounces vanilla wafers
- 5 ounces graham crackers
- ½ cup (1 stick) butter
- ¾ cup white sugar
- 2 eggs
- 16 ounces (2 packages) cream cheese, softened
- 2 teaspoons vanilla extract
- 2 tablespoons lemon juice or 2 tablespoons lime juice
- Optional Toppings:
- 4 strawberries
- 4 slices bacon
- 1 ½ tablespoons maple syrup
- 3 ½ ounces dark chocolate
- 2 tablespoons butter
Equipment Needed
- Muffin tins (tassie pans) (2 inches in diameter)
- Paper liners (2 inches in diameter)
- Blender or food processor
- Mixing bowls
- Electric mixer
- Spoon
- Double boiler (optional, for melting chocolate)
Instructions
- Preheat your oven to 350 degrees F (175 degrees C). This ensures that the cheesecakes bake evenly.
- Line your muffin tins (tassie pans) with paper liners. This prevents sticking and makes the cheesecakes easy to remove. Use liners that are 2 inches in diameter to perfectly fit the jumbo mini size.
- Crush the vanilla wafers and graham crackers finely. The easiest way to do this is by using a blender or a household mixer. A food processor also works well. The finer the crumbs, the better the crust will hold together.
- Brown the butter on low heat in a small saucepan. This adds a nutty, rich flavor to the crust. Watch it carefully to prevent burning; you want it a golden brown color.
- In a mixing bowl, combine the finely crushed vanilla wafers, graham crackers, and browned butter. Mix with a spoon until the crumbs are evenly moistened and begin to stick together. This is the key to forming a cohesive crust.
- Place the crumb mixture into the prepared paper liners. Use the back of a spoon to flatten the crumbs and create an even crust layer in each liner. Press firmly to compact the crumbs.
- Bake the crusts in the preheated oven for 5 minutes. This pre-baking helps the crust set and prevents it from becoming soggy when the filling is added.
- Cool the baked crusts at room temperature for 5 minutes. This allows them to firm up slightly before adding the filling.
- While the crusts are cooling, prepare the cheesecake filling. In a separate mixing bowl, beat together the sugar and eggs with an electric mixer until the mixture begins to thicken and becomes pale yellow. This incorporates air and creates a light, airy texture.
- Add the softened cream cheese, lemon juice (or lime juice), and vanilla extract to the sugar and egg mixture. Continue beating with the electric mixer until everything is well combined and smooth. Don’t overmix, as this can cause the filling to crack during baking. It’s normal for the mixture to look a little lumpy at this stage; the lumps will disappear during baking.
- Spoon the cream cheese mixture on top of the pre-baked crusts, filling the paper liners only about halfway. This allows room for the cheesecakes to puff up during baking without overflowing.
- Bake the filled cheesecakes in the preheated oven for 15 minutes. The cheesecakes are done when the filling is set around the edges but still slightly jiggly in the center. They will continue to set as they cool.
- Cool the baked cheesecakes in the refrigerator for at least 4 hours. Cooling overnight is even better, especially if you are making them a day in advance. This chilling period is essential for the cheesecakes to fully set and develop their creamy texture.
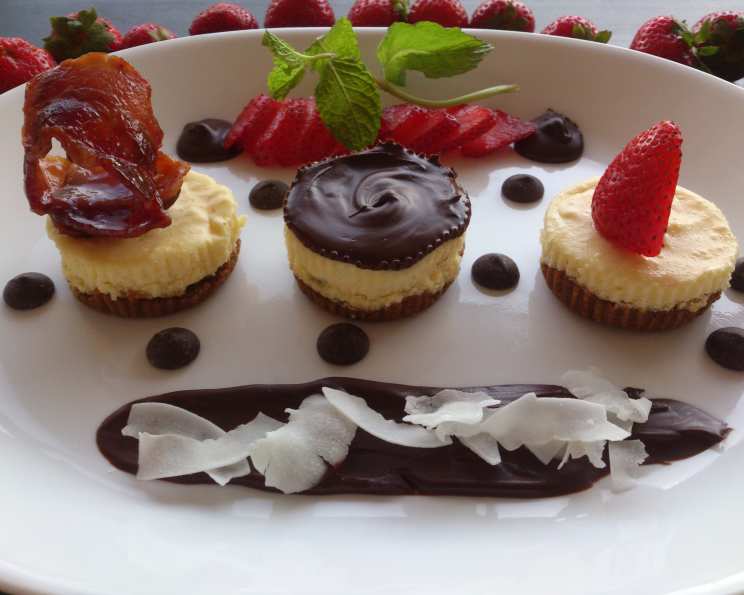
- Optional Toppings: Once the cheesecakes are thoroughly chilled, you can add your desired toppings.
- Strawberries: Cut the strawberries in half and place one half on top of 8 of the cheesecakes.
- Maple Bacon: Pan-fry the bacon until crispy. Drain off any excess grease. Brush the bacon with maple syrup while still in the pan. Cut each slice in half and place one piece on top of 8 of the cheesecakes.
- Dark Chocolate Ganache: Melt the dark chocolate using a double boiler or in the microwave in 30-second intervals, stirring in between, until smooth. Add the butter and stir until melted and combined. Spoon the chocolate ganache on top of 8 of the cheesecakes and return them to the refrigerator for 30 minutes to allow the ganache to set.
Expert Tips & Tricks
- Cream Cheese Temperature: Make sure your cream cheese is fully softened before beating it. This will help prevent lumps in your filling.
- Prevent Cracking: Avoid opening the oven door while the cheesecakes are baking. Sudden temperature changes can cause them to crack.
- Water Bath: For an even creamier texture, try baking the cheesecakes in a water bath. Place the muffin tins in a larger baking pan and add hot water to the pan until it reaches about halfway up the sides of the muffin tins.
- Crust Variation: For a gluten-free option, use gluten-free vanilla wafers and graham crackers.
- Topping Ideas: Don’t be afraid to experiment with different toppings! Consider fresh berries, fruit preserves, chopped nuts, caramel sauce, or even a sprinkle of sea salt.
Serving & Storage Suggestions
Serve the Twice-Baked Jumbo Mini Cheesecakes chilled. They make a perfect dessert for potlucks, picnics, brunch, or dinner parties.
- Storage: Store leftover cheesecakes in an airtight container in the refrigerator for up to 5 days.
- Freezing: For longer storage, you can freeze the cheesecakes for up to 2 months. Thaw them in the refrigerator overnight before serving.
- Reheating: Reheating is not recommended, as it can alter the texture of the cheesecake. Enjoy them straight from the refrigerator for the best taste and consistency.
Nutritional Information
| Nutrient | Amount per Serving | % Daily Value |
|---|---|---|
| Calories | 183 kcal | N/A |
| Total Fat | 12.5g | 19% |
| Saturated Fat | 6.6g | 32% |
| Cholesterol | 46.5mg | 15% |
| Sodium | 146.9mg | 6% |
| Total Carbohydrate | 15.9g | 5% |
| Dietary Fiber | 0.3g | 1% |
| Sugars | 8.8g | N/A |
| Protein | 2.4g | 4% |
Note: Nutritional information is an estimate and may vary based on specific ingredients and portion sizes.
Variations & Substitutions
- Crust: Use gingersnaps or chocolate wafers for a different flavor profile in the crust.
- Filling: Add a tablespoon of cocoa powder to the filling for chocolate cheesecakes.
- Citrus: Experiment with different citrus flavors, such as orange or grapefruit, in place of lemon or lime juice.
- Spices: Add a pinch of cinnamon, nutmeg, or cardamom to the filling for a warm, spiced cheesecake.
- Dairy-Free: To make a dairy-free version, use dairy-free cream cheese alternative. Be mindful that this may alter the taste and texture slightly.
- Vegan: Adapt by replacing both the cream cheese and eggs with vegan alternatives, ensuring the ingredients work cohesively for the texture needed.
FAQs (Frequently Asked Questions)
Q: Why are my cheesecakes cracking?
A: Cheesecakes often crack due to sudden temperature changes. Avoid opening the oven door frequently and let them cool gradually in the oven before refrigerating.
Q: Can I use a different type of sweetener?
A: Yes, you can substitute the white sugar with an equal amount of brown sugar or a sugar substitute. Keep in mind that this might slightly change the flavor and texture.
Q: How do I prevent the crust from getting soggy?
A: Pre-baking the crust helps prevent it from becoming soggy. Also, make sure to cool the crust completely before adding the filling.
Q: Can I make these ahead of time?
A: Absolutely! These cheesecakes are perfect for making ahead of time. In fact, they taste even better after chilling overnight.
Q: What is the best way to melt chocolate for the ganache?
A: The best way to melt chocolate is using a double boiler or in the microwave in 30-second intervals, stirring in between, until smooth. This prevents the chocolate from burning.
Final Thoughts
So there you have it – a simple, yet elegant recipe for Twice-Baked Jumbo Mini Cheesecakes. Don’t be intimidated by the “twice-baked” part; it’s simply a way to ensure a perfectly set crust and creamy filling. I encourage you to try this recipe and make it your own by experimenting with different toppings and flavor combinations. Share your creations with friends and family, and let me know what you think! Happy baking!