
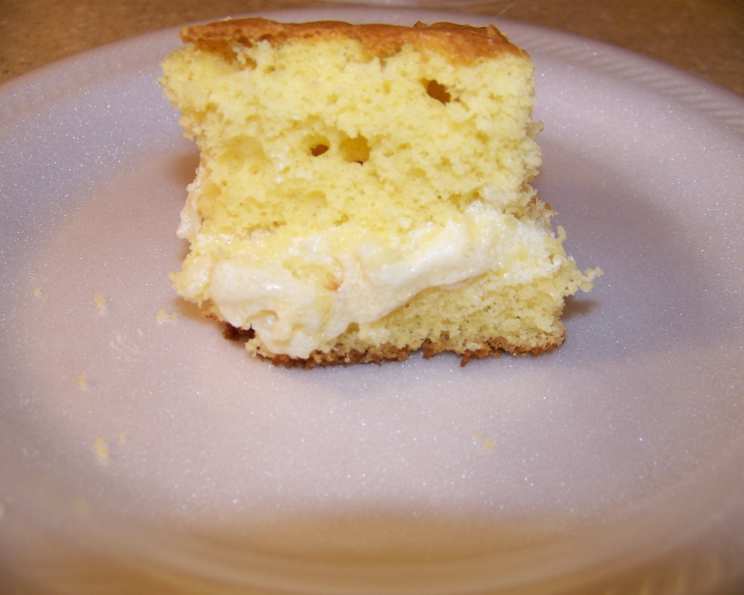
Twinkie Cake: A Nostalgic Treat Reimagined
I remember summer afternoons as a kid, the kind where the air hung thick and heavy with the promise of thunderstorms. We’d be at my grandmother’s house, the scent of her garden mingling with the cool, sugary aroma drifting from the kitchen. While she was famous for her pies, sometimes, just sometimes, she’d whip up something unexpected – a cake that tasted suspiciously like our favorite childhood snack, the Twinkie. This wasn’t just any cake; it was a testament to her playful spirit, a reminder that even the most humble treats could be elevated with a little love and ingenuity.
Recipe Overview
- Prep Time: 15 minutes
- Cook Time: 30-35 minutes
- Total Time: At least 3 hours (includes cooling time)
- Servings: 12-15
- Yield: 1 cake
- Dietary Type: Not specified (contains dairy and eggs)
Ingredients
For the Cake:
- 1 (18 1/4 ounce) box yellow cake mix
- 1 (3 ounce) box instant vanilla pudding
- 3 eggs
- 1/4 cup oil (vegetable or canola oil recommended)
- 1 1/4 cups water
For the Filling:
- 1/4 cup flour (all-purpose)
- 1 cup whole milk
- 1/4 cup butter (unsalted)
- 1 cup sugar (granulated)
- 1/4 cup butter flavored shortening (such as Crisco)
- 1 teaspoon vanilla extract
Equipment Needed
- 9×13 inch baking pan
- Mixing bowls
- Electric mixer (stand or hand-held)
- Saucepan (small)
- Whisk
- Spatula
- Refrigerator
Instructions
-
Preheat your oven to 350 degrees Fahrenheit (175 degrees Celsius). This is crucial for ensuring the cake bakes evenly.
-
In a large mixing bowl, combine the yellow cake mix, instant vanilla pudding, eggs, oil, and water.
-
Using an electric mixer on medium speed, beat all the cake ingredients together for 2 minutes. This thorough mixing incorporates air and ensures a light, fluffy texture. Don’t overmix, as this can result in a tough cake.
-
Grease a 9×13 inch baking pan. This prevents the cake from sticking and makes it easier to remove later. You can use butter, shortening, or cooking spray.
-
Pour the cake batter into the prepared pan and spread it evenly.
-
Bake for 30-35 minutes, or until a toothpick inserted into the middle comes out clean. Start checking for doneness around 30 minutes. The top of the cake should be golden brown. If the top is browning too quickly, you can loosely tent it with aluminum foil.
-
Let the cake cool completely in the pan. This is important for preventing the cake from crumbling when you slice it.
-
While the cake is cooling, begin preparing the filling. In a small saucepan, whisk together the flour and milk. Make sure there are no lumps.
-
Bring the mixture to a boil on low heat, stirring constantly with a whisk. It is vital to stir constantly to prevent scorching and to ensure the mixture thickens evenly.
-
Continue stirring until the mixture becomes very thick, resembling a paste. This process can take some time, and you might think it won’t thicken. Be patient and persistent; it will eventually come together. The mixture will suddenly thicken very quickly.
-
Remove the saucepan from the heat.
-
Let the thickened mixture cool completely in the refrigerator for a couple of hours. This step is essential for achieving the right consistency in the filling.
-
Once the flour and milk mixture is completely cooled, add the remaining filling ingredients: butter, sugar, butter flavored shortening, and vanilla extract.
-
Beat the filling ingredients with an electric mixer until the consistency resembles cool whip. This light and airy texture is key to replicating the Twinkie filling.
-
Remove the cooled cake from the pan. You can use a knife to loosen the edges if needed.
-
Slice the cake in half horizontally.
-
Carefully remove the top half of the cake and set it aside.
-
Spread the filling evenly onto the bottom half of the cake.
-
Return the top portion of the cake to its position on top of the filling.
-
Serve immediately or place back into the refrigerator to chill before serving. Chilling can help the cake firm up and allows the flavors to meld even further.
-
Store any leftover Twinkie cake in the refrigerator.
Expert Tips & Tricks
- Cake Mix Upgrade: For an even richer flavor, substitute the water in the cake mix with milk or buttermilk.
- Flavor Boost: A pinch of salt in the cake batter enhances the sweetness and balances the flavors.
- Easy Release: Line the baking pan with parchment paper, leaving an overhang on the sides, to easily lift the cooled cake out.
- Softening Butter: Soften the butter for the filling to room temperature before mixing. This will ensure a smoother, creamier texture.
- Preventing Lumps: To avoid lumps when thickening the milk and flour mixture, whisk constantly and consider using a double boiler for more even heat distribution.
- Consistent Cooling: Ensure the flour-milk mixture is completely cool before adding other filling ingredients; otherwise, the butter and shortening may melt and affect the filling’s consistency.
- Even Layers: Use a long serrated knife to slice the cake horizontally, ensuring an even layer for the filling.
- Filling Stability: If the filling seems too soft, add a tablespoon of cornstarch while mixing to help stabilize it.
- Neat Slices: For clean, professional-looking slices, chill the cake before cutting and use a warm, wet knife.
Serving & Storage Suggestions
Serve this Twinkie cake chilled or at room temperature, depending on your preference. A dusting of powdered sugar adds an elegant touch. It pairs well with a scoop of vanilla ice cream or a glass of cold milk.
Store leftovers in an airtight container in the refrigerator for up to 3-4 days. Due to the creamy filling, it’s best not to leave it at room temperature for more than 2 hours. Freezing is not recommended as it can alter the texture of the filling.
Nutritional Information
| Nutrient | Amount per Serving | % Daily Value |
|---|---|---|
| Calories | 330 kcal | 17% |
| Total Fat | 15g | 23% |
| Saturated Fat | 8g | 40% |
| Cholesterol | 40mg | 13% |
| Sodium | 250mg | 10% |
| Total Carbohydrate | 45g | 15% |
| Dietary Fiber | 1g | 4% |
| Sugars | 30g | N/A |
| Protein | 3g | 6% |
Note: Nutritional information is an estimate and can vary based on specific ingredients and portion sizes.
Variations & Substitutions
- Gluten-Free: Use a gluten-free yellow cake mix and ensure all other ingredients are certified gluten-free.
- Dairy-Free: Substitute the whole milk with a plant-based milk alternative like almond milk or oat milk. Use a dairy-free butter substitute for both the cake and filling.
- Lower Sugar: Reduce the amount of sugar in the filling by 1/4 cup. You can also use a sugar substitute, but be mindful of how it affects the texture and flavor.
- Lemon Twist: Add the zest of one lemon to the cake batter for a bright, citrusy flavor.
- Chocolate Variation: Mix 1/4 cup of cocoa powder into the cake batter for a chocolate Twinkie cake.
- Birthday Cake: Add sprinkles to the cake batter and filling for a festive birthday celebration.
FAQs (Frequently Asked Questions)
Q: Can I use a different type of pudding mix?
A: Yes, you can experiment with other flavors of instant pudding, such as butterscotch or banana cream, to create different variations.
Q: Why is my filling not thickening properly?
A: Ensure you are cooking the flour and milk mixture on low heat and stirring constantly. Patience is key; it will thicken eventually. Also, make sure your flour is fresh.
Q: Can I make this cake ahead of time?
A: Yes, you can bake the cake and make the filling separately. Store them in the refrigerator until ready to assemble. Assemble the cake no more than 24 hours before serving.
Q: How do I prevent the cake from sticking to the pan?
A: Thoroughly greasing the pan or lining it with parchment paper are both effective ways to prevent sticking.
Q: Can I add food coloring to the filling?
A: Yes, you can add a few drops of food coloring to the filling to create a more vibrant, Twinkie-like appearance.
Final Thoughts
This Twinkie cake is more than just a dessert; it’s a journey back to simpler times, a celebration of sweet memories, and a testament to the power of homemade goodness. Don’t hesitate to try this recipe and share the joy with your loved ones. I encourage you to experiment with variations, make it your own, and most importantly, enjoy the process of creating something truly special. Serve it with a dollop of whipped cream and a warm smile! Let me know how it turns out for you!