
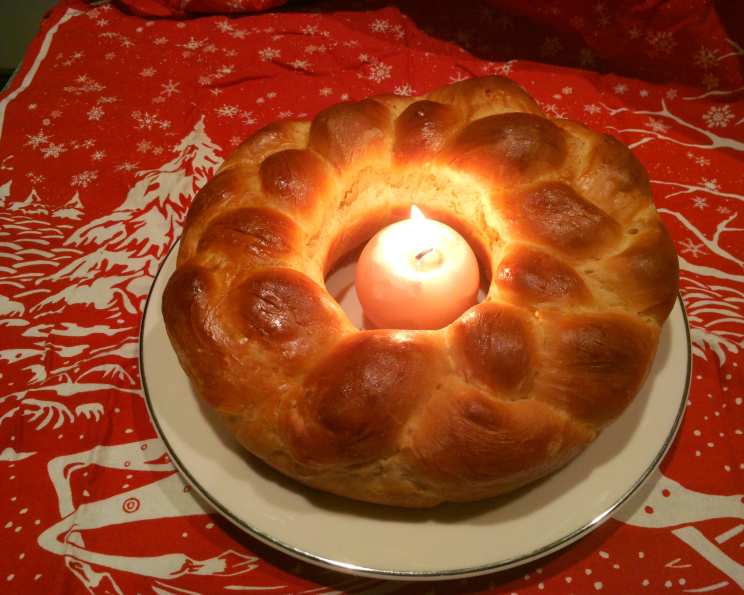
Ukrainian Christmas Bread: Kolach – A Taste of Tradition
The scent of warm, yeasty bread baking in the oven always takes me back to my grandmother’s kitchen. I remember standing on a stool, barely tall enough to see over the counter, mesmerized by her skilled hands as she braided the dough for Kolach. The golden, intricately woven bread, destined for the Christmas Eve Sviaty Vechir table, wasn’t just food; it was a symbol of family, tradition, and the warmth of the holiday season. The aroma alone, a blend of sweet dough and melted butter, held the promise of festive gatherings and cherished memories.
Recipe Overview
- Prep Time: 45 minutes
- Cook Time: 1 hour
- Total Time: 4 hours 45 minutes (including rising time)
- Yields: 1 Kolach
- Dietary Type: Vegetarian
Ingredients
- 2 teaspoons active dry yeast
- 1 cup lukewarm water
- 1/3 cup sugar
- 1 cup milk, heated to lukewarm
- 8 tablespoons unsalted butter, melted (1 stick) or 8 tablespoons vegetable oil
- 1 teaspoon salt (1/2 teaspoon if using salted butter)
- 2 large eggs, beaten
- 6-7 cups unbleached all-purpose flour
- 1 egg, beaten, for egg wash
Equipment Needed
- Small bowl
- Large bowl
- Plastic wrap
- 9-inch round cake pan or cast iron frying pan (or a 9- or 10-inch flan ring set on a baking sheet)
- Wire rack
Instructions
-
In a small bowl, dissolve the yeast in the warm water, then add 1 teaspoon of the sugar and stir well. Set aside. Note: Make sure your yeast is fresh. If it does not break the surface with little bubbles, the yeast is old; start over with fresh yeast.
-
In a large bowl, dissolve the remaining sugar in the warm milk. Stir in the melted butter, salt, and eggs, then add 2 cups of the flour and stir until smooth. Add the yeast mixture and stir it well, always stirring in the same direction.
-
Add 4 to 5 cups more flour, 1 cup at a time, stirring and turning to incorporate it; when the dough becomes too difficult to mix, turn it out onto a well-floured surface and knead for 5 minutes or more, adding flour if necessary, until firm (not soft), smooth, and elastic.
-
Place the dough in a large clean bowl and cover tightly with plastic wrap. Let rise in a fairly warm place (about 70°F) until doubled in volume, about 3 hours.
-
Pull the dough away from the sides of the bowl and deflate it, then cover and let rise again until doubled, about 1 hour.
-
Butter or grease a 9-inch round cake pan or cast iron frying pan (or a 9- or 10-inch flan ring set on a baking sheet).
-
Turn the risen dough out onto a lightly floured surface. Cut into 6 equal pieces (first cut the dough in half, then cut each piece into 3).
-
Set 4 pieces aside, lightly covered.
-
Roll the remaining 2 pieces out under your palms into ropes about 33 to 36 inches long. Lay 1 piece diagonally across the other at the center of each, then, working from that center point, twine the ropes around each other, toward each end, to make a long coiled rope.
-
Make a circle of the rope, pressing the ends together, and place it in the buttered pan or ring.
-
Roll out the remaining 4 pieces of dough into 24-inch lengths and, following the instructions above, use them to make 2 coiled ropes. Then use the same technique to twist the 2 coils around each other to make a DOUBLE coil.
-
Lay the coil inside the dough in the pan to form a circle, and pinch the ends together, trimming them at an angle as necessary to make a neat joint. There will be a small circular gap in the center of the bread.
-
Cover and let rise until almost doubled in volume, about 45 minutes.
-
Meanwhile, place a rack in the lower third of the oven. If you have a baking stone or unglazed quarry tiles, place them on the rack. Preheat the oven to 350°F (175°C).
-
Brush the top of the risen dough generously with egg wash. Transfer to the stone, tiles, or a baking sheet and bake for about 1 hour. The bread should have a rich golden crust and sound hollow when tapped on the bottom. (The bread starts to turn golden very early in the baking because of the egg wash. This does not mean the bread has baked, but it may tempt you to take it out too early. Be sure to use the “hollow tap” test to make sure it has baked through.)
-
Let the bread stand for at least 1 hour on a wire rack to firm up before slicing.
Note: To make the traditional three breads, triple the recipe as follows: Increase the yeast to 4 teaspoons and the milk to 5 cups; triple the quantities of sugar, butter, eggs, and flour. Divide the risen dough into three, then shape each loaf separately. You will probably have to bake them in two batches unless your oven is very large, since only two breads will fit on a regular rack. The breads must be completely cool and firm before being stacked—make them a day ahead if possible.
Expert Tips & Tricks
- Yeast is Key: Always check the expiration date of your yeast. To ensure it’s active, perform the initial proofing step with warm water and sugar. If it doesn’t foam, the yeast is dead.
- Dough Temperature: Maintaining a consistent temperature during rising is crucial. A slightly warm environment (around 70°F) promotes optimal yeast activity. If your kitchen is cold, consider placing the dough in a slightly warmed oven (turned off!) or near a warm appliance.
- Kneading Properly: Kneading develops the gluten, creating the bread’s structure. Don’t be afraid to knead for the full 5 minutes (or longer!) until the dough is smooth and elastic.
- The Poke Test: To test if bread has risen enough, use the “poke test.” Press a moistened finger briefly into the dough. If the dent stays dented, it’s ready. This test is especially useful when you’re trying to determine if shaped breads or rolls are ready to be put in the oven.
- The Tap and Pinch Test: To test if a loaf has baked enough, tap on the bottom of the loaf to see if it sounds hollow, and then use the “pinch test.” Pinch the loaf at the corners or at the bottom edge. It should feel firm, not soft. If it still feels soft, place it back in the oven for another five or ten minutes. When baking pan loaves, take them out of the pans to test them. If you need to bake them a little longer and you have a baking stone or unglazed quarry tiles in your oven, bake them straight on the hot surface, rather than putting them back in the pans.
Serving & Storage Suggestions
Kolach is traditionally served as part of the Sviaty Vechir (Holy Evening) meal on Christmas Eve, January 6th. It’s often presented as three breads stacked one on top of the other and topped by a candle. This bread is delicious on its own, or can be served with butter, honey, or alongside other traditional Ukrainian dishes.
To store, wrap the Kolach tightly in plastic wrap or place it in an airtight container. It will last for 2-3 days at room temperature, or up to a week in the refrigerator. For longer storage, freeze the bread for up to 2 months. Thaw completely before serving. To refresh the bread, warm it in a low oven (300°F) for 10-15 minutes.
Nutritional Information
| Nutrient | Amount per Serving | % Daily Value |
|---|---|---|
| Calories | 4202.5 kcal | N/A |
| Calories from Fat | 1113g | 26% |
| Total Fat | 123.7 g | 190% |
| Saturated Fat | 69.8 g | 348% |
| Cholesterol | 912.9 mg | 304% |
| Sodium | 2691.3 mg | 112% |
| Total Carbohydrate | 654.5 g | 218% |
| Dietary Fiber | 21.9 g | 87% |
| Sugars | 69.8 g | 279% |
| Protein | 108.4 g | 216% |
Note: Nutritional information is an estimate and may vary based on specific ingredients and portion sizes.
Variations & Substitutions
- Vegan Kolach: Substitute the butter with a vegan butter alternative or vegetable oil. Use plant-based milk like almond, soy, or oat milk in place of cow’s milk. Replace the eggs with a flax egg (1 tablespoon ground flaxseed mixed with 3 tablespoons water, let sit for 5 minutes to thicken) in the dough, and brush with maple syrup or agave nectar instead of an egg wash.
- Sweet Kolach: Add raisins, dried cranberries, or chopped nuts to the dough for extra flavor and texture.
- Savory Kolach: Incorporate herbs like dill or rosemary into the dough and brush with garlic-infused olive oil before baking.
- Gluten-Free Kolach: While challenging, a gluten-free version can be attempted using a high-quality gluten-free all-purpose flour blend. Be mindful that the dough may be more delicate and require careful handling.
FAQs (Frequently Asked Questions):
Q: Why does the recipe call for two separate rising times?
A: The double rising process helps develop the flavor and texture of the bread. The first rise allows the yeast to fully activate and create air pockets, while the second rise further enhances the dough’s lightness and improves its overall structure.
Q: Can I use a stand mixer to make the dough?
A: Absolutely! Use the dough hook attachment and mix on low speed until the dough comes together. Then, increase the speed to medium and knead for 5-7 minutes, or until the dough is smooth and elastic.
Q: How can I prevent the Kolach from browning too quickly?
A: If the bread starts to brown too much during baking, tent it loosely with aluminum foil to protect the top while allowing the inside to continue cooking.
Q: What is the best way to slice a Kolach?
A: Use a serrated knife and slice carefully to avoid crushing the delicate bread. You can cut it into wedges or horizontal slices.
Q: Can I prepare the dough ahead of time?
A: Yes, you can prepare the dough up to the end of the first rise. Punch it down, wrap it tightly, and refrigerate it for up to 24 hours. Let it come to room temperature before proceeding with the second rise and shaping.
Final Thoughts
Creating a Kolach is more than just baking; it’s an act of preserving heritage and sharing a piece of Ukrainian culture. While the process might seem a bit involved, the results are well worth the effort. The rich, flavorful bread, with its intricate design, is a stunning centerpiece for any festive occasion. Gather your ingredients, embrace the process, and create a Kolach that will be cherished for generations to come. Don’t be afraid to experiment with variations to make it your own, and most importantly, share it with loved ones. Enjoy!