
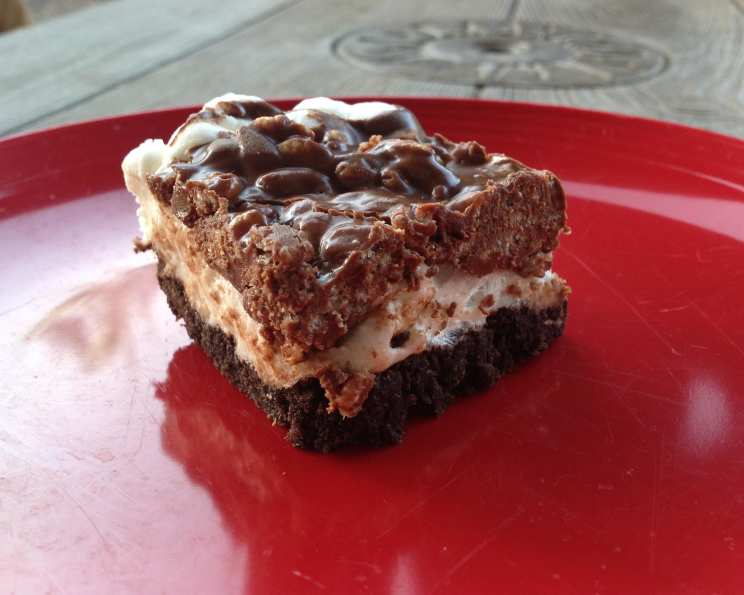
Ultimate Rich Peanut Butter Marshmallow Crispie Brownie Bars
There’s something undeniably magical about the scent of baking brownies wafting through the house. For me, it’s a time machine, instantly transporting me back to my childhood kitchen, where my grandmother would let me lick the batter from the spoon – a privilege only bestowed upon me when I promised to behave (which, admittedly, wasn’t always). These Peanut Butter Marshmallow Crispie Brownie Bars capture that same nostalgic joy, but with an added layer of utter decadence. They’re dangerously addictive, the kind of treat that disappears in a flash, leaving you craving just one more bite.
Recipe Overview
- Prep Time: 10 minutes
- Cook Time: 40 minutes
- Total Time: 50 minutes
- Servings: 20
- Yield: One 9×13 inch pan of bars
- Dietary Type: Not specified (can be adapted for gluten-free with GF brownie mix and cereal)
Ingredients
- 1 (20 ounce) box brownie mix
- 1 (10 3/4 ounce) bag mini marshmallows
- 1 1/2 cups semi-sweet chocolate chips
- 1 cup peanut butter
- 1 tablespoon butter
- 2 cups crisp rice cereal
Equipment Needed
- 9″ x 13″ baking dish
- Medium saucepan
- Mixing spoon
- Measuring cups and spoons
Instructions
-
Preheat your oven to 350 degrees F (175 degrees C).
-
Lightly grease the bottom of a 9″ x 13″ baking dish. This will ensure the brownies don’t stick and are easy to remove once cooled. You can use cooking spray or butter for greasing.
-
Prepare the brownie mix according to the instructions on the box. Follow the box directions exactly for the best results. Different brands may have slightly different instructions, so consistency is key here.
-
Pour the prepared brownie batter into the greased baking dish and spread it evenly.
-
Bake the brownies according to the box directions. Check for doneness by inserting a toothpick into the center; it should come out with fudgy crumbs attached. Be careful not to overbake, as this will result in dry brownies.
-
Remove the brownies from the oven and immediately sprinkle the mini marshmallows evenly over the hot surface.
-
Return the baking dish to the oven for another 3 minutes, or until the marshmallows just start to puff up and slightly melt. Watch them carefully, as they can burn quickly!
-
Remove the baking dish from the oven and set it aside to cool off slightly.
-
While the brownies and marshmallows are cooling, place the chocolate chips, peanut butter, and butter in a medium saucepan.
-
Melt the mixture over low heat, stirring constantly to avoid burning. Low and slow is the name of the game here. You want a smooth, melted mixture, so be patient. If the mixture seems too thick, you can add a tiny splash of milk (dairy or non-dairy) to thin it out.
-
Once the chocolate and peanut butter are completely melted and smooth, remove the saucepan from the heat.
-
Add the crisp rice cereal to the melted chocolate-peanut butter mixture and mix well, ensuring that all the cereal is coated evenly.
-
Drop spoonfuls of the chocolate-crispie mix over the marshmallows, covering the entire top surface.
-
Spread the crispie mixture evenly across the top of the marshmallows, gently pressing down to help it adhere.
-
Allow the bars to cool completely before cutting into squares. This is crucial for clean cuts and prevents the marshmallows from sticking to the knife.
-
If it’s warm in your house, you might want to refrigerate the bars to help them set up properly.
Expert Tips & Tricks
- For extra fudgy brownies: Add a tablespoon of unsweetened cocoa powder to the brownie mix before baking.
- Prevent sticking: Line the baking dish with parchment paper, leaving an overhang on the sides. This makes it incredibly easy to lift the bars out after they’ve cooled.
- Marshmallow browning: For a more toasted marshmallow flavor, you can broil the marshmallows for a minute or two after they puff up, but watch them very closely to prevent burning.
- Nut butter variations: Feel free to substitute almond butter, cashew butter, or even sunflower seed butter for the peanut butter, depending on your preference or dietary needs.
- Even crispier topping: Toast the crisp rice cereal in a dry skillet for a few minutes before adding it to the melted chocolate mixture. This will enhance its crunchiness.
Serving & Storage Suggestions
These bars are best served at room temperature. Cut them into squares or rectangles, depending on your preference. They’re perfect for parties, potlucks, or just a special treat.
To store, keep the bars in an airtight container at room temperature for up to 3 days. For longer storage, you can refrigerate them for up to a week. You can also freeze them for up to 2 months. To freeze, wrap the bars individually in plastic wrap and then place them in a freezer-safe container.
To reheat frozen bars, simply thaw them at room temperature for a few hours.
Nutritional Information
| Nutrient | Amount per Serving | % Daily Value |
|---|---|---|
| Calories | 330.8 kcal | N/A |
| Calories from Fat | N/A | 42% |
| Total Fat | 15.4 g | 23% |
| Saturated Fat | 4.7 g | 23% |
| Cholesterol | 1.5 mg | 0% |
| Sodium | 189.4 mg | 7% |
| Total Carbohydrate | 48.4 g | 16% |
| Dietary Fiber | 1.6 g | 6% |
| Sugars | 17.1 g | 68% |
| Protein | 5.4 g | 10% |
Please note that these values are estimates and may vary based on specific ingredients and preparation methods.
Variations & Substitutions
- Gluten-Free: Use a gluten-free brownie mix and gluten-free crisp rice cereal to make this recipe gluten-free.
- Vegan: Use a vegan brownie mix, vegan chocolate chips, vegan butter, and vegan marshmallows (some marshmallows are made with gelatin).
- Dark Chocolate: Substitute dark chocolate chips for the semi-sweet chocolate chips for a richer, less sweet flavor.
- Different Cereal: Experiment with other types of cereal, such as corn flakes or puffed wheat, for a different texture.
- Nuts: Add chopped nuts, such as peanuts, walnuts, or pecans, to the crispie mixture for added crunch and flavor.
- Salted Caramel: Drizzle salted caramel sauce over the cooled bars for an extra layer of indulgence.
FAQs (Frequently Asked Questions)
Q: Can I use a different size baking dish?
A: While a 9×13 inch pan is recommended, you can use an 8×8 inch pan for thicker bars. Just be aware that the baking time may need to be adjusted.
Q: Can I make these ahead of time?
A: Absolutely! These bars are perfect for making ahead of time. They can be stored at room temperature for a few days or in the refrigerator for up to a week.
Q: What if my marshmallows burn?
A: Watch the marshmallows very carefully while they’re in the oven. If they start to brown too quickly, remove them immediately.
Q: My crispie mixture is too thick. What should I do?
A: Add a tablespoon of milk (dairy or non-dairy) to the melted chocolate mixture to thin it out.
Q: The top layer is sliding off when I cut the bars. How can I prevent this?
A: Make sure the bars are completely cool before cutting them. You can also refrigerate them for a few hours to help the top layer set. Using a warm knife can also help.
Final Thoughts
These Ultimate Rich Peanut Butter Marshmallow Crispie Brownie Bars are a symphony of textures and flavors that will leave you and anyone you share them with utterly delighted. The fudgy brownies, gooey marshmallows, and crunchy crispie topping create an irresistible combination. Don’t be surprised if these bars become a new family favorite. So, preheat your oven, gather your ingredients, and prepare to embark on a baking adventure that will tantalize your taste buds and bring a smile to your face. And please, share your creations – and any clever variations you invent – with me. Happy baking!