
Ultimate Tri-Tip Roast: A Flavorful Barbecue Experience
The scent of sizzling meat, the crackle of charcoal, and the laughter of friends – these are the elements that define summer in my memory. As a young boy, my grandfather, a true barbecue aficionado, would prepare tri-tip roasts that were legendary in our family. The perfectly seared crust, the tender, juicy interior, and that unmistakable smoky flavor—it was pure culinary magic. This recipe captures the essence of those cherished memories, bringing the flavors of summer to your table.
Recipe Overview
- Prep Time: 15 minutes
- Cook Time: 30-35 minutes
- Total Time: 45-50 minutes (plus marinating time)
- Servings: 4-6
- Dietary Type: Gluten-Free, Dairy-Free
Ingredients
- 6 garlic cloves, chopped
- 1/4 cup oil (vegetable or olive oil work well)
- 4 teaspoons salt
- 1/2 teaspoon whole black peppercorns
- 2 – 2 1/2 lbs tri-tip roast, with thin fat layer
Equipment Needed
- Blender
- Sealable plastic bag
- Grill
- Chimney starter for charcoal
- Bowl
- Inverted plate
- Sharp knife
- Meat thermometer
- Platter
Instructions
-
Prepare the Garlic Paste: In a blender, combine the chopped garlic, oil, salt, and black peppercorns. Grind the mixture until it forms a coarse paste. This aromatic paste is the key to infusing the tri-tip with incredible flavor. Don’t over-blend; a little texture is desirable.
-
Prepare the Tri-Tip: Pat the tri-tip roast dry with a paper towel. This step is crucial for achieving a good sear. Using a sharp knife, score the fat layer in a crosshatch pattern. Be careful to cut through the fat, but avoid cutting into the meat itself. This scoring helps render the fat and allows the garlic paste to penetrate the meat.
-
Marinate the Tri-Tip: Place the tri-tip in a sealable plastic bag. Scrape the garlic paste into the bag, press out as much air as possible, and seal tightly. Massage the meat with the paste, ensuring it is evenly coated on all sides. Set aside at room temperature for at least 1 hour. This allows the flavors to meld and the meat to tenderize slightly. If you plan to marinate for more than 2 hours, refrigerate the meat, but remember to remove it from the refrigerator 1 hour before cooking to allow it to come back to room temperature for more even cooking.
-
Prepare the Grill: About 1 hour before serving, start a fire on the grill using 1 chimney full of charcoal briquettes (approximately 50). While the charcoal is heating, place about one-fourth pound of oak or hickory chips in a bowl and cover them completely with water. Place an inverted plate on top of the chips to keep them submerged. Soaking the wood chips prevents them from burning too quickly and creates flavorful smoke.
-
Create the Cooking Zones: When the flames have subsided and the coals are covered with white ash (this indicates they are ready for cooking), carefully dump the chimney of hot coals into a mound on one side of the grill. Drain the soaked wood chips and scatter them evenly across the top of the hot coals. This creates two distinct cooking zones: a hot zone directly over the coals for searing and a cooler zone for slower cooking.
-
Sear the Fat Side: Place the tri-tip on the grill, fat side down, directly over the hot coals. Leave the grill lid off for this step. Sear the fat side for 3 to 4 minutes, until it develops a rich, golden-brown crust. Don’t be afraid of a little char; it adds incredible flavor.
-
Sear the Lean Side: Turn the tri-tip and sear the lean side directly over the coals for another 3 to 4 minutes, again aiming for a flavorful crust. Watch closely to prevent burning.
-
Cook to Desired Doneness: Once both sides are seared, move the tri-tip to the cool side of the grill, away from the direct heat. Replace the grill lid, making sure the vents are open to allow for proper airflow. Cook the tri-tip to your desired level of doneness, checking the internal temperature of the meat every 4 to 5 minutes using a meat thermometer.
- For rare to medium-rare (125°F): approximately 20 to 25 minutes.
- For medium (135°F): approximately 25 to 30 minutes.
Cooking times may vary depending on your grill and the temperature of the fire, so rely on the meat thermometer for accuracy.
-
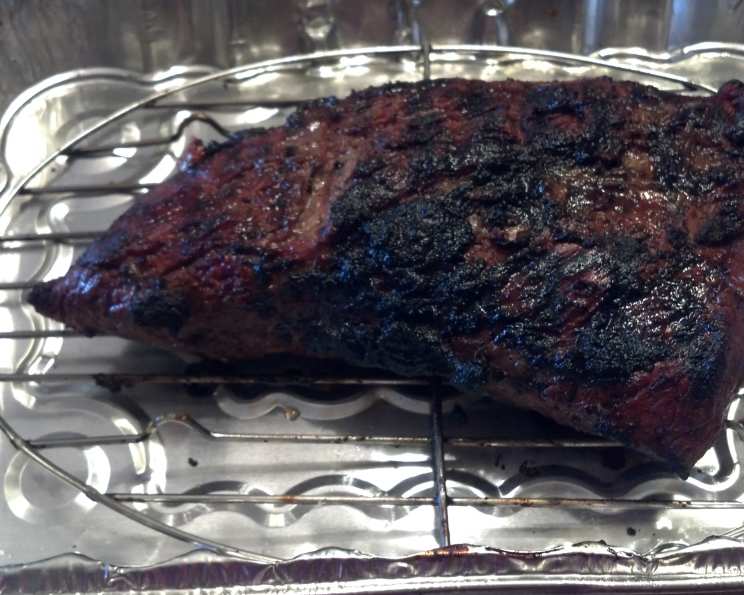
Rest the Meat: Once the tri-tip reaches your desired internal temperature, remove it from the grill and place it on a platter. Tent it loosely with foil and let it rest for 10 minutes before carving. This resting period allows the juices to redistribute throughout the meat, resulting in a more tender and flavorful roast.
-
Carve and Serve: After resting, carve the tri-tip fairly thinly (no more than one-fourth-inch thick), against the grain, and with the knife held at an angle to create wide slices. Spoon any accumulated carving juices over the sliced meat.
Expert Tips & Tricks
- Don’t skip the marinating step: The garlic paste not only flavors the tri-tip but also helps to tenderize it.
- Use a meat thermometer: This is the most accurate way to ensure the tri-tip is cooked to your desired level of doneness.
- Control the heat: Keep a close eye on the grill temperature and adjust the vents as needed to maintain a consistent cooking environment.
- Resting is key: Allowing the tri-tip to rest before carving is crucial for optimal juiciness.
Serving & Storage Suggestions
Serve the sliced tri-tip immediately after carving. It pairs beautifully with a variety of sides, such as a tossed green salad, grilled vegetables, roasted potatoes, or garlic bread.
Leftover tri-tip can be stored in an airtight container in the refrigerator for up to 3-4 days. Reheat gently in a skillet or microwave, or enjoy it cold in sandwiches or salads. It’s best consumed within the recommended timeframe for optimal flavor and food safety. Freezing is not recommended as the meat’s texture may change upon thawing.
Nutritional Information
| Nutrient | Amount per Serving | % Daily Value |
|---|---|---|
| Calories | 350 kcal (estimated) | N/A |
| Total Fat | 25g (estimated) | N/A |
| Saturated Fat | 10g (estimated) | N/A |
| Cholesterol | 100mg (estimated) | N/A |
| Sodium | 1500mg (estimated) | N/A |
| Protein | 30g (estimated) | N/A |
| Carbohydrates | 2g (estimated) | N/A |
| Fiber | 0g | N/A |
| Sugar | 1g (estimated) | N/A |
| Please note these values are estimations based on average ingredients and cooking methods. Actual nutritional content may vary. |
Variations & Substitutions
- Spice it up: Add a pinch of red pepper flakes to the garlic paste for a touch of heat.
- Herb it up: Incorporate fresh herbs like rosemary or thyme into the garlic paste for added flavor complexity.
- Vinegar tang: A tablespoon of balsamic vinegar or red wine vinegar to the marinade can add depth.
- Different wood chips: Experiment with different types of wood chips, such as applewood or mesquite, to create unique smoky flavors.
FAQs (Frequently Asked Questions)
Q: What is tri-tip, and where does it come from?
A: Tri-tip is a triangular cut of beef from the bottom sirloin. It’s known for its rich flavor and tender texture.
Q: How do I know when the tri-tip is done?
A: The best way to determine doneness is to use a meat thermometer. Insert it into the thickest part of the roast, avoiding bone, and cook to your desired internal temperature.
Q: Can I cook this in the oven if I don’t have a grill?
A: Yes, you can sear the tri-tip in a hot skillet on the stovetop and then finish it in a 350°F (175°C) oven until it reaches your desired internal temperature.
Q: Why is it important to cut against the grain?
A: Cutting against the grain shortens the muscle fibers, making the meat more tender and easier to chew.
Q: What if I don’t have oak or hickory chips?
A: You can use other types of wood chips or even skip them altogether, although the smoky flavor will be diminished.
Final Thoughts
This Ultimate Tri-Tip Roast recipe is more than just a set of instructions; it’s an invitation to create lasting memories with friends and family. The combination of smoky flavors, tender meat, and simple preparation makes it a guaranteed crowd-pleaser. So fire up your grill, gather your loved ones, and embark on this delicious culinary adventure. Don’t hesitate to experiment with variations and share your feedback – happy grilling! Pair this magnificent roast with a robust Cabernet Sauvignon for a truly unforgettable dining experience.