
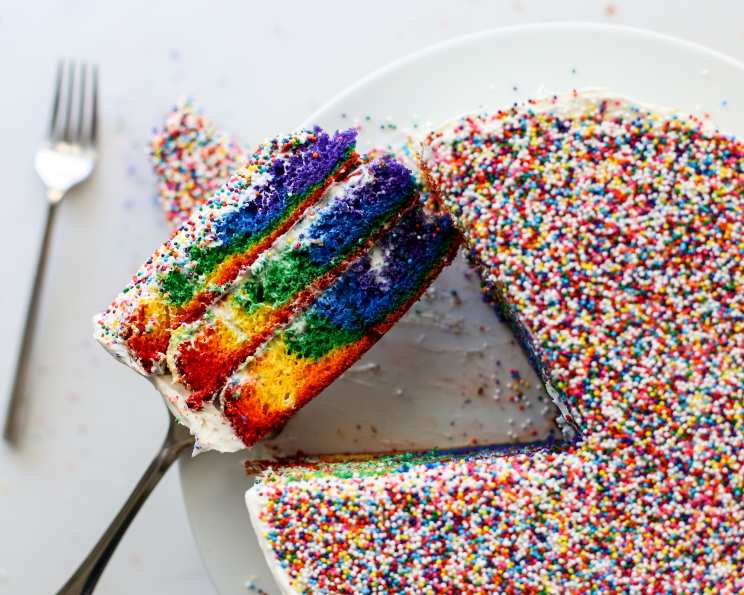
Vibrant Rainbow Cake: A Slice of Happiness
Baking, for me, has always been about more than just following a recipe; it’s about creating moments. I remember one particularly gloomy afternoon when my niece, Lily, was feeling under the weather. Nothing seemed to cheer her up. Then, on a whim, I decided to bake a rainbow cake. As we layered the vibrant colors and watched her eyes light up with each new hue, the gray skies outside seemed to fade away. That cake wasn’t just dessert; it was a burst of joy, a reminder that even the simplest things can bring immense happiness. This recipe captures that spirit perfectly – it’s a cake designed to spark smiles.
Recipe Overview
- Prep Time: 30 minutes
- Cook Time: 30-35 minutes
- Total Time: 1 hour
- Servings: 12-16
- Yield: 1 two-layer cake
- Dietary Type: Varies based on cake mix and frosting used.
Ingredients
- 1 (18 ounce) box white cake mix (I used Duncan Hines Classic Moist White)
- Eggs (as stated on cake mix box instructions)
- Water (as stated on cake mix box instructions)
- Oil (as stated on cake mix box instructions)
- Frosting (I used one tub of Funfetti Vanilla Frosting)
- Gel food coloring (regular and neon colors)
- Rainbow candy sprinkles (or whatever other decorations you like!)
Equipment Needed
- Two 9-inch round cake pans
- Mixing bowls (at least 6)
- Electric mixer
- Measuring cups and spoons
- Rubber spatula
- Wire cooling rack
Instructions
-
Preheat your oven to the temperature indicated on your cake mix box. Typically, this will be around 350°F (175°C). Grease two 9-inch round cake pans thoroughly with shortening, then lightly flour each pan. This prevents the cake from sticking and ensures easy removal.
-
Prepare the cake batter according to the instructions on the white cake mix box, using the specified amounts of eggs, water, and oil.
-
Divide the cake batter evenly into six separate mixing bowls. If you’re aiming for a precise rainbow gradient, it’s helpful to put slightly more batter in the first bowl (for the red layer) and gradually reduce the amount of batter in each subsequent bowl, with the smallest amount in the final bowl (for the violet layer). This ensures that the colors are evenly distributed when baked.
-
Add gel food coloring to each bowl, mixing until you achieve the desired color intensity. Remember, gel food coloring is crucial for achieving vibrant colors without affecting the batter’s consistency. Use a small amount for pastel shades and more for bold, saturated hues. Ensure you carefully match the correct color to the appropriate batter bowl if you pre-portioned the batter amounts. The classic rainbow order is red, orange, yellow, green, blue, and violet.
-
Begin assembling the cake in the prepared pans. Take the first color (red, if you’re following the rainbow pattern) and carefully spoon half of the colored batter into the very center of each cake pan. Gently tilt the pan to encourage the batter to spread outwards, but don’t worry if it doesn’t reach the edges completely – it will as you add the other colors.
-
Repeat the process with the remaining colors, pouring each subsequent color directly into the center of the previous one in each pan. Tilt the pans slightly after each addition to encourage the batter to spread, but avoid stirring or swirling, as this will muddy the colors. By the time you’ve added all six colors, the outermost color (red) should have reached the edges of the pan.
-
Bake the cakes according to the time indicated on the cake mix box. Typically, this will be around 30-35 minutes. To check for doneness, insert a toothpick into the center of each cake. If it comes out clean or with just a few moist crumbs, the cakes are ready.
-
Remove the cakes from the oven and let them cool in the pans for a few minutes before inverting them onto a wire rack to cool completely. After a few minutes, I like to carefully flip them right side up so the bottoms are on the rack; this helps prevent the tops from sticking to the wire as they cool.
-
Once the cakes are completely cool, use a serrated knife to shave a thin layer off the top of one cake to create a flat surface. This will prevent the stacked cake from tipping.
-
Frost the cake. I used Funfetti Vanilla Frosting for mine. You can also add a filling between the layers, but I didn’t for mine.
-
Decorate the cake with rainbow sprinkles or any other decorations you like.
Expert Tips & Tricks
- Level Layers: Use a long serrated knife to trim the tops of the cooled cakes to ensure they are level before frosting. A perfectly flat surface makes for easier stacking and a more professional-looking cake.
- Chill Time: For easier frosting, chill the cake layers in the refrigerator for about 30 minutes before frosting. This will firm up the layers and prevent them from crumbling as you work.
- Homemade Frosting: While store-bought frosting is convenient, consider making your own buttercream frosting for a richer, more flavorful cake. A simple recipe of butter, powdered sugar, vanilla extract, and a splash of milk can elevate the entire dessert.
- Coloring Consistency: Ensure that each colored batter is the same consistency. If one color seems thicker than the others, add a tiny amount of milk or water to even it out.
- Prevent Sticking: For foolproof cake release, line the bottoms of the cake pans with parchment paper rounds in addition to greasing and flouring.
- Even Baking: To ensure even baking, rotate the cake pans halfway through the baking time.
Serving & Storage Suggestions
Serve the Vibrant Rainbow Cake chilled or at room temperature. It’s best served within 2-3 days for optimal freshness. Store leftover cake in an airtight container at room temperature for up to 2 days, or in the refrigerator for up to 5 days. For longer storage, wrap individual slices tightly in plastic wrap and freeze for up to 2 months. Thaw frozen cake in the refrigerator overnight before serving.
Nutritional Information
Note: Nutritional information is an estimate and will vary based on specific ingredients and serving size.
| Nutrient | Amount per Serving | % Daily Value |
|---|---|---|
| Calories | 350 kcal | 18% |
| Total Fat | 15g | 23% |
| Saturated Fat | 8g | 40% |
| Cholesterol | 30mg | 10% |
| Sodium | 250mg | 10% |
| Total Carbohydrate | 50g | 17% |
| Dietary Fiber | 1g | 4% |
| Sugars | 30g | – |
| Protein | 3g | 6% |
Variations & Substitutions
- Gluten-Free Rainbow Cake: Use a gluten-free white cake mix instead of a regular one. Be sure to check that your frosting and sprinkles are also gluten-free.
- Dairy-Free Rainbow Cake: Use a dairy-free white cake mix and a dairy-free frosting alternative, such as a coconut-based frosting. You can also substitute plant-based milk for any milk called for in the cake mix instructions.
- Different Color Themes: Instead of a rainbow, use different color combinations to match a specific holiday or event. For example, red and green for Christmas, or red, white, and blue for the 4th of July.
- Ombre Cake: Create an ombre effect by using different shades of a single color, gradually getting lighter or darker as you move from the bottom layer to the top.
- Cupcakes: Pour the batter into cupcake liners instead of cake pans for individual rainbow cupcakes.
FAQs (Frequently Asked Questions)
Q: Can I use liquid food coloring instead of gel food coloring?
A: While you can use liquid food coloring, gel food coloring is highly recommended because it is more concentrated and will give you more vibrant colors without altering the consistency of the batter.
Q: Can I make this cake ahead of time?
A: Yes, you can bake the cake layers a day or two in advance. Wrap them tightly in plastic wrap and store them at room temperature or in the refrigerator. Frost the cake just before serving.
Q: How do I prevent the cake layers from sticking to the pan?
A: Grease and flour the cake pans thoroughly before pouring in the batter. For extra insurance, you can also line the bottoms of the pans with parchment paper rounds.
Q: What kind of frosting is best for a rainbow cake?
A: Vanilla frosting is a classic choice, as it allows the vibrant colors of the cake to shine. However, you can use any frosting you like, such as chocolate, cream cheese, or even a flavored buttercream.
Q: Can I freeze this cake?
A: Yes, you can freeze the cake for up to 2 months. Wrap individual slices tightly in plastic wrap and store them in an airtight container. Thaw frozen cake in the refrigerator overnight before serving.
Final Thoughts
Creating this Vibrant Rainbow Cake is about more than just baking; it’s about crafting a centerpiece of joy and celebration. Whether it’s for a child’s birthday, a festive gathering, or simply a way to brighten a gloomy day, this cake is guaranteed to bring smiles. So, gather your ingredients, preheat your oven, and let your creativity flow. Don’t be afraid to experiment with different colors, frostings, and decorations to make this cake your own. And most importantly, have fun! I encourage you to try this recipe and share your creations with friends and family. Pair it with a scoop of vanilla ice cream or a glass of cold milk for the ultimate treat! Enjoy!