
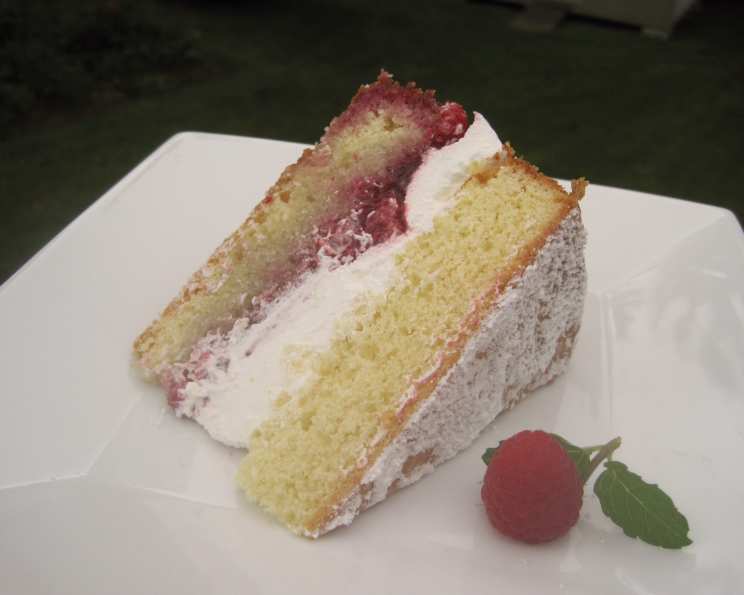
Victoria Sponge: A Timeless Classic
The aroma of a Victoria Sponge baking in the oven instantly transports me back to my grandmother’s kitchen. She’d always have one ready for afternoon tea, the delicate crumb yielding to a dollop of homemade raspberry jam and freshly whipped cream. The simple elegance of that cake, the pure joy it brought, is something I’ve tried to recreate ever since, a small piece of her warmth in every bite.
Recipe Overview
- Prep Time: 20 minutes
- Cook Time: 25 minutes
- Total Time: 45 minutes
- Servings: 6-8
- Yields: 1 cake
- Dietary Type: Vegetarian
Ingredients
- 1 cup unsalted butter, very soft
- ¾ cup sugar
- 1 teaspoon vanilla extract
- 4 large eggs
- 1 ⅓ cups self-rising cake flour
- 2 tablespoons cornstarch
- 1 teaspoon baking powder (only if using the food processor method)
- 4 tablespoons milk
- Jam, for filling (raspberry or strawberry are traditional)
- Fresh fruit, such as raspberries or strawberries, for filling
- Whipped cream, for filling
- 1 tablespoon sugar, for dusting
Equipment Needed
- Two 8-inch round cake pans
- Parchment or wax paper
- Mixer (stand or hand-held) or Food Processor
- Wire rack
- Cake tester or toothpick
Instructions
-
Preheat your oven to 350°F (175°C). Ensuring your oven is properly preheated is crucial for even baking and a light, airy texture.
-
Cream together 1 cup of very soft unsalted butter and ¾ cup of sugar until light and fluffy. This step is vital for incorporating air into the batter, leading to a tender crumb. Beat for at least 5 minutes to achieve the desired consistency.
-
Add 1 teaspoon of vanilla extract to the butter and sugar mixture, mixing until well combined. The vanilla enhances the overall flavor profile of the cake.
-
Add 4 large eggs one at a time, incorporating each egg fully before adding the next. Add a spoonful of the self-rising cake flour between each egg to prevent the batter from curdling. This helps maintain a smooth and stable emulsion.
-
Fold in the remaining 1 ⅓ cups of self-rising cake flour and 2 tablespoons of cornstarch into the batter. Be careful not to overmix, as this can develop the gluten in the flour and result in a tough cake. Gently fold until just combined.
-
Add 4 tablespoons of milk, gradually, until the batter reaches a soft, dropping consistency. The batter should be easily pourable but not too runny.
-
Alternative Method (Food Processor): If using a food processor, combine all ingredients (except the milk and baking powder) in the bowl and process until smooth. Then, slowly add the milk while pulsing until you achieve the desired soft, dropping consistency. Add 1 teaspoon of baking powder to the processor if using this method.
-
Prepare your two 8-inch round cake pans by buttering them thoroughly and lining the bottoms with parchment or wax paper. This ensures the cakes release easily after baking.
-
Pour and scrape the batter evenly into the prepared cake pans. Distribute the batter equally between the two pans to ensure even baking and cakes of similar height.
-
Bake for approximately 25 minutes, or until the cakes are beginning to come away from the edges of the pans, are springy to the touch on top, and a cake tester inserted into the center comes out clean. Be careful not to overbake, as this can result in a dry cake.
-
Leave the cakes in their pans on a wire rack for 10 minutes before turning them out onto the rack to cool completely. This allows the cakes to firm up slightly, making them easier to handle. Ensure the cakes are completely cooled before adding the filling.
-
Once the cakes are completely cool, place one layer on a serving plate, right-side up.
-
Spread the top of the first layer generously with your favorite jam (raspberry or strawberry are classic choices) and scatter fresh fruit (such as raspberries or strawberries) on top of the jam.
-
Spread a layer of freshly whipped cream on top of the fruit. The cream should be lightly sweetened and softly whipped, not stiff peaks.
-
Carefully place the second cake layer on top of the cream filling.
-
Sprinkle the top of the cake with 1 tablespoon of sugar for a delicate, elegant finish.
Expert Tips & Tricks
- For an extra light and airy sponge, sift the flour before adding it to the batter.
- Ensure all ingredients are at room temperature for optimal emulsification. This helps create a smooth and stable batter.
- Don’t overmix the batter once the flour is added. Overmixing develops gluten, which can lead to a tough cake.
- If your oven tends to bake unevenly, rotate the cake pans halfway through the baking time.
- For a more intense vanilla flavor, use vanilla bean paste instead of extract.
- If you are in a high altitude area, you may need to adjust the amount of flour or liquid in the recipe to compensate for the thinner air. Start by reducing the sugar by 1-2 tablespoons or add 1-2 tablespoons of flour.
Serving & Storage Suggestions
Serve the Victoria Sponge immediately or within a few hours of assembling. The cake is best enjoyed fresh. Store any leftover cake in an airtight container at room temperature for up to 2 days, or in the refrigerator for up to 3 days. Be aware that the cream filling may soften the cake over time. You can also freeze the cake layers separately before filling. Wrap them tightly in plastic wrap and then foil. Thaw completely before assembling.
Nutritional Information
| Nutrient | Amount per Serving | % Daily Value |
|---|---|---|
| Calories | 533 kcal | N/A |
| Total Fat | 34.5 g | 53% |
| Saturated Fat | 20.8 g | 103% |
| Cholesterol | 206.8 mg | 68% |
| Sodium | 470.2 mg | 19% |
| Total Carbohydrate | 49 g | 16% |
| Dietary Fiber | 0.8 g | 3% |
| Sugars | 25.2 g | N/A |
| Protein | 7.6 g | 15% |
Note: Nutritional information is an estimate and may vary based on specific ingredients and portion sizes.
Variations & Substitutions
- Lemon Victoria Sponge: Add the zest of one lemon to the batter for a citrusy twist.
- Chocolate Victoria Sponge: Replace 2 tablespoons of flour with 2 tablespoons of cocoa powder.
- Gluten-Free Victoria Sponge: Use a gluten-free cake flour blend. You may need to experiment to find a blend that works well for you.
- Different Jam Fillings: Experiment with different flavors of jam, such as blackcurrant, apricot, or even lemon curd.
- Berries: Consider using blueberries, blackberries, or mixed berries for the filling.
- Rosewater: Add a teaspoon of rosewater to the whipped cream for a floral aroma.
FAQs (Frequently Asked Questions)
Q: Can I make the cake layers ahead of time?
A: Yes, you can bake the cake layers a day or two in advance. Wrap them tightly in plastic wrap and store them at room temperature.
Q: Can I use margarine instead of butter?
A: While margarine can be used, butter provides a richer flavor and a more tender crumb.
Q: How do I prevent the cake from sticking to the pan?
A: Make sure to grease the pans thoroughly and line the bottoms with parchment paper.
Q: My cake is sinking in the middle. What happened?
A: This can be caused by several factors, including overmixing the batter, opening the oven door too early, or underbaking the cake.
Q: Can I freeze the filled Victoria Sponge?
A: Freezing a filled Victoria Sponge is not recommended, as the cream can become icy and the cake may become soggy. However, you can freeze the cake layers separately before filling.
Final Thoughts
The Victoria Sponge is more than just a cake; it’s a symbol of warmth, comfort, and shared moments. With its simple elegance and delicious flavors, it’s a recipe that deserves a place in every baker’s repertoire. I encourage you to try this recipe, put your own personal touch on it, and share the joy with your loved ones. Perhaps a cup of Earl Grey tea or a glass of sparkling wine would complement this cake perfectly. Happy baking!