
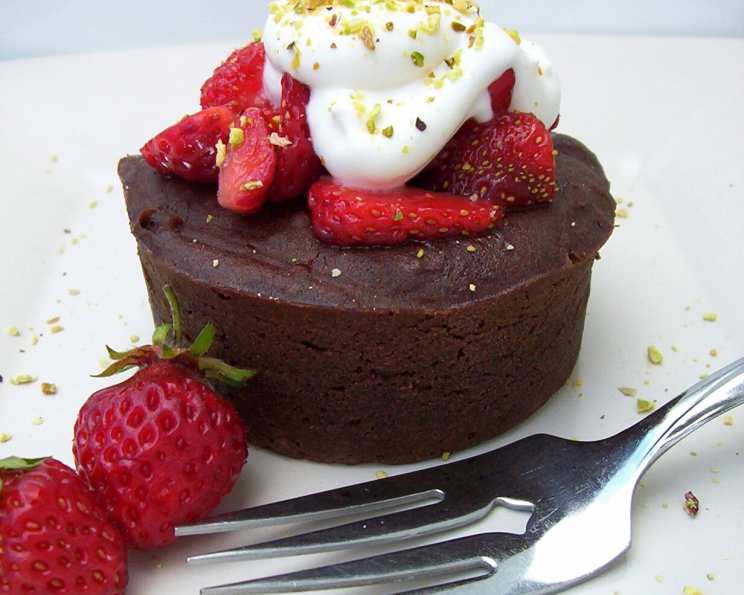
Volcanic Chocolate Truffle Cakes: An Unexpected Delight
I remember the first time I tasted something truly surprising in a dessert. It was at a small, unassuming cafe in the heart of San Francisco. The waiter placed a dark, almost obsidian-looking cake in front of me. One bite, and I was floored – the rich chocolate was undeniable, but there was also a depth, a hidden layer of earthiness that I couldn’t quite place. It was intriguing, delicious, and utterly unforgettable. This recipe for Volcanic Chocolate Truffle Cakes evokes that same sense of delightful surprise. You may look at the ingredient list and raise an eyebrow, but trust me, the result is pure chocolate magic!
Recipe Overview
- Prep Time: 20 minutes
- Cook Time: 45-60 minutes
- Total Time: 4 hours 45 minutes – 5 hours 20 minutes (includes chilling time)
- Servings: 6
- Yield: 6 ramekins
- Dietary Type: Gluten-Free (can be easily modified to be dairy-free, see variations)
Ingredients
- 6 ounces bittersweet chocolate
- 2 tablespoons butter
- 2 cups cooked chickpeas, drained and reserved (canned are fine, just rinse well!)
- 1 large egg
- 1/4 cup milk
- 1/4 cup plain yogurt
- 1/3 cup orange juice, freshly squeezed
- 1 cup light brown sugar
- 1/2 teaspoon baking powder
- 1/4 cup flour (all-purpose or gluten-free blend)
- 1/4 cup pistachios, shelled and chopped nicely
- 10 strawberries
- Confectioners’ sugar, to taste
- 1/2 cup whipping cream
- 1 teaspoon sugar
- 1/4 teaspoon vanilla extract
- 1/8 cup finely ground pistachios
Equipment Needed
- 6 individual ramekins
- Baking dish (large enough to hold the ramekins)
- Food processor or blender
- Mixing bowl
- Sifter
- Whisk
- Electric mixer or whisk (for whipping cream)
Instructions
- Preheat your oven to 375°F (190°C). Ensure your oven rack is positioned in the center.
- Lightly butter the insides of 6 individual ramekins. This will help prevent the cakes from sticking and allow for easy removal.
- In a heat-safe bowl set over a simmering pot of water (or in the microwave in 30-second intervals), melt the bittersweet chocolate with the butter. Stir frequently until smooth and completely melted. Remove from heat and set aside to cool slightly. It’s crucial to let it cool so it doesn’t cook the egg in the next step.
- In a food processor or blender, combine the cooked chickpeas, egg, milk, yogurt, orange juice, brown sugar, and baking powder. Process until completely smooth. This step is vital to achieving the right texture, so don’t rush it!
- Once the melted chocolate mixture has cooled a bit (it should still be liquid but not hot), add it to the chickpea mixture in the food processor. Process again until everything is thoroughly combined and the mixture is a uniform color and consistency.
- In a separate bowl, sift together the flour and baking powder. Sifting ensures there are no lumps in your final product.
- Add the flour mixture to the food processor with the chocolate-chickpea mixture. Process until just combined. Be careful not to over-mix, as this can lead to a tough cake.
- Transfer the mixture to a large, clean bowl (preferably glass). Gently fold in the chopped pistachios. Folding ensures the pistachios are evenly distributed without deflating the batter.
- Pour the batter evenly into your prepared ramekins. Fill each ramekin almost to the top, leaving a little room for expansion during baking.
- Place the filled ramekins into a baking dish. Carefully pour boiling water into the baking dish until it reaches halfway up the sides of the ramekins. This creates a water bath, which helps the cakes bake evenly and prevents them from drying out.
- Bake in your preheated oven for approximately 45 minutes to 1 hour, or until the cakes are set around the edges but still slightly soft in the center. The baking time can vary depending on your oven. A toothpick inserted into the center should come out with moist crumbs attached.
- NOTE: These cakes will rise dramatically during baking and may even look like exploding volcanoes! This is perfectly normal and part of their charm. They will deflate as they cool.
- Remove the baking dish from the oven and carefully remove the ramekins from the water bath. Allow the cakes to cool completely at room temperature.
- Once cooled, cover the ramekins with plastic wrap and refrigerate for at least 4 hours, or preferably overnight. This chilling period is essential for the cakes to set properly.
- After chilling, prepare the strawberry topping. Remove the tops from the strawberries, clean them, and cut them into thin “sticks” or matchsticks.
- Gently toss the damp strawberry sticks with the desired amount of confectioners’ sugar. The sugar will help to draw out some of the moisture from the strawberries and create a slightly candied effect. Set aside.
- In a chilled bowl, whip the whipping cream with the sugar and vanilla extract until stiff peaks form. Be careful not to over-whip the cream, as it can turn into butter.
- To assemble, remove the ramekins from the refrigerator. Arrange the sugared strawberry sticks in a fancy pattern on top of each cake, dividing them evenly.
- Top each cake with a dollop of freshly whipped cream and sprinkle with finely ground pistachios.
- Serve immediately and enjoy!
Expert Tips & Tricks
- For an even richer chocolate flavor, use high-quality bittersweet chocolate with a cocoa percentage of 70% or higher.
- If you don’t have ramekins, you can use muffin tins, but the baking time may need to be adjusted. Check for doneness a few minutes earlier.
- To prevent the tops from cracking excessively, try lowering the oven temperature by 25°F (15°C) and extending the baking time slightly.
- If you find that the cakes are sticking to the ramekins, you can run a thin knife around the edges to loosen them before inverting.
- Make the whipped cream ahead of time and store it in the refrigerator. Just re-whip it briefly before serving if it has lost some of its volume.
Serving & Storage Suggestions
These Volcanic Chocolate Truffle Cakes are best served chilled. The combination of the rich, dense cake, the tart strawberries, and the light whipped cream creates a perfect balance of flavors and textures.
Leftovers can be stored in the refrigerator for up to 3 days. The cakes may become slightly denser over time, but they will still be delicious. It is best to store them without the strawberry and whipped cream topping, and add those just before serving.
Freezing is not recommended, as the texture of the cake may change upon thawing.
Nutritional Information
| Nutrient | Amount per Serving | % Daily Value |
|---|---|---|
| Calories | 438.6 kcal | N/A |
| Total Fat | 17.2 g | 26% |
| Saturated Fat | 8.2 g | 41% |
| Cholesterol | 75.3 mg | 25% |
| Sodium | 340.4 mg | 14% |
| Total Carbohydrate | 65.3 g | 21% |
| Dietary Fiber | 4.9 g | 19% |
| Sugars | 39.2 g | N/A |
| Protein | 8.5 g | 17% |
Note: Nutritional information is an estimate and may vary based on specific ingredients and portion sizes.
Variations & Substitutions
- Dairy-Free: Substitute the butter with a dairy-free butter alternative, the milk with almond milk or oat milk, and the yogurt with a dairy-free yogurt alternative (like coconut yogurt). Use a dairy-free whipped cream or coconut whipped cream for topping.
- Gluten-Free: Ensure you use a gluten-free all-purpose flour blend.
- Chocolate Intensity: Adjust the type of chocolate used to your preference. Milk chocolate will result in a sweeter, milder flavor, while using a higher percentage of cacao will provide a more intense, bitter chocolate experience.
- Seasonal Fruit: Substitute the strawberries with other seasonal fruits, such as raspberries, blueberries, or blackberries. You can also use a fruit compote or jam.
- Nutty Twist: Replace the pistachios with other nuts, such as chopped walnuts, pecans, or almonds.
FAQs (Frequently Asked Questions)
Q: Can I taste the chickpeas?
A: Surprisingly, no! The chickpeas blend seamlessly into the batter and provide a fudgy texture, without any distinct chickpea flavor.
Q: Why is a water bath necessary?
A: The water bath ensures even baking and prevents the cakes from drying out, resulting in a moist and tender crumb.
Q: Can I make this recipe in advance?
A: Absolutely! The cakes can be made up to 2 days in advance and stored in the refrigerator. Just add the toppings before serving.
Q: Can I use canned chickpeas?
A: Yes, canned chickpeas work perfectly well. Just be sure to drain and rinse them thoroughly before using.
Q: What if I don’t have orange juice?
A: While fresh orange juice adds a unique flavor, you can substitute it with apple juice or even a tablespoon of orange zest and a tablespoon of water.
Final Thoughts
Don’t let the unexpected ingredient list deter you – these Volcanic Chocolate Truffle Cakes are a revelation. They’re rich, decadent, and surprisingly healthy. The combination of textures and flavors is simply irresistible. So, gather your ingredients, preheat your oven, and prepare to be amazed! I encourage you to try this recipe and share your feedback. Pair these delightful cakes with a strong cup of coffee or a glass of dessert wine for the ultimate indulgence. Enjoy!