
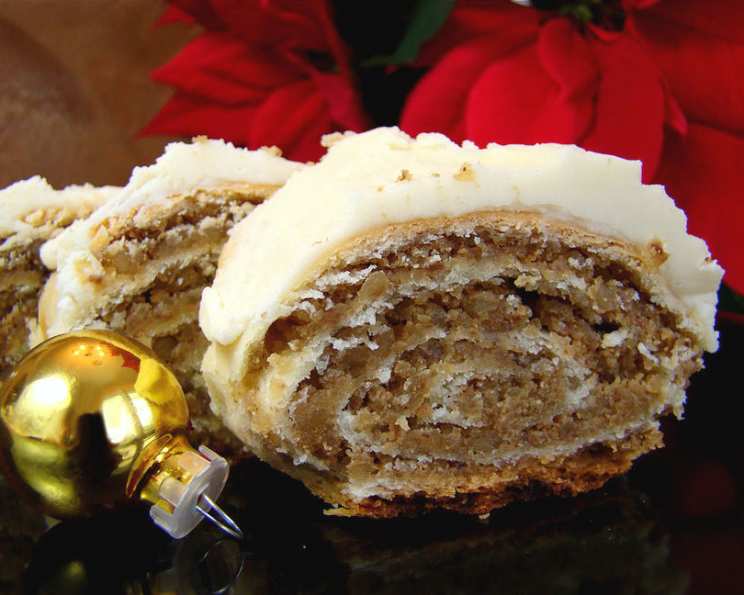
The Irresistible Charm of Walnut Nut Rolls: A Family Tradition
My grandmother’s kitchen always held the promise of something magical during the holidays, but nothing could quite compare to the moment she’d pull out a batch of her walnut nut rolls. The aroma of toasted nuts and warm dough would fill every corner of the house, a comforting scent that instantly transported me back to childhood. I remember sneaking slices while they were still warm, the sweet, nutty filling practically melting in my mouth. To this day, that first bite of a perfectly made nut roll is pure, unadulterated bliss.
Recipe Overview
- Prep Time: 45 minutes
- Cook Time: 30 minutes
- Total Time: 1 hour 15 minutes
- Yields: 3-4 12 inch rolls
- Dietary Type: Vegetarian
Ingredients
Dough:
- 2 tablespoons sugar
- 2 (1/4 ounce) packets yeast (approximately 4 1/2 to 5 tsp.)
- 7/8 cup lukewarm milk
- 4 cups flour
- 1 cup butter, softened
- 1 teaspoon salt
- 2 eggs, separated
Filling:
- 1/2 cup butter
- 1 1/2 lbs ground nutmeats (we use walnuts, approximately 6 cups)
- 1 cup sugar
- 3/4 cup milk
- 1 teaspoon vanilla
Icing (Optional):
- 1/3 cup butter
- 3 1/2 – 4 cups confectioners’ sugar
- 1 egg yolk
- 3 tablespoons milk
- 1 1/2 teaspoons vanilla
Equipment Needed
- Large mixing bowls
- Saucepan
- Measuring cups and spoons
- Rolling pin
- Baking sheets
- Pastry brush (optional)
- Electric mixer (for icing, optional)
Instructions
-
Prepare the Dough: In a large mixing bowl, dissolve the yeast and sugar in the lukewarm milk. Let it stand for 5-10 minutes until foamy, indicating the yeast is active. This step is crucial for a light and airy dough.
-
Combine Wet and Dry Ingredients: Add the softened butter, salt, and egg yolks to the yeast mixture. Stir well to combine.
-
Incorporate the Flour: Gradually add 2 cups of the flour to the wet ingredients and mix until well combined. Then, add the remaining flour and continue mixing until a dough forms.
-
Knead the Dough: Turn the dough out onto a lightly floured surface and knead for 5 minutes until it becomes smooth and elastic. This develops the gluten, giving the rolls their structure.
-
Divide and Rest: Divide the dough into 3-4 equal parts. Cover each portion with a clean kitchen towel and let them rise while you prepare the filling. This allows the gluten to relax, making the dough easier to roll out.
-
Make the Filling: In a saucepan over medium heat, combine the butter, ground nutmeats, sugar, and milk. Heat until the butter is melted and the sugar is completely dissolved, stirring constantly to prevent scorching.
-
Flavor the Filling: Remove the filling from the heat and stir in the vanilla. Let the filling cool completely before using. This prevents it from melting the butter in the dough.
-
Roll Out the Dough: Preheat your oven to 350°F (175°C). On a lightly floured surface, roll out each portion of dough to approximately 1/8 inch thickness in a rectangular shape.
-
Add the Filling: Spread an equal amount of the cooled filling evenly over each portion of the rolled-out dough.
-
Roll and Shape: Carefully roll up each filled dough rectangle jelly-roll fashion, starting from one of the long sides. Make sure the roll is tight to prevent air pockets.
-
Let Rise Again: Place the rolled logs onto baking sheets lined with parchment paper. Let them rise for 15-20 minutes. This final rise gives the rolls a light and fluffy texture.
-
Egg Wash (Optional): Traditionally, the rolls are brushed with egg whites before baking. However, I’ve found that skipping this step results in a slightly softer crust, which some people prefer. If you choose to use an egg wash, whisk the egg whites lightly and brush them evenly over the rolls.
-
Bake: Bake in the preheated oven for 30 minutes, or until golden brown. Keep a close eye on them to prevent burning. Ovens can vary, so adjust the baking time as needed.
-
Cool: Remove the baked rolls from the oven and let them cool completely on a wire rack before slicing and icing (if desired).
-
Make the Icing (Optional): In a mixing bowl, cream together the butter and egg yolk until smooth. Gradually add the confectioners’ sugar, one cup at a time, beating on medium speed. Add the vanilla and milk, one tablespoon at a time, and beat on high speed until the icing is light and fluffy.
-
Ice and Serve: Once the rolls are completely cool, drizzle or spread the icing evenly over the top. Slice and serve.
Expert Tips & Tricks
- Nut Grinding: Grinding your own walnuts will yield the freshest flavor. A food processor works well, but be careful not to over-process them into walnut butter.
- Dough Consistency: If your dough seems too sticky, add a little more flour, one tablespoon at a time, until it becomes manageable. Conversely, if it’s too dry, add a touch more milk.
- Preventing Cracks: To minimize cracking during baking, ensure the dough is properly kneaded and allowed to rise sufficiently. Also, avoid overfilling the rolls.
- Make Ahead: The dough can be made ahead of time and stored in the refrigerator for up to 24 hours. Just bring it to room temperature before rolling it out. The baked rolls also freeze well; simply wrap them tightly in plastic wrap and foil.
- Even Baking: For even baking, rotate the baking sheets halfway through the baking time.
Serving & Storage Suggestions
These walnut nut rolls are best served slightly warm or at room temperature. They make a wonderful addition to breakfast, brunch, or dessert. Store leftover rolls in an airtight container at room temperature for up to 3 days, in the refrigerator for up to a week, or in the freezer for up to 3 months. To reheat, wrap the rolls in foil and warm them in a low oven (around 300°F/150°C) until heated through.
Nutritional Information
| Nutrient | Amount per Serving | % Daily Value |
|---|---|---|
| Calories | 3212.2 kcal | N/A |
| Calories from Fat | 1970 g | 61% |
| Total Fat | 219 g | 336% |
| Saturated Fat | 78.3 g | 391% |
| Cholesterol | 386.5 mg | 128% |
| Sodium | 1731.5 mg | 72% |
| Total Carbohydrate | 268.4 g | 89% |
| Dietary Fiber | 26.2 g | 104% |
| Sugars | 75.7 g | 302% |
| Protein | 67.9 g | 135% |
Note: Nutritional information is an estimate and may vary based on specific ingredients and portion sizes.
Variations & Substitutions
- Other Nuts: Feel free to experiment with other nuts, such as pecans, hazelnuts, or almonds.
- Citrus Zest: Add a teaspoon of orange or lemon zest to the filling for a brighter flavor.
- Spices: Incorporate a pinch of cinnamon, nutmeg, or cardamom into the filling for added warmth.
- Dairy-Free: Use a dairy-free butter substitute and plant-based milk in both the dough and filling for a dairy-free version.
- Chocolate: Add a handful of chocolate chips to the filling for a decadent twist.
FAQs (Frequently Asked Questions)
Q: Can I use active dry yeast instead of instant yeast?
A: Yes, but you may need to proof it for a bit longer. Ensure it’s foamy before adding other ingredients.
Q: My filling seems too dry. What can I do?
A: Add a tablespoon or two more of milk to the filling until it reaches a spreadable consistency.
Q: Can I freeze the unbaked rolls?
A: Yes, you can freeze the unbaked rolls after they’ve been shaped. Thaw them in the refrigerator overnight and then let them rise before baking.
Q: My rolls are browning too quickly. What should I do?
A: Tent the rolls loosely with foil during the last part of the baking time to prevent them from burning.
Q: How do I know when the rolls are done?
A: The rolls are done when they are golden brown and the internal temperature reaches 200°F (93°C).
Final Thoughts
These walnut nut rolls are more than just a recipe; they’re a slice of tradition, a memory made edible. Don’t be intimidated by the steps – each one is a building block to a truly exceptional treat. Gather your ingredients, preheat your oven, and prepare to fill your kitchen with the irresistible aroma of homemade goodness. I encourage you to try this recipe and make it your own, adding your personal touch to create a family favorite that will be cherished for generations to come. And please, share your creations and experiences – I’d love to hear how they turn out!