
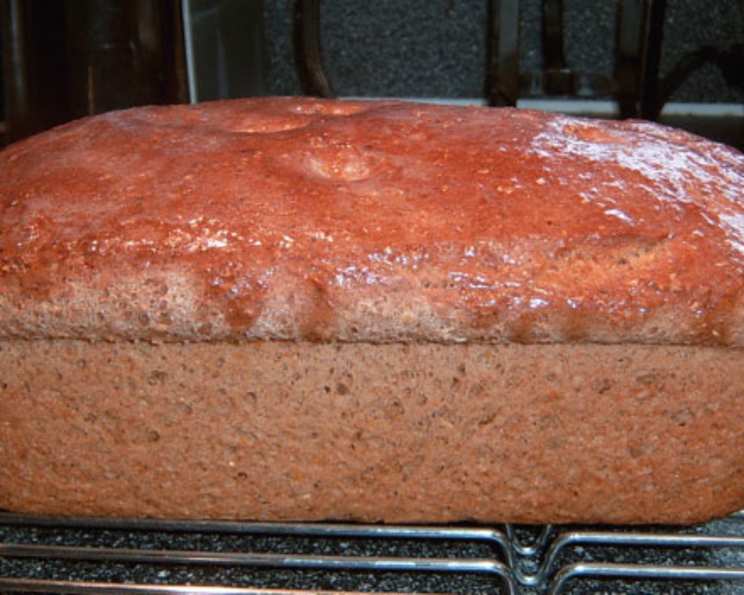
Baking Through Time: A Hearty Loaf of War Bread
The aroma of freshly baked bread has always been a source of comfort, a silent promise of warmth and sustenance. I remember my grandmother, her hands dusted with flour, patiently kneading dough on her weathered wooden table. The scent of yeast mingling with warm sugar would fill her kitchen, a haven of love and laughter. It wasn’t just about the bread itself; it was about the connection, the history, and the stories woven into each loaf. This War Bread recipe, with its rustic blend of grains, reminds me of those simpler times, when resourceful ingenuity turned scarcity into something wonderfully nourishing.
Recipe Overview
- Prep Time: 4 hours 10 minutes
- Cook Time: 1 hour
- Total Time: 5 hours 10 minutes
- Servings: Varies
- Yield: 2-3 loaves
- Dietary Type: Vegetarian
Ingredients
- 1 cup rolled oats
- 1 cup cornmeal
- 1 cup whole wheat flour
- 1 tablespoon shortening
- 1/3 cup molasses
- 1 tablespoon salt
- 3 cups boiling water
- 1 (1/4 ounce) package yeast
- 5-6 cups all-purpose flour, approximately
Equipment Needed
- Large mixing bowl
- Measuring cups and spoons
- Plastic wrap
- Lightly floured work surface
- 2-3 9×5 inch loaf pans (or 3 8×4 inch loaf pans)
- Wax paper
- Metal cooling rack
- Optional: Stand mixer with dough hook
Instructions
-
In a large mixing bowl, combine the rolled oats, cornmeal, whole wheat flour, shortening, molasses, and salt.
-
Pour in the boiling water, stirring constantly until the mixture is smooth and well combined. This is crucial to properly hydrate the grains.
-
Set the mixture aside to cool to between 120-130 degrees Fahrenheit. This is essential for the yeast to activate properly. If the mixture is too hot, it will kill the yeast. Use a thermometer to be sure.
-
Sprinkle the yeast on top of the cooled batter and blend it in thoroughly. Make sure the yeast is fully dissolved to ensure even rising.
-
Stir in the all-purpose flour, ½ cup at a time. Initially, use a spoon or spatula. As the dough thickens, switch to kneading by hand or using the flat beater attachment of a mixer.
-
Note that the dough will be somewhat heavy and dense; it won’t have the same elasticity as dough made solely with white flour. Don’t be alarmed if it seems a little different.
-
Continue adding flour until the dough forms a shaggy mass that cleans the sides of the bowl. It will be slightly sticky, but should pull away from the sides as you mix.
-
Sprinkle a bit more flour to control the stickiness if necessary. The exact amount of flour will vary depending on the humidity and the type of flour you are using.
-
Turn the dough out onto a lightly floured work surface and knead it with a rhythmic push-turn-fold motion, or with a dough hook in your mixer, for about 8 minutes. The kneading develops the gluten and creates a smoother dough.
-
The dough should become smoother and more elastic as you knead. If the dough continues to stick to the work surface or your fingers, sprinkle on a little more flour. But avoid adding too much, as this can make the bread dry.
-
Place the dough in a bowl and pat the surface with butter or greased fingers to prevent it from crusting. This step helps to keep the surface of the dough moist during rising.
-
Cover the bowl tightly with plastic wrap and set it aside in a warm place for the dough to rise until it has doubled in size. This should take approximately 1 hour, though it may be shorter if you are using rapid-rise yeast. The warmer the environment, the faster it will rise.
-
Once the dough has doubled, punch it down to release the air. Knead it gently for about 30 seconds to press out any remaining bubbles. This helps to create a more even texture in the final loaf.
-
Divide the dough into 2 or 3 pieces, depending on the size of your loaf pans. Shape each piece into a ball and let them rest on the work surface for 3-4 minutes. This allows the gluten to relax, making the dough easier to shape.
-
Form the dough into loaves and place them in greased 2 9-inch or 3 8-inch loaf pans.
-
Cover the loaf pans with wax paper and let the dough rise again until the center of the dough has risen to about an inch above the edge of the pans. This second rise is crucial for a light and airy loaf. This should take about 50 minutes.
-
Preheat your oven to 350 degrees Fahrenheit about 20 minutes before baking.
-
Bake the loaves in the preheated oven until they are nicely browned and test done, about 1 hour. I like to check them at around 45 minutes.
-
To check for doneness, turn one loaf out of its pan and tap the bottom crust with your finger. A hard, hollow sound means it is done. An internal temperature of 200-210°F is ideal.
-
If the loaves are browning too quickly, cover them loosely with brown sack paper or aluminum foil. This will help prevent the crust from burning before the inside is fully cooked.
-
Midway through baking and again near the end, shift the pans in the oven so the loaves are equally exposed to temperature variations. Ovens often have hot spots, so rotating the pans ensures even baking.
-
Remove the bread from the oven and turn it out of the pans. Place the loaves on a metal rack to cool completely before slicing and serving. This prevents the bottom crust from becoming soggy.
Expert Tips & Tricks
- For a richer flavor, try using dark molasses instead of light.
- If you don’t have shortening, you can substitute butter or margarine.
- To ensure a good rise, make sure your yeast is fresh. You can test the yeast by dissolving it in warm water with a pinch of sugar. If it foams within 5-10 minutes, it is active.
- If your kitchen is cold, place the dough in a slightly warmed oven (turned off) or on top of the refrigerator to help it rise.
- To prevent sticking, grease your loaf pans well with shortening or cooking spray. You can also line the bottom of the pans with parchment paper.
Serving & Storage Suggestions
War Bread is delicious served warm with butter, jam, or honey. It also makes excellent toast or sandwiches. Store leftover bread in an airtight container at room temperature for up to 3 days. For longer storage, wrap the bread tightly in plastic wrap and freeze it for up to 3 months. Thaw frozen bread at room temperature before serving. To refresh stale bread, sprinkle it with a little water and reheat it in a 350°F oven for a few minutes.
Nutritional Information
Please note that these values are estimates and can vary based on specific ingredients and portion sizes.
| Nutrient | Amount per Serving | % Daily Value |
|---|---|---|
| Calories | 250 kcal | 13% |
| Total Fat | 5g | 6% |
| Saturated Fat | 1g | 5% |
| Cholesterol | 0mg | 0% |
| Sodium | 300mg | 13% |
| Total Carbohydrate | 45g | 17% |
| Dietary Fiber | 5g | 20% |
| Sugars | 8g | – |
| Protein | 8g | 16% |
Variations & Substitutions
- Sweeter Loaf: Increase the amount of molasses to ½ cup for a sweeter flavor.
- Nutty Flavor: Add ½ cup of chopped nuts, such as walnuts or pecans, to the dough.
- Seeded Bread: Sprinkle the top of the loaves with sesame seeds, poppy seeds, or sunflower seeds before baking.
- Spiced Bread: Add 1 teaspoon of ground cinnamon, nutmeg, or allspice to the dough for a warm, spiced flavor.
- Gluten-Free Variation: Although this recipe contains wheat flour, experimenting with gluten-free flour blends could yield a gluten-free version. Use a 1-to-1 gluten-free baking flour and add a teaspoon of xanthan gum.
FAQs (Frequently Asked Questions)
Q: Why is it called War Bread?
A: This bread gained popularity during wartime, particularly in New England, when white flour was scarce. The combination of rolled oats, cornmeal, and whole wheat flour helped stretch the available white flour supply.
Q: Can I use rapid-rise yeast instead of active dry yeast?
A: Yes, you can use rapid-rise yeast. If using rapid-rise yeast, you may not need to let it sit in the warm water before adding it to the other ingredients. Check the package instructions for guidance. The rising time may also be slightly shorter.
Q: The dough is very sticky. Is this normal?
A: Yes, this dough is naturally a bit sticky due to the high percentage of whole grains. Resist the urge to add too much flour, as this can make the bread dry.
Q: How do I know if the bread is fully baked?
A: The best way to check for doneness is to insert a thermometer into the center of the loaf. The internal temperature should be between 200-210°F. You can also tap the bottom of the loaf; a hollow sound indicates that it is done.
Q: Can I freeze this bread?
A: Absolutely! War Bread freezes well. Allow the bread to cool completely, then wrap it tightly in plastic wrap and place it in a freezer bag. It can be stored in the freezer for up to 3 months.
Final Thoughts
This War Bread recipe is more than just a way to create a loaf of bread; it’s a journey back in time, a tribute to resourcefulness and resilience. Whether you’re a seasoned baker or just starting out, I encourage you to try this recipe. The hearty flavor and satisfying texture of this bread are sure to please. Share it with friends and family, and let the aroma of freshly baked bread fill your home with warmth and memories. Pair it with a comforting bowl of soup or a simple salad for a complete and nourishing meal. Happy baking!