
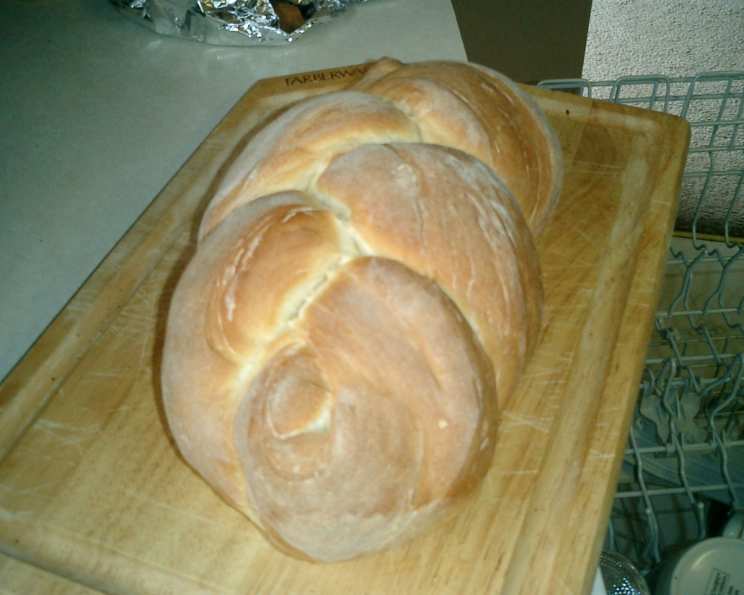
The Soul-Satisfying Simplicity of Homemade White Bread
There’s something truly magical about the smell of bread baking. It transports me back to my grandmother’s kitchen, a place filled with warmth, laughter, and the comforting aroma of freshly baked loaves cooling on the windowsill. I remember standing on a stool, mesmerized as she effortlessly kneaded the dough, her hands moving with a practiced grace passed down through generations. That simple white bread was more than just food; it was love, tradition, and the heart of our family.
Recipe Overview
- Prep Time: 2 hours (includes rising time)
- Cook Time: 30 minutes
- Total Time: 2 hours 30 minutes
- Servings: 12
- Yield: 1 loaf
- Dietary Type: Vegetarian
Ingredients
- 3 cups strong white bread flour
- ¼ ounce dried active dry yeast
- ½ pint milk
- ½ pint water
- 1 teaspoon sugar
- 1 teaspoon salt
- ¼ teaspoon white pepper
- 1 tablespoon Crisco
- 1 tablespoon butter, room temperature
Equipment Needed
- Microwaveable jar
- Small bowl
- Large mixing bowl
- Measuring cups and spoons
- Clean work surface
- Large bowl (for rising)
- Clingfilm
- Ziplock bags (optional, for storing dough)
- Loaf pan (greased)
- Oven
- Pastry brush (optional, for egg wash)
Instructions
-
Begin by preparing the yeast. In a microwaveable jar, combine the milk and water. Heat in the microwave for about 1 minute, until lukewarm. The temperature should be warm to the touch, but not hot, to avoid killing the yeast.
-
In a small bowl, combine the dried active dry yeast with the sugar and a small amount of the warmed milk and water mixture. Stir gently and let this mixture “prove” for about 10 minutes. You’ll know it’s ready when it has doubled in volume and become frothy. This step ensures that your yeast is active and will properly leaven the bread.
-
While the yeast is proving, prepare the dry ingredients. In a large mixing bowl, add the strong white bread flour, salt, and white pepper. Stir well to combine these ingredients evenly.
-
Add the butter (at room temperature for easier incorporation) and Crisco to the flour mixture. Use your fingertips to rub the fats into the flour until the mixture resembles coarse breadcrumbs. This step creates a more tender crumb in the final bread.
-
Once the yeast mixture has proved, create a well in the center of the flour mixture. Pour in the yeast mixture, along with some of the remaining milk and water mixture. Begin stirring the wet ingredients into the flour, gradually adding more of the milk and water until a soft dough begins to form. The amount of liquid needed may vary depending on the moisture content of your flour, so add it a little at a time until the dough comes together.
-
Lightly flour your hands and turn the dough out onto a floured surface. Knead the dough for about 10 minutes, adding extra flour to your hands and the work surface as needed to prevent sticking. The dough should become smooth and elastic as you knead. This step is crucial for developing the gluten, which gives the bread its structure.
-
Once the dough is smooth and elastic, place it in a large bowl that has been sprayed with Pam or another non-stick cooking spray. This will prevent the dough from sticking to the bowl as it rises. Cover the bowl with clingfilm and place it in a warm area to rise for about 1 to 1 ½ hours, or until it has doubled in size. The warmer the environment, the faster the dough will rise.
-
After the dough has risen, turn it out onto a floured surface and knead it again for about 5 minutes. This step helps to redistribute the yeast and create a more even texture. At this stage, you can also divide the dough into smaller portions and store them in ziplock bags in the refrigerator for up to 3 days. The dough will continue to rise slowly in the fridge, so make sure to use quart-sized bags to accommodate the expansion.
-
Shape the dough into your desired loaf shape or place it into a pre-greased loaf pan.
-
Preheat your oven to 400°F (200°C).
-
Cover the shaped dough and allow it to rise again for about 15 minutes. This second rise helps to create a lighter, airier loaf.
-
Just before baking, brush the top of the dough with egg wash (optional, for a glossy crust) and sprinkle with sesame seeds and a little kosher salt (optional, for added flavor and texture).
-
Bake in the preheated oven for about 30 minutes, or until the loaf is golden brown and sounds hollow when tapped on the bottom. The internal temperature should reach around 200-210°F (93-99°C).
Expert Tips & Tricks
- For a richer flavor, try using melted butter instead of Crisco.
- If your kitchen is cold, you can create a warmer environment for rising by placing the dough in an oven preheated to 170°F (77°C) for 15 minutes, then turned off.
- To prevent the crust from browning too quickly, tent the loaf with foil during the last 10-15 minutes of baking.
- Don’t over-knead the dough. Over-kneading can result in a tough loaf.
- Ensure your yeast is fresh. Expired yeast will not rise properly, leading to a dense, flat loaf.
Serving & Storage Suggestions
This homemade white bread is delicious served warm with butter, jam, or as a base for sandwiches. It’s also fantastic toasted or used for making croutons.
Store leftover bread in an airtight container at room temperature for up to 3 days. For longer storage, slice the bread and freeze it in a freezer bag for up to 2 months. To reheat frozen bread, thaw it at room temperature or toast it directly from frozen.
Nutritional Information
| Nutrient | Amount per Serving | % Daily Value |
|---|---|---|
| Calories | 148 kcal | N/A |
| Total Fat | 3.1g | 4% |
| Saturated Fat | 1.4g | 7% |
| Cholesterol | 5.4mg | 1% |
| Sodium | 211.9mg | 8% |
| Total Carbohydrate | 25.4g | 8% |
| Dietary Fiber | 1g | 3% |
| Sugars | 0.4g | N/A |
| Protein | 4.1g | 8% |
Variations & Substitutions
- Whole Wheat Bread: Substitute up to half of the white bread flour with whole wheat flour for a nuttier flavor and increased fiber.
- Herb Bread: Add 1-2 tablespoons of chopped fresh herbs, such as rosemary, thyme, or oregano, to the dough during the kneading process.
- Garlic Bread: Mix minced garlic and melted butter together and brush it over the baked loaf while it’s still warm.
- Dairy-Free Bread: Substitute the milk with a non-dairy alternative like almond milk or soy milk.
FAQs (Frequently Asked Questions)
Q: Why is my bread dense and not rising properly?
A: This could be due to several factors, including using expired yeast, not kneading the dough enough, or not allowing it to rise in a warm enough environment.
Q: Can I use a bread machine for this recipe?
A: While this recipe is designed for hand-kneading, you can adapt it for a bread machine. Follow your bread machine’s instructions for adding ingredients, but keep a close eye on the dough’s consistency and adjust the liquid accordingly.
Q: How do I know when the bread is fully baked?
A: The bread is done when it is golden brown and sounds hollow when tapped on the bottom. You can also use a food thermometer to check the internal temperature, which should be around 200-210°F (93-99°C).
Q: Can I freeze the dough instead of baking it right away?
A: Yes, you can freeze the dough after the first rise. Punch down the dough, shape it into a loaf, wrap it tightly in plastic wrap, and then place it in a freezer bag. Thaw the dough in the refrigerator overnight before baking.
Q: What can I use instead of Crisco?
A: You can substitute the Crisco with another type of vegetable shortening or melted coconut oil.
Final Thoughts
I truly believe that baking bread is one of the most rewarding things you can do in the kitchen. It’s a simple act that transforms humble ingredients into something truly special. So, roll up your sleeves, embrace the process, and experience the joy of creating your own homemade white bread. Share your freshly baked loaf with friends and family, and let the comforting aroma fill your home with warmth and love. Don’t hesitate to experiment with variations, and most importantly, have fun! I’d love to hear about your baking adventures and any creative twists you add to this classic recipe.