
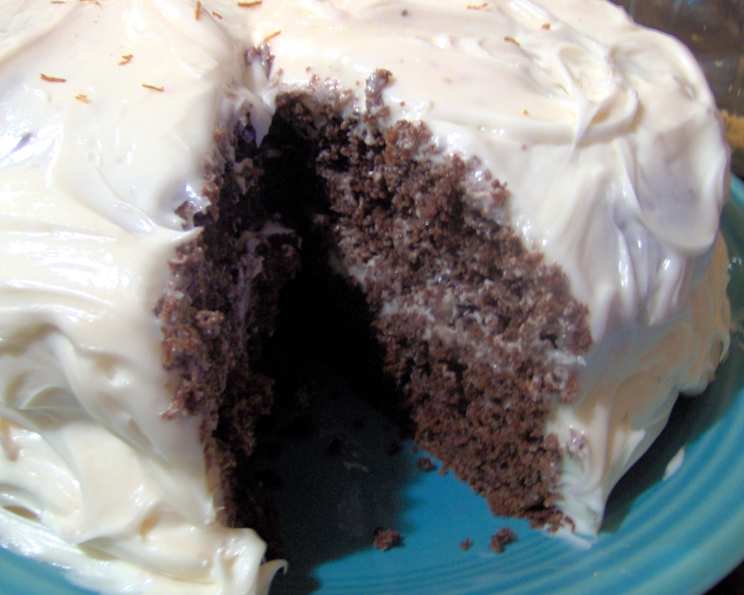
White Devil Cake: An Unexpectedly Divine Indulgence
I’ll admit, the name “White Devil Cake” initially raised an eyebrow. It sounded almost…forbidden. But one bite, and I understood. It wasn’t about wickedness; it was about an unbelievably delicious surprise. My grandmother, bless her heart, always swore by this recipe for potlucks. It was her secret weapon, a guaranteed crowd-pleaser that nobody ever suspected came from a humble cake mix. The tangy zest of orange mingling with the deep chocolate and creamy frosting – it’s a symphony of flavors that dances on your tongue, leaving you craving just one more slice. To this day, the mere mention of “White Devil Cake” transports me back to her bustling kitchen, filled with laughter and the irresistible aroma of baking.
Recipe Overview
- Prep Time: 20 minutes
- Cook Time: 25-28 minutes
- Total Time: 2 hours 45 minutes (includes cooling and frosting time)
- Servings: 12
- Yield: 1 two-layer cake
- Dietary Type: Not specified (contains dairy and eggs)
Ingredients
- 1 (18 ounce) package devil’s food cake mix (Duncan Hines)
- 1 cup sour cream
- ⅛ cup milk
- 3 large eggs
- ⅔ cup canola oil
- 2 teaspoons orange zest, finely grated
- 2 (12 ounce) cans vanilla frosting, whipped
- 1 – 1 ½ teaspoon orange zest, finely grated
Equipment Needed
- 2 (9-inch) round cake pans
- Wax paper
- Mixing bowls
- Electric mixer
- Rubber spatula
- Cooling racks
- Grater or zester
Instructions
-
Preheat your oven to 350 degrees Fahrenheit (175 degrees Celsius). Ensuring the oven is properly preheated is crucial for even baking.
-
Grease two 9-inch round cake pans thoroughly with cooking spray or butter. Then, line the bottom of each pan with a circle of wax paper. This prevents the cake from sticking and makes for easy removal.
-
In a large mixing bowl, combine the devil’s food cake mix, sour cream, milk, eggs, and canola oil.
-
Using an electric mixer on medium speed, beat the ingredients together for 3 minutes until the batter is light and fluffy. Don’t skimp on the beating time; this incorporates air into the batter, resulting in a tender cake.
-
Add 2 teaspoons of finely grated orange zest to the cake batter and mix lightly with a rubber spatula until just combined. Be careful not to overmix at this stage, as it can toughen the cake.
-
Pour the batter evenly into the two prepared cake pans. Use a kitchen scale for precision, if desired, to ensure even layers.
-
Bake in the preheated oven for 25-28 minutes, or until a wooden skewer inserted into the center comes out clean. Start checking for doneness around 25 minutes.
-
Place the pans on cooling racks and let them cool for 15 minutes before removing the cakes from the pans. This prevents the cakes from breaking while still warm.
-
Carefully invert the cakes onto the cooling racks and remove the wax paper. Let the cakes cool completely on the racks. This step is crucial before frosting, as warm cakes will melt the frosting.
-
In a small bowl, stir the remaining 1 to 1 1/2 teaspoons of orange zest into the whipped vanilla frosting. This adds a burst of citrus flavor to complement the chocolate.
-
Once the cakes are completely cool, frost the top of one layer with half of the orange-infused vanilla frosting.
-
Gently place the second cake layer on top of the frosted layer.
-
Frost the top and sides of the cake with the remaining frosting.
-
Let the frosted cake sit for at least 2 hours before serving to allow the flavors to meld and the frosting to set. This patience will be rewarded with a more flavorful and stable cake.
Expert Tips & Tricks
- Elevate the Cake Mix: While this recipe utilizes a cake mix for convenience, you can elevate it by using high-quality ingredients. Opt for organic eggs and a good-quality canola oil.
- Don’t Overbake: Overbaking is the enemy of a moist cake. Start checking for doneness at the 25-minute mark and use a toothpick to test.
- Level the Layers: If your cake layers are uneven, use a serrated knife to carefully level them before frosting. This ensures a more professional-looking finished product.
- Chill for Easier Frosting: If you’re short on time, chilling the cake layers for about 30 minutes before frosting makes them easier to handle and prevents crumbs from mixing into the frosting.
- Create a Crumb Coat: Before applying the final layer of frosting, spread a thin “crumb coat” over the cake. Chill for 15 minutes to set the crumbs before applying the remaining frosting.
Serving & Storage Suggestions
Serve the White Devil Cake chilled or at room temperature. To make it look extra special, garnish with a few fresh orange slices or a sprinkle of additional orange zest.
Storage: Store leftover cake in an airtight container at room temperature for up to 2 days, or in the refrigerator for up to 5 days. For longer storage, you can freeze the cake for up to 2 months. Thaw it overnight in the refrigerator before serving. For individual slices, wrap tightly in plastic wrap before freezing.
Nutritional Information
Please note that these values are estimates and can vary based on specific ingredient brands and portion sizes.
| Nutrient | Amount per Serving | % Daily Value |
|---|---|---|
| Calories | 587.6 kcal | N/A |
| Calories from Fat | 299 g | 51% |
| Total Fat | 33.3 g | 51% |
| Saturated Fat | 6.9 g | 34% |
| Cholesterol | 61.7 mg | 20% |
| Sodium | 484.1 mg | 20% |
| Total Carbohydrate | 70.7 g | 23% |
| Dietary Fiber | 1.1 g | 4% |
| Sugars | 52.2 g | 208% |
| Protein | 4.8 g | 9% |
Variations & Substitutions
- Lemon Zest: Substitute lemon zest for orange zest for a brighter, tangier flavor profile.
- Chocolate Frosting: For a more intense chocolate experience, use chocolate frosting instead of vanilla.
- Coffee Enhancement: Add a teaspoon of instant coffee powder to the batter to enhance the chocolate flavor.
- Nutty Addition: Incorporate ½ cup of chopped walnuts or pecans into the batter or sprinkle them on top of the frosted cake.
- Gluten-Free Version: Use a gluten-free devil’s food cake mix, ensuring all other ingredients are also gluten-free.
FAQs (Frequently Asked Questions)
Q: Why is it called “White Devil Cake”?
A: The name is a playful contrast between the “devil’s food” chocolate cake and the light vanilla frosting. It’s more about the unexpected combination than any actual deviousness!
Q: Can I use a different type of frosting?
A: Absolutely! Feel free to experiment with cream cheese frosting, chocolate ganache, or even a simple powdered sugar glaze.
Q: Can I make this cake ahead of time?
A: Yes, you can bake the cake layers a day in advance, wrap them tightly, and store them at room temperature. Frost just before serving.
Q: How do I prevent the cake from sticking to the pan?
A: Thoroughly grease the pans and line the bottoms with wax paper. This creates a barrier that prevents sticking.
Q: What can I do if my frosting is too thin?
A: Add a tablespoon of powdered sugar at a time until the frosting reaches your desired consistency.
Final Thoughts
Don’t let the unconventional name fool you; this White Devil Cake is pure delight. It’s a testament to the fact that even humble ingredients, when combined with a touch of creativity and love, can create something truly extraordinary. So, gather your ingredients, preheat your oven, and prepare to be amazed by this unexpectedly delicious cake. I encourage you to try this recipe and share your creations. Perhaps pair it with a scoop of vanilla ice cream or a glass of cold milk for the ultimate indulgence. Happy baking!