
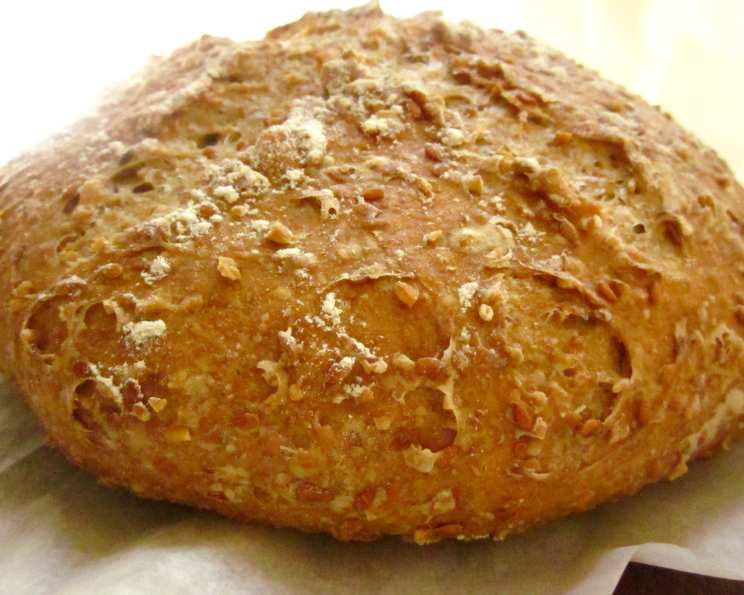
Rustic Whole Wheat No-Knead Bread with Flax Seeds and Oats
The aroma of freshly baked bread has always been a source of comfort and nostalgia for me. I remember watching my grandmother, her hands dusted with flour, effortlessly transform simple ingredients into the most incredible loaves. The warmth that radiated from her kitchen, filled with the yeasty fragrance, is a feeling I try to recreate every time I bake. This particular no-knead recipe, with its hearty whole wheat flavor and satisfyingly crunchy crust, brings me right back to those cherished moments, proving that even the simplest methods can yield extraordinary results. It’s a loaf that whispers of tradition and home, perfect for sharing with loved ones.
Recipe Overview
- Prep Time: 20 minutes
- Cook Time: 50-60 minutes
- Total Time: 18 hours 50 minutes (including rising time)
- Servings: Approximately 12 slices
- Yield: 1 loaf
- Dietary Type: Vegetarian (easily made vegan by ensuring vinegar is plant-derived)
Ingredients
- 3/4 cup whole wheat flour
- 1/2 cup steel cut oats
- 4 tablespoons flax seeds
- 2 1/4 cups bread flour
- 1 1/2 teaspoons table salt (or 3/4 tablespoon kosher salt)
- 1 1/3 cups water
- 1 tablespoon white distilled vinegar
- 1/4 teaspoon instant yeast
Equipment Needed
- Large bowl
- Rubber spatula
- Plastic wrap
- 10-inch skillet
- Parchment paper
- Nonstick cooking spray
- Lightly floured work surface
- 6-8 quart heavy-bottomed Dutch oven (with lid)
- Razor blade or sharp knife
- Wire rack
- Instant-read thermometer
Instructions
-
In a large bowl, whisk together the whole wheat flour, steel cut oats, flax seeds, bread flour, instant yeast, and salt. Ensure all ingredients are well combined.
-
Add the water and white distilled vinegar to the dry ingredients.
-
Using a rubber spatula, fold the mixture, scraping up any dry flour from the bottom of the bowl, until a shaggy, sticky ball of dough forms. Don’t worry about achieving a smooth dough at this stage.
-
Cover the bowl tightly with plastic wrap.
-
Let the dough rest at warm room temperature (approximately 70 degrees Fahrenheit) for at least 12 hours, but preferably around 18 hours. This long fermentation period is crucial for developing flavor and texture in this no-knead bread.
-
After the resting period, lay a 12×18-inch sheet of parchment paper inside a 10-inch skillet. Spray the parchment paper generously with nonstick cooking spray to prevent the dough from sticking.
-
The dough is ready when its surface is dotted with bubbles. This indicates that the yeast has been actively working.
-
Transfer the dough to a lightly floured work surface. Gently knead it 10 to 15 times. The dough will still be somewhat sticky, but the flour on the work surface will help manage it.
-
Shape the dough into a ball by pulling the edges into the middle. This creates surface tension that will help the bread rise properly.
-
Transfer the dough, seam-side down, to the parchment-lined skillet. Spray the surface of the dough with nonstick cooking spray.
-
Cover the skillet loosely with plastic wrap and let the dough rise at room temperature until it has doubled in size and does not readily spring back when poked with a finger. This usually takes about 2 hours. The rising time may vary depending on the temperature of your kitchen.
-
About 30 minutes before baking, adjust an oven rack to the lowest position. Place a 6-8 quart heavy-bottomed Dutch oven (with its lid) on the rack and preheat the oven to 475 degrees Fahrenheit. Ensuring the Dutch oven is thoroughly heated is vital for achieving that signature crunchy crust.
-
Lightly flour the top of the dough. Using a razor blade or a very sharp knife, make one 6-inch-long, 1/2-inch-deep slit along the top of the dough. This allows the bread to expand properly during baking and prevents it from cracking unpredictably.
-
Carefully remove the preheated Dutch oven from the oven and remove the lid. Be extremely cautious as the Dutch oven will be very hot.
-
Pick up the dough by lifting the parchment overhang and lower it carefully into the pot. Let any excess parchment paper hang over the pot edge.
-
Cover the pot with the lid and place it back in the oven.
-
Reduce the oven temperature to 425 degrees Fahrenheit and bake the bread covered for 30 minutes.
-
After 30 minutes, carefully remove the lid and continue to bake until the loaf is a deep brown color and an instant-read thermometer inserted into the center registers 210 degrees Fahrenheit. This usually takes an additional 20 to 30 minutes.
-
Carefully remove the bread from the pot, using the parchment paper to lift it out. Transfer the bread to a wire rack and cool completely to room temperature before slicing. This is essential for preventing a gummy texture.
Expert Tips & Tricks
- For an even tangier flavor, experiment with extending the initial resting period up to 24 hours.
- If you don’t have a Dutch oven, you can use a large stockpot with a tight-fitting lid. The key is to trap the steam during the initial baking period.
- To enhance the crust, try spritzing the dough with water just before placing it in the Dutch oven.
- Don’t be afraid to experiment with different flours. You can substitute a portion of the bread flour with rye flour for a more complex flavor.
- If your kitchen is particularly cold, you can proof the dough in a slightly warmed oven (turned off!) or a proofer to ensure it rises properly.
- The slash on top is not just decorative; it controls how the bread expands. Experiment with different slash patterns to achieve unique results.
- Be careful when removing the Dutch oven. It is very hot and can cause serious burns. Use oven mitts and protect your work surface.
- If the crust is browning too quickly, you can tent the loaf with foil during the final baking stages.
Serving & Storage Suggestions
This rustic whole wheat no-knead bread is best enjoyed fresh, sliced, and served with a generous smear of butter or a drizzle of olive oil. It’s also fantastic for making sandwiches, toast, or using as a base for bruschetta.
To store leftovers, wrap the bread tightly in foil or place it in an airtight container. It will stay fresh at room temperature for up to 2 days. For longer storage, you can freeze the bread for up to 2 months. Thaw it completely before reheating in a low oven (around 300 degrees Fahrenheit) for 10-15 minutes to restore its crustiness. While the crust is best on the first day, reheating helps bring it back to life.
Nutritional Information
(Estimated values per slice, based on 12 slices per loaf)
| Nutrient | Amount per Serving | % Daily Value |
|---|---|---|
| Calories | 155 kcal | 8% |
| Total Fat | 2.3g | 3% |
| Saturated Fat | 0.3g | 2% |
| Cholesterol | 0mg | 0% |
| Sodium | 293mg | 13% |
| Total Carbohydrate | 28.6g | 10% |
| Dietary Fiber | 3.1g | 11% |
| Sugars | 0.15g | 0% |
| Protein | 5.2g | 10% |
Note: Nutritional information is an estimate and may vary based on specific ingredients and preparation methods.
Variations & Substitutions
- Seeds & Nuts: Incorporate other seeds like pumpkin seeds, sunflower seeds, or poppy seeds for added texture and flavor. You can also add chopped walnuts or pecans.
- Herbs & Spices: Experiment with adding dried herbs like rosemary, thyme, or oregano to the dough. Spices like cinnamon or cardamom can also create interesting flavor profiles.
- Sweet Variations: Add a touch of honey or maple syrup to the dough for a slightly sweeter loaf. You can also incorporate dried fruits like raisins or cranberries.
- Gluten-Free Option: While this recipe is not inherently gluten-free, you could try substituting the flours with a gluten-free bread flour blend. Note that the texture may be different.
- Vegan Option: Ensure your white distilled vinegar is plant-derived.
FAQs (Frequently Asked Questions)
Q: Why is the long resting period necessary?
A: The extended resting time allows the yeast to slowly ferment the dough, developing a deeper, more complex flavor and a more open crumb structure. It also allows the gluten to develop without the need for kneading.
Q: Can I use active dry yeast instead of instant yeast?
A: Yes, but you’ll need to activate the active dry yeast first by dissolving it in warm water for 5-10 minutes before adding it to the other ingredients.
Q: What if my dough doesn’t double in size during the second rise?
A: The rising time can vary depending on the temperature of your kitchen. If it’s a cold day, you may need to let it rise for longer. You can also place the dough in a slightly warmed oven (turned off) or a proofer to speed up the process.
Q: My crust is too dark. What can I do?
A: If the crust is browning too quickly, you can tent the loaf with foil during the final baking stages to prevent it from burning.
Q: Why is it important to let the bread cool completely before slicing?
A: Cutting into the bread while it’s still warm can result in a gummy texture. Allowing it to cool completely allows the crumb to set properly.
Final Thoughts
I sincerely hope you’re inspired to give this rustic whole wheat no-knead bread recipe a try. There’s something incredibly satisfying about creating your own bread, and this recipe makes it surprisingly accessible. Embrace the process, experiment with different flavors, and don’t be afraid to make it your own. Share your creations with friends and family, and let the aroma of freshly baked bread fill your home with warmth and joy. I’d love to hear about your baking adventures and any variations you come up with! Perhaps pair it with a hearty soup or a simple cheese platter for the perfect comforting meal.