
Wicked Good Boston Cream Pie
My grandmother, Nana Rose, made a Boston Cream Pie every year for my birthday. Not just any year, but every single year. As a child, I found the name confusing, but the taste? The taste was pure birthday magic. The delicate sponge cake, soaked with creamy vanilla custard and draped in a shimmering chocolate glaze, was the epitome of celebration. I remember watching her carefully spread the custard, her hands moving with practiced ease. Each bite was a testament to her love, and to this day, the aroma of vanilla and chocolate instantly transports me back to her warm kitchen, filled with laughter and the sweet promise of another year. It’s a dish I’ve tinkered with over the years, always striving to capture that same sense of comfort and joy.
Recipe Overview
- Prep Time: 1 hour
- Cook Time: 35 minutes
- Total Time: 3 hours 35 minutes (plus chilling time)
- Servings: 8-10
- Yield: 1 cake
- Dietary Type: Not Gluten-Free
Ingredients
Pastry Cream:
- 2 cups half-and-half
- 6 large egg yolks
- ½ cup sugar
- ⅛ teaspoon table salt (a pinch)
- ¼ cup unbleached all-purpose flour
- 4 tablespoons cold unsalted butter, cut into four pieces
- 1 ½ teaspoons vanilla extract
Cake:
- 1 ½ cups unbleached all-purpose flour
- 1 ½ teaspoons baking powder
- ¾ teaspoon table salt
- ¾ cup whole milk
- 6 tablespoons unsalted butter
- 1 ½ teaspoons vanilla extract
- 3 large eggs
- 1 ½ cups sugar
Glaze:
- ½ cup heavy cream
- 2 tablespoons light corn syrup
- 4 ounces bittersweet chocolate, chopped fine
Equipment Needed
- Medium saucepan
- Medium bowl
- Whisk
- Fine-mesh strainer
- Lightly greased parchment paper
- Stand mixer with whisk attachment
- Small saucepan
- Nonstick cooking spray
- Two 9-inch round cake pans
- Wire rack
- Small plastic knife
- Offset spatula
Instructions
- To prepare the pastry cream, heat the half-and-half in a medium saucepan over medium heat until it just begins to simmer. While the half-and-half is heating, whisk the egg yolks, sugar, and salt together in a medium bowl until the mixture is smooth. Add the flour to the yolk mixture and whisk until fully incorporated, ensuring there are no lumps.
- Remove the half-and-half from the heat. While whisking constantly, slowly drizzle in about ½ cup of the hot half-and-half into the yolk mixture. This is called tempering the eggs and prevents them from scrambling.
- Whisking constantly, return the tempered yolk mixture to the remaining half-and-half in the saucepan.
- Return the saucepan to medium heat and cook, whisking constantly, until the mixture begins to thicken slightly. This should take about 1 minute. Reduce the heat to medium-low and continue to simmer, whisking constantly, for another 8 minutes. Don’t be tempted to stop whisking, as this will ensure a smooth, lump-free pastry cream.
- Increase the heat to medium and cook, whisking vigorously, until bubbles begin to burst on the surface of the pastry cream. This should take about 1 to 2 minutes. Remove the saucepan from the heat.
- Whisk in the cold butter and vanilla extract until the butter is completely melted and incorporated into the cream.
- Strain the pastry cream through a fine-mesh strainer set over a medium bowl. This will remove any lumps and create an incredibly smooth texture.
- Press a piece of lightly greased parchment paper directly onto the surface of the pastry cream. This will prevent a skin from forming as it cools. Refrigerate the pastry cream until it is completely set, for at least 2 hours and up to 24 hours. This chilling time is crucial for the pastry cream to achieve the right consistency.
- For the cake, adjust the oven rack to the middle position and preheat the oven to 325 degrees Fahrenheit. Lightly grease two 9-inch round cake pans with nonstick cooking spray. Then, line the bottoms of the pans with parchment paper circles. This ensures the cakes release easily after baking.
- In a medium bowl, whisk together the flour, baking powder, and salt. This ensures that the baking powder is evenly distributed throughout the flour, which is essential for a light and airy cake.
- In a small saucepan, heat the milk and butter over low heat until the butter is completely melted. Remove the saucepan from the heat, add the vanilla extract, and cover the saucepan to keep the mixture warm. This warm milk mixture helps to create a tender cake.
- In a stand mixer fitted with the whisk attachment, whip the eggs and sugar at high speed until the mixture is light and airy, about 5 minutes. The mixture should be noticeably paler and have increased significantly in volume. This step is crucial for creating a light and fluffy cake.
- Remove the mixer bowl from the stand. Gently pour the warm milk mixture into the egg mixture and whisk by hand until just incorporated. Be careful not to overmix at this stage.
- Add the dry ingredients (flour mixture) to the wet ingredients (egg and milk mixture) and whisk until just incorporated. Again, be careful not to overmix, as this can result in a tough cake.
- Working quickly, divide the batter evenly between the prepared cake pans. Use a kitchen scale for perfect accuracy, if you have one!
- Bake until the tops of the cakes are light brown and a toothpick inserted into the center of the cakes comes out clean. This should take about 20 to 22 minutes. Start checking for doneness around the 20-minute mark, as baking times can vary depending on your oven.
- Transfer the cake pans to a wire rack and cool the cakes completely in the pans, about 2 hours. Cooling in the pans helps the cakes retain their moisture.
- Once the cakes are completely cooled, run a small plastic knife around the edge of the pans to loosen them. Invert the cakes onto a wire rack. Carefully remove the parchment paper from the bottoms of the cakes, then reinvert the cakes onto another wire rack.
- To assemble the Boston Cream Pie, place one cake round on a large plate.
- Whisk the pastry cream briefly to loosen it, then spoon it onto the center of the cake. Using an offset spatula, spread the pastry cream evenly to the edge of the cake.
- Place the second cake layer on top of the pastry cream, bottom side up, making sure the layers line up properly. Press lightly on the top of the cake to level it. Refrigerate the cake while you prepare the glaze.
- To prepare the glaze, bring the heavy cream and corn syrup to a simmer in a small saucepan over medium heat.
- Remove the saucepan from the heat and add the finely chopped bittersweet chocolate.
- Whisk gently until the chocolate is smooth and completely melted, about 30 seconds. Let the glaze stand, whisking occasionally, until it has thickened slightly, about 5 minutes. This will allow the glaze to coat the cake properly.
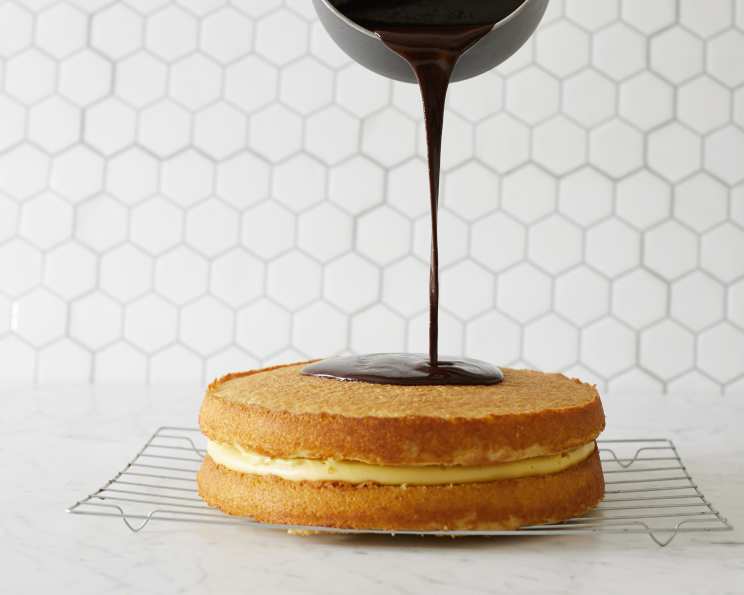
- Pour the glaze onto the center of the cake. Use an offset spatula to spread the glaze to the edge of the cake, allowing the excess to drip decoratively down the sides.
- Chill the finished cake for at least 3 hours before slicing and serving. This chilling time is crucial for the flavors to meld together and for the cake to be easy to cut. The cake can be made up to 24 hours before serving.
Expert Tips & Tricks
- For an extra moist cake, brush the cake layers with a simple syrup (equal parts sugar and water, simmered until sugar dissolves) before adding the pastry cream.
- If your pastry cream is too thick, whisk in a tablespoon or two of milk until it reaches the desired consistency.
- Don’t overbake the cake! A slightly underbaked cake is better than a dry one.
- If you don’t have an offset spatula, you can use a regular knife to spread the pastry cream and glaze.
- For a richer chocolate flavor, use a combination of bittersweet and semi-sweet chocolate in the glaze.
Serving & Storage Suggestions
Serve the Boston Cream Pie chilled, sliced into wedges. A dusting of powdered sugar on top adds a touch of elegance. Leftovers should be stored in the refrigerator, tightly covered, for up to 3 days. The cake is best served cold as it can get very soft at room temperature. It is not recommended to freeze the assembled cake, as the pastry cream can become watery upon thawing.
Nutritional Information
| Nutrient | Amount per Serving | % Daily Value |
|---|---|---|
| Calories | 652.6 kcal | N/A |
| Calories from Fat | 297 g | 46% |
| Total Fat | 33 g | 50% |
| Saturated Fat | 19.1 g | 95% |
| Cholesterol | 291.3 mg | 97% |
| Sodium | 380.4 mg | 15% |
| Total Carbohydrate | 80.2 g | 26% |
| Dietary Fiber | 0.7 g | 2% |
| Sugars | 53.1 g | N/A |
| Protein | 10.2 g | 20% |
Variations & Substitutions
- For a gluten-free version, substitute the all-purpose flour in the cake with a gluten-free all-purpose flour blend. Be sure to check that your baking powder is also gluten-free.
- For a dairy-free version, use non-dairy milk and butter substitutes. Ensure the chocolate in the glaze is also dairy-free.
- Add a tablespoon of coffee liqueur to the pastry cream for a mocha twist.
- Replace the bittersweet chocolate in the glaze with white chocolate for a blond Boston Cream Pie.
FAQs (Frequently Asked Questions)
Q: Can I make the pastry cream ahead of time?
A: Yes! The pastry cream can be made up to 24 hours in advance and stored in the refrigerator. Just make sure to cover it with parchment paper to prevent a skin from forming.
Q: Can I use store-bought cake instead of making my own?
A: While homemade cake is always best, you can use store-bought cake layers in a pinch. Look for a plain yellow or vanilla cake.
Q: How do I prevent the cake from sticking to the pan?
A: Grease the cake pans thoroughly with nonstick cooking spray and line the bottoms with parchment paper circles. This will ensure the cakes release easily after baking.
Q: Why is my pastry cream lumpy?
A: Lumpy pastry cream is usually caused by the eggs scrambling. Make sure to temper the eggs properly by slowly whisking in a small amount of the hot milk mixture before adding them to the saucepan. Also, whisk constantly while cooking the pastry cream. Straining the final product removes any lumps.
Q: How long does the finished cake last?
A: The finished cake will last for up to 3 days in the refrigerator, tightly covered.
Final Thoughts
Now it’s your turn to create your own Boston Cream Pie memories. Don’t be intimidated by the multiple steps – each one is simple and straightforward. This recipe is a labor of love, and the result is a truly special dessert that’s sure to impress. Gather your ingredients, put on some music, and enjoy the process. And if you make it, let me know what you think! Perhaps you’ll even create your own family tradition with this wicked good treat. Consider pairing it with a cup of rich, dark roast coffee or a glass of chilled dessert wine for the ultimate indulgence. Enjoy!