
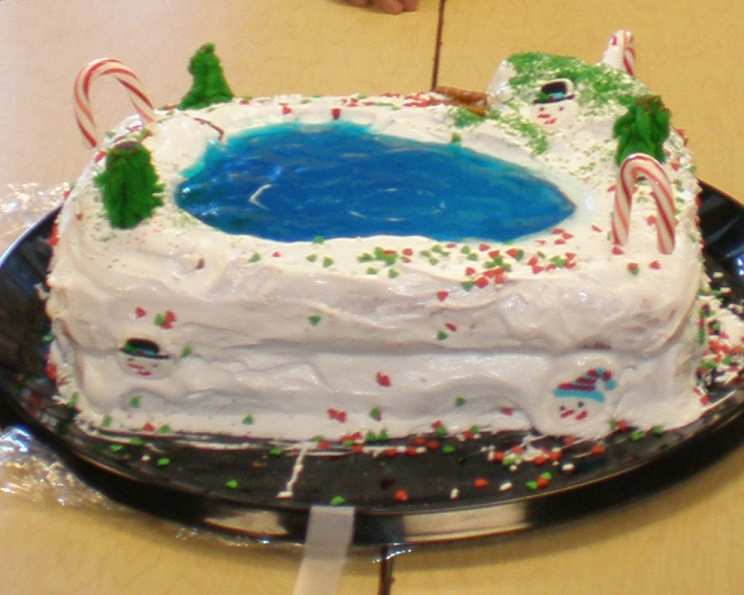
A Winter Wonderland Cake
The first snow of winter always filled our little kitchen with a special kind of magic. I remember one year, bundled in oversized sweaters, my siblings and I watched flakes dance past the window as Mom crafted a cake that mirrored the scene outside. It wasn’t just a cake; it was a edible snowscape, complete with marshmallow snowdrifts and pretzel stick trees. It was pure joy on a plate, and every bite tasted like a perfect snow day.
Recipe Overview
- Prep Time: 45 minutes
- Cook Time: 30 minutes
- Total Time: 1 hour 15 minutes
- Servings: 12
- Yield: 1 cake
- Dietary Type: Not specified
Ingredients
For the Cake:
- 1 (18 1/4 ounce) package Pillsbury Moist Supreme White Cake Mix
- 1 1/4 cups water
- 1/4 cup oil
- 2 eggs
For the Frosting:
- 1 (16 ounce) can Creamy Supreme Vanilla Frosting
- 1 (7 ounce) jar Marshmallow Creme
For the Hill and Pond:
- Pretzel sticks
- 1 (3 ounce) package Berry Blue Gelatin Mix
- Hot water
- Ice cubes
For Decoration (Optional):
- Bugles (horn-shaped corn snacks)
- Marshmallows
- Gumdrops
- Fruit by the Foot Chewy Fruit Snack Roll
- Teddy Grahams
- Chewing gum
- Gummy rings
- Gum sticks
Equipment Needed
- Two 9-inch round cake pans
- Medium mixing bowl
- Electric mixer
- Serving plate
- Cutting board
- Small sharp knife
- Spoon
Instructions
-
Begin by preparing the cake batter according to the directions on the package of Pillsbury Moist Supreme White Cake Mix. Use 1 1/4 cups water, 1/4 cup oil, and 2 eggs.
-
Grease and flour two 9-inch round cake pans. This ensures the cakes release cleanly after baking.
-
Pour the batter evenly into the prepared pans.
-
Bake the cakes as directed on the package instructions, usually around 30 minutes at 350°F (175°C). Check for doneness by inserting a toothpick into the center of the cake; it should come out clean or with only a few moist crumbs attached.
-
Once baked, remove the cakes from the oven and let them cool in the pans for 15 minutes.
-
After the initial cooling period, invert the cakes onto a wire rack and let them cool completely for another 20 minutes. It’s crucial that the cakes are completely cool before frosting to prevent the frosting from melting.
-
Place one cake layer in the freezer for at least 20 minutes. This will make it easier to cut and handle without crumbling.
-
While the cake layer is chilling, prepare the frosting. In a medium bowl, combine the can of Creamy Supreme Vanilla Frosting and the jar of Marshmallow Creme.
-
Use an electric mixer to beat the frosting and marshmallow creme until smooth and well combined. This will create a light and airy frosting with a delicious marshmallow flavor.
-
Take the room temperature cake layer and place it rounded side down on your serving plate.
-
Spread the top of the room temperature cake layer with a generous amount of the marshmallow frosting.
-
Remove the frozen cake layer from the freezer. Place it rounded side up, on a cutting board.
-
Using a small sharp knife, carefully cut out an irregular 6×4 inch oval shaped hole in the center of the frozen cake layer. This will be the “pond” in our winter scene. Be sure to cut no closer than 1 1/2 inches from the edge of the cake to maintain structural integrity.
-
Gently remove the oval piece of cake from the center. Save this piece, as it will be used to create the sliding hill.
-
Carefully place the frozen cake layer, rounded side up, on top of the frosted room temperature cake layer.
-
Frost the sides and top of the cake with the remaining marshmallow frosting, creating a smooth, even surface.
-
Thickly frost the inside of the pond with marshmallow frosting. Be sure to completely seal any gaps to prevent the gelatin from leaking.
-
Cut the oval piece of cake that was removed to make the pond in half lengthwise.
-
Place one half of the oval piece on top of the cake close to the pond to form the sliding hill.
-
Secure the hill by inserting pretzel sticks into the cake to provide support.
-
Frost the hill with the marshmallow frosting, creating a smooth, snowy surface.
-
Set the other half of the oval piece aside for later.
-
Prepare the Berry Blue Gelatin Mix as directed for speed set. This usually involves dissolving the gelatin in hot water and then adding ice cubes to quickly cool and set the gelatin. Follow the package instructions carefully.
-
Allow the gelatin to cool and thicken slightly. Once it has reached a slightly thickened consistency, carefully spoon it into the pond, filling it to within 1/4 inch of the top of the cake.
-
Now comes the fun part: Decorate your winter wonderland cake! Use Bugles to create trees, marshmallows to create snowmen with gumdrop hats and noses, and Fruit by the Foot to make scarves. You can use Teddy Grahams with chewing gum skates, gummy ring inner tubes, or gum stick toboggans to add playful figures to the scene. Get creative and let your imagination run wild!
Expert Tips & Tricks
- For a more stable pond, consider using a clear piping gel instead of gelatin. This will prevent any potential leaks and provide a longer-lasting, edible “water” feature.
- To create a truly wintery effect, lightly dust the entire cake with powdered sugar to mimic freshly fallen snow.
- If you’re short on time, you can purchase pre-made cake decorations instead of making your own. Look for snowflake sprinkles, miniature snowmen figurines, or other winter-themed embellishments.
- Ensure your cake layers are completely cool before frosting. A warm cake will melt the frosting, resulting in a messy and uneven finish.
- Level the cake layers before frosting to create a more uniform and professional-looking cake. Use a serrated knife to carefully trim any domed tops.
Serving & Storage Suggestions
Serve this winter wonderland cake as a festive dessert for holiday gatherings, birthday parties, or any special occasion. The cake is best enjoyed on the day it is made, but it can be stored in an airtight container in the refrigerator for up to 3 days. Be aware that the gelatin pond may start to weep slightly after a day or two. It is not recommended to freeze this cake due to the gelatin and the decorated elements.
Nutritional Information
Note: Nutritional information is an estimate and can vary based on specific ingredients used.
| Nutrient | Amount per Serving | % Daily Value |
|---|---|---|
| Calories | 479 kcal | 24% |
| Total Fat | 18g | 28% |
| Saturated Fat | 3g | 15% |
| Cholesterol | 71mg | 24% |
| Sodium | 417mg | 17% |
| Total Carbohydrate | 79g | 26% |
| Dietary Fiber | 0.4g | 2% |
| Sugars | 62g | N/A |
| Protein | 3g | 6% |
Variations & Substitutions
- Cake Flavor: Experiment with different cake mix flavors, such as chocolate, vanilla, or lemon.
- Frosting: Substitute the marshmallow frosting with cream cheese frosting, chocolate ganache, or a simple buttercream.
- Gelatin Alternative: For a vegetarian option, use agar-agar to set the blue “pond.” Follow the package instructions for agar-agar, adjusting the water and setting time accordingly.
- Dietary Restrictions: Use a gluten-free cake mix and gluten-free pretzels to make this cake gluten-free. Look for dairy-free frosting and marshmallow creme alternatives to make it dairy-free.
FAQs (Frequently Asked Questions)
Q: Can I make the cake layers ahead of time?
A: Yes, you can bake the cake layers a day or two in advance. Wrap them tightly in plastic wrap and store them at room temperature or in the refrigerator.
Q: How do I prevent the gelatin from leaking out of the pond?
A: Make sure to completely seal the edges of the pond with a thick layer of frosting. You can also use a clear piping gel to create a more secure barrier.
Q: What if I don’t have Bugles for the trees?
A: You can use other cone-shaped snacks, such as waffle cones or sugar cones, or even create trees from frosting.
Q: Can I use a different flavor of gelatin?
A: Absolutely! Choose any flavor that complements the winter theme, such as blue raspberry, or even a clear gelatin with blue food coloring.
Q: How can I make the cake more visually appealing?
A: Get creative with your decorations! Use edible glitter, snowflake sprinkles, or miniature winter figurines to add a touch of magic to your cake.
Final Thoughts
This Winter Wonderland Cake is more than just a dessert; it’s an edible work of art that’s sure to bring joy and wonder to any occasion. So gather your ingredients, unleash your creativity, and create a winter masterpiece that will be remembered long after the last slice is devoured. Don’t be afraid to experiment with different decorations and flavors to make it your own. And most importantly, have fun! Share your creations and feedback, I am eager to see your take on this recipe!