
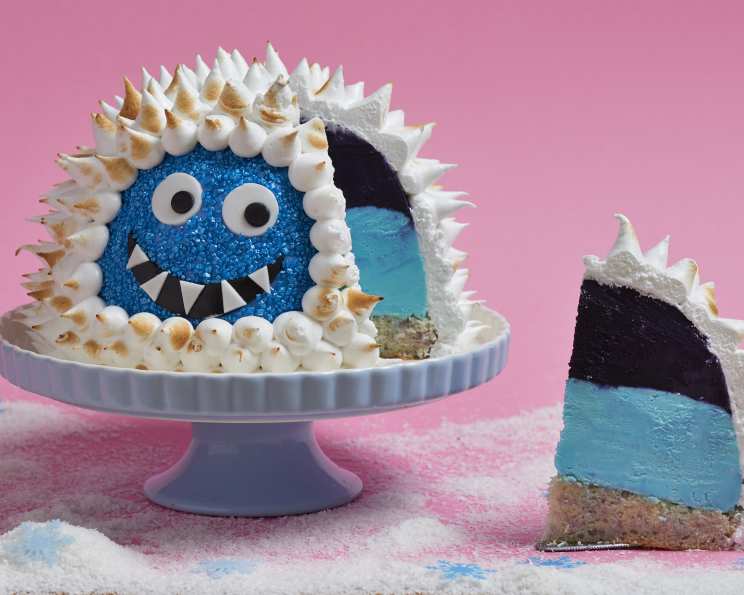
Yeti Baked Alaska: A Culinary Everest
I still remember the first time I saw a Baked Alaska. It was at a dimly lit restaurant, the kind with velvet booths and hushed conversations. The waiter appeared with a flaming meringue dome, a miniature spectacle of fire and ice. The contrast of the scorching exterior and the frozen heart was pure magic, a culinary illusion that sparked my lifelong fascination with dessert transformations. This Yeti Baked Alaska takes that classic wonder to new heights, both literally and figuratively, with its playful design and frosty, flavorful layers.
Recipe Overview
- Prep Time: 45 minutes
- Cook Time: 25 minutes
- Total Time: 1 hour 10 minutes
- Servings: 8-10
- Yield: 1 Baked Alaska
- Dietary Type: Not specified (can be adapted)
Ingredients
- ½ quantity vanilla sponge cake mix
- 2 tablespoons purple candy sprinkles
- 2 tablespoons blue candy sprinkles
- 2 cups purple ice cream (or gelato)
- 2 cups blue ice cream (or gelato)
Meringue:
- 4 egg whites
- 1 cup caster sugar
- ⅓ cup water
- 1 pinch cream of tartar
Decoration:
- Blue, white, and black fondant icing
- White icing sugar
- Blue sanding sugar
Equipment Needed
- 7-inch round cake tin
- Wire rack
- 2-pint glass bowl
- Plastic wrap
- Small saucepan
- Sugar thermometer
- Whisk
- Piping bag with a large round nozzle
- Serving plate
- Brule torch
Instructions
- Preheat your oven according to the instructions on the vanilla sponge cake mix packaging.
- Prepare the vanilla sponge cake mix according to the package directions, incorporating the 2 tablespoons of purple candy sprinkles and 2 tablespoons of blue candy sprinkles into the batter before baking. This adds a whimsical touch of color and fun throughout the cake.
- Grease and line a 7-inch round cake tin with baking parchment. This prevents sticking and makes for easy removal.
- Pour the batter into the prepared cake tin and bake according to the package instructions. Typically, this will be around 20-25 minutes, but check for doneness with a toothpick. The cake is ready when a toothpick inserted into the center comes out clean.
- Once baked, remove the cake from the oven and let it cool in the tin for 10 minutes before transferring it to a wire rack to cool completely. This prevents the cake from becoming soggy.
- While the cake is cooling, prepare the ice cream mold. Double line the base of a 2-pint glass bowl with plastic wrap, leaving generous overhang on the edges. The plastic wrap is essential for easy unmolding later.
- Allow the purple ice cream to soften slightly at room temperature – just enough to make it easily spoonable, but not completely melted.
- Spoon the softened purple ice cream into the bottom of the bowl, smoothing the surface evenly. This creates the first layer of our Yeti’s icy interior.
- Place the bowl in the freezer for 2 hours to allow the purple ice cream to set firmly. This ensures a distinct layer that won’t bleed into the next.
- Repeat steps 7-9 with the blue ice cream, spooning it over the set purple ice cream layer. The blue ice cream should come approximately to the top of the bowl.
- Once the cake has completely cooled, use a serrated knife to trim the edges so it fits perfectly inside the glass bowl, pressing it firmly onto the blue ice cream. Ensure the cake sits snugly on top of the ice cream to create a solid base for the meringue.
- Return the bowl to the freezer to allow the cake and ice cream layers to freeze solid together, ideally for at least 2 hours or overnight.
- Prepare the Yeti’s face. Using the blue, white, and black fondant icing, mold and shape the features of a Yeti face (eyes, nose, mouth). Set the finished face aside.
- Lightly brush the fondant face with water and sprinkle it with blue sanding sugar. This adds a touch of sparkle and visual interest.
- Prepare the meringue. Combine the caster sugar and water in a small saucepan fitted with a sugar thermometer.
- Stir the caster sugar and water over low heat until the sugar is completely dissolved.
- Increase the heat to medium and cook the syrup without stirring, until it reaches 240°F (115°C) on the sugar thermometer. This is the “soft-ball” stage.
- While the syrup is heating, whisk the egg whites and cream of tartar in a clean, grease-free bowl using an electric mixer until soft peaks form. The cream of tartar helps stabilize the egg whites.
- Once the syrup reaches 240°F (115°C), remove it from the heat. Carefully and slowly drizzle the hot syrup into the egg whites, whisking constantly on medium-high speed. It’s crucial to pour the syrup in a thin stream to avoid cooking the egg whites.
- Continue whisking the mixture until it becomes stiff, glossy, and cool to the touch. This may take 5-7 minutes. This Italian meringue is stable and perfect for creating a beautiful baked alaska.
- Spoon the meringue into a piping bag fitted with a large round nozzle.
- Remove the ice cream and cake from the freezer. Invert it onto a serving plate. Remove the plastic wrap.
- Attach the prepared fondant Yeti face onto the side of the ice cream dome.
- Pipe the Yeti’s fur all over the surface of the cake and ice cream dome in long, spiky strands using the prepared meringue. This creates the Yeti’s characteristic shaggy coat.
- Return the entire creation to the freezer until ready to serve.
- Just before serving, use a brulee torch to lightly brown the meringue. Be careful not to melt the ice cream underneath. Aim for a golden-brown color on the tips of the meringue spikes.
Expert Tips & Tricks
- For an extra layer of flavor, brush the sponge cake with a simple syrup (sugar and water boiled together) before assembling the Baked Alaska. This adds moisture and sweetness.
- To ensure the ice cream stays frozen during the torching process, work quickly and efficiently. Use a high-powered torch and keep the flame moving.
- If you don’t have a brulee torch, you can briefly broil the Baked Alaska in the oven, watching it very carefully to prevent burning.
- Make sure all bowls and utensils that come in contact with the egg whites are completely clean and free of grease for the best meringue volume.
Serving & Storage Suggestions
Serve the Yeti Baked Alaska immediately after torching for the best contrast between the warm meringue and the cold ice cream. Present it on a chilled serving plate.
Leftovers can be stored in the freezer, tightly wrapped in plastic wrap, for up to 2-3 days. Be aware that the meringue may soften slightly upon refreezing. It is best enjoyed fresh.
Nutritional Information
| Nutrient | Amount per Serving | % Daily Value |
|---|---|---|
| Calories | 350 kcal | 18% |
| Total Fat | 15g | 23% |
| Saturated Fat | 9g | 45% |
| Cholesterol | 80mg | 27% |
| Sodium | 150mg | 7% |
| Total Carbohydrate | 50g | 17% |
| Dietary Fiber | 1g | 4% |
| Sugars | 35g | – |
| Protein | 5g | 10% |
Note: Nutritional information is an estimate and may vary based on specific ingredients and portion sizes.
Variations & Substitutions
- For a gluten-free version, use a gluten-free vanilla sponge cake mix.
- Experiment with different ice cream flavors. Raspberry and chocolate, or pistachio and strawberry would be delicious combinations.
- For a vegan Baked Alaska, use a vegan sponge cake and vegan ice cream. Aquafaba (chickpea brine) can be used to make a vegan meringue.
- Instead of a Yeti face, decorate with edible glitter, sprinkles, or other fondant shapes.
FAQs (Frequently Asked Questions)
Q: Can I make this ahead of time?
A: Yes, you can assemble the entire Baked Alaska (up to the meringue piping stage) and freeze it for several days. Add the meringue and torch just before serving.
Q: What if I don’t have a sugar thermometer?
A: While a sugar thermometer is recommended for the Italian meringue, you can use the “soft-ball stage” test. Drop a small amount of the syrup into a bowl of cold water. If it forms a soft, pliable ball, it’s ready.
Q: Can I use store-bought meringue instead of making my own?
A: While possible, homemade meringue is highly recommended for its superior texture and stability. Store-bought meringue may not hold its shape as well or brown evenly.
Q: How do I prevent the ice cream from melting when torching the meringue?
A: Ensure the Baked Alaska is thoroughly frozen before torching, and use a high-powered torch with a focused flame. Keep the torch moving constantly and avoid lingering in one spot.
Q: What can I do if my meringue isn’t stiff enough?
A: Make sure your bowl and whisk are completely clean and grease-free. Try adding a pinch more cream of tartar to stabilize the egg whites. If it still doesn’t stiffen, the egg whites may have been contaminated with yolk.
Final Thoughts
The Yeti Baked Alaska is more than just a dessert; it’s an experience. The combination of flavors, textures, and visual appeal is truly captivating. Don’t be intimidated by the seemingly complex steps – with a little patience and attention to detail, you can create this show-stopping dessert and wow your friends and family. Embrace the challenge, unleash your inner artist, and bring this frosty friend to life in your own kitchen. I’d love to hear how your Yeti adventure turns out! Share your creations and feedback – happy baking!