
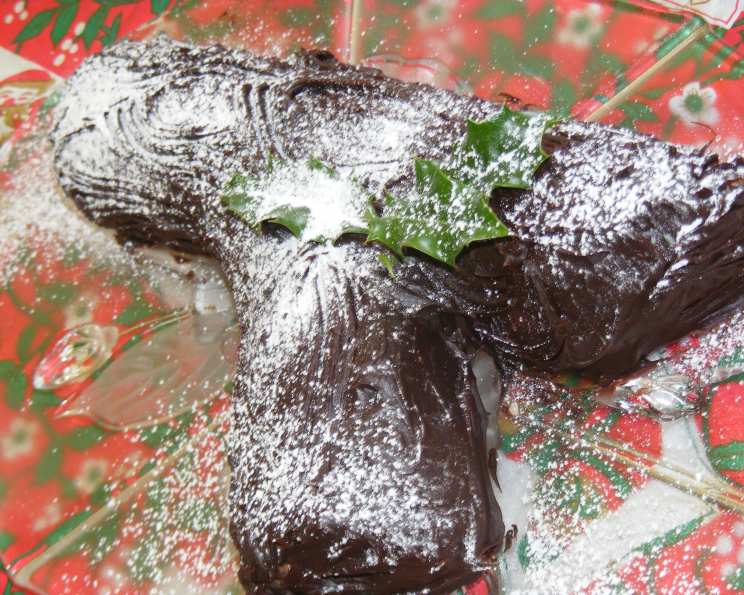
A Chocolate Yule Log: A Festive Tradition
The first time I made a Yule Log, or Bûche de Noël, I was a nervous culinary student determined to impress my family during the holidays. I remember the frantic search for the perfect bark texture, wielding a fork with the precision of a sculptor, and the sweet, earthy aroma of chocolate and hazelnuts filling the kitchen. The final result, though a bit rustic, was met with delighted gasps and satisfied smiles, sparking a tradition that continues to this day. This recipe, adapted from a cherished family cookbook, captures the essence of that initial experience – rich, decadent, and guaranteed to bring joy to your holiday table.
Recipe Overview
- Prep Time: 30 minutes
- Cook Time: 12 minutes
- Total Time: 42 minutes
- Servings: 8
- Yield: 1 Yule Log
- Dietary Type: Not specified
Ingredients
For the Sponge:
- ½ cup plain flour
- 2 tablespoons cocoa powder
- 3 eggs
- ⅓ cup caster sugar
- 50 g (1.8 oz) butter, melted and cooled
- 1 tablespoon caster sugar, extra
For the Filling:
- 125 g (4.4 oz) white chocolate, chopped
- ½ cup cream
- 50 g (1.8 oz) hazelnuts, toasted and finely chopped
For the Topping:
- 125 g (4.4 oz) dark chocolate, chopped
- ½ cup cream
- Icing sugar, to dust
Equipment Needed
- 30x35cm (12×14 inch) Swiss roll tin
- Baking paper
- Electric beaters
- Small heatproof bowls
- Small saucepan
- Large metal spoon
- Clean tea towel
- Serving platter
- Fork
Instructions
-
Begin by preparing the Swiss roll tin. Brush the base and sides of a 30x35cm (12×14 inch) Swiss roll tin generously with oil or melted butter. Then, line the base and sides neatly with baking paper. This will ensure the sponge releases easily after baking.
-
Preheat your oven to 180°C (350°F). Make sure the oven rack is positioned in the center for even baking.
-
In a medium bowl, sift together the plain flour and cocoa powder twice. This helps to aerate the dry ingredients and prevent lumps in the batter, resulting in a smoother sponge.
-
In a large bowl, using electric beaters, beat the eggs and caster sugar for approximately 5 minutes, or until the mixture becomes light and fluffy and has significantly increased in volume. This step is crucial for creating a light and airy sponge.
-
Sift the flour mixture carefully over the egg mixture. Then, pour the melted and cooled butter around the edge of the bowl.
-
Using a large metal spoon, gently fold the mixture together to incorporate the flour and butter. It’s essential to fold carefully to avoid overmixing and losing too much volume from the beaten eggs. Overmixing will result in a dense, flat sponge.
-
Spread the mixture evenly into the prepared tin. Ensure the batter reaches all corners of the tin for a uniform bake.
-
Bake for about 12 minutes, or until the sponge springs back lightly to the touch. Overbaking will result in a dry and brittle sponge, making it difficult to roll.
-
While the sponge bakes, sprinkle the extra caster sugar evenly over a clean tea towel. This will prevent the sponge from sticking when rolled.
-
Once the sponge is baked, immediately turn it out onto the sugared tea towel, with the baking paper still attached to the cake. Position the sponge close to one end of the towel.
-
Carefully roll up the sponge and tea towel together, starting from one end. This step needs to be done while the sponge is still warm to prevent cracking.
-
Leave the rolled sponge to cool completely in the tea towel. This will help the sponge retain its shape and prevent it from breaking when unrolled later.
-
To prepare the white chocolate filling, place the chopped white chocolate in a small heatproof bowl.
-
Bring a small pan of water to a gentle boil, then remove it from the heat. Add the cream to the chocolate and place the bowl over the pan of water, ensuring the base of the bowl does not touch the water (a double boiler effect).
-
Stir until the chocolate is melted and smooth. This process ensures the chocolate melts gently without burning.
-
Repeat the same process with the dark chocolate and cream for the topping, placing the chopped dark chocolate in a separate heatproof bowl and melting it over a pan of simmering water.
-
Allow the white chocolate mixture to cool to room temperature until it reaches a thick, creamy consistency. This is important for creating a stable filling.
-
Similarly, let the dark chocolate mixture cool until it thickens to a spreadable consistency.
-
Once the white chocolate filling has cooled, using electric beaters, beat the mixture until soft peaks form. Be careful not to overbeat, as this can cause the chocolate to seize.
-
Carefully unroll the cooled sponge, removing the tea towel and baking paper.
-
Spread the white chocolate filling evenly over the sponge, leaving a 2cm (¾ inch) border at one end to prevent the filling from squeezing out when re-rolled.
-
Sprinkle the toasted and finely chopped hazelnuts generously over the filling.
-
Re-roll the sponge tightly, starting from the filled end. Trim the ends neatly with a sharp knife.
-
Cut one end of the log off on the diagonal and place it alongside the main log to create a branch, using some of the chocolate frosting to adhere it to the log.
-
Place the completed roll onto a serving platter.
-
Spread the dark chocolate topping evenly over the entire log, ensuring it is fully coated.
-
To create the bark effect, run the tines of a fork along the length of the roll, making irregular lines and textures.
-
Just before serving, dust the Yule log generously with icing sugar to resemble snow. Decorate with fresh green leaves, if desired, for an extra festive touch.
Expert Tips & Tricks
- To prevent the sponge from cracking while rolling, ensure it is still slightly warm when you first roll it up in the tea towel.
- If you find the sponge is too dry, lightly brush it with a simple sugar syrup before adding the filling.
- For an intensified hazelnut flavor, toast the hazelnuts until fragrant and then rub off their skins before chopping.
- If the dark chocolate topping becomes too thick to spread, gently warm it over a pan of simmering water until it reaches a more manageable consistency.
- Experiment with different fillings, such as chocolate ganache, coffee buttercream, or even a layer of raspberry jam for a fruity twist.
Serving & Storage Suggestions
Serve your Chocolate Yule Log chilled or at room temperature. For a truly festive presentation, garnish the platter with additional icing sugar “snow”, fresh berries, and sprigs of rosemary or other greenery.
Leftovers can be stored in an airtight container in the refrigerator for up to 3 days. Due to the cream-based fillings and toppings, it’s best to avoid leaving the Yule Log at room temperature for extended periods. Freezing is not recommended as it can affect the texture of the sponge and fillings.
Nutritional Information
Please note that these values are estimates and can vary based on specific ingredients and portion sizes.
| Nutrient | Amount per Serving | % Daily Value |
|---|---|---|
| Calories | 420 kcal | 21% |
| Total Fat | 25g | 38% |
| Saturated Fat | 15g | 75% |
| Cholesterol | 115mg | 38% |
| Sodium | 95mg | 4% |
| Total Carbs | 45g | 15% |
| Dietary Fiber | 2g | 8% |
| Sugars | 30g | 60% |
| Protein | 5g | 10% |
Variations & Substitutions
- Gluten-Free Yule Log: Substitute the plain flour with a gluten-free flour blend for a gluten-free version. Ensure the blend contains xanthan gum or add some separately to help with the sponge’s structure.
- Dairy-Free Filling: Use coconut cream instead of regular cream in both the white and dark chocolate mixtures for a dairy-free alternative.
- Nut-Free Yule Log: Omit the hazelnuts entirely or replace them with other toppings like chocolate shavings, sprinkles, or candied orange peel.
- Flavor Variations: Add a teaspoon of instant coffee powder to the dark chocolate topping for a mocha-flavored Yule Log or a splash of rum or other liqueur to the white chocolate filling for an adult twist.
FAQs (Frequently Asked Questions)
Q: Why is my sponge cracking when I roll it?
A: The sponge is likely too dry or has cooled down too much. Make sure to roll the sponge while it’s still slightly warm, and consider brushing it with a simple sugar syrup before adding the filling to add moisture.
Q: Can I make the Yule Log ahead of time?
A: Yes, you can bake the sponge and prepare the fillings a day in advance. Store the sponge rolled in a tea towel at room temperature and the fillings in airtight containers in the refrigerator. Assemble the Yule Log on the day you plan to serve it.
Q: How do I get the perfect bark texture on the chocolate topping?
A: Use a fork and drag it along the length of the log, varying the pressure and angle to create irregular lines and textures that mimic the appearance of bark.
Q: Can I use a different type of chocolate for the filling or topping?
A: Absolutely! Feel free to experiment with milk chocolate, flavored chocolate, or even a combination of different chocolates to create your own unique flavor profile.
Q: What can I do if my white chocolate filling is too runny?
A: If the filling is too runny, refrigerate it for about 15-20 minutes to allow it to thicken slightly before beating it with electric beaters. Be careful not to over-chill it, or it may become too firm.
Final Thoughts
This Chocolate Yule Log is more than just a dessert; it’s a symbol of warmth, joy, and togetherness during the holiday season. Whether you’re a seasoned baker or a novice in the kitchen, I encourage you to give this recipe a try. Don’t be afraid to get creative with your decorations and flavors, and most importantly, enjoy the process of creating a delicious and beautiful centerpiece for your holiday celebration. I’d love to hear about your experiences and any variations you try, so please share your feedback! And if you’re looking for a perfect pairing, consider serving this Yule Log with a glass of chilled dessert wine or a warm cup of spiced coffee. Happy baking!