
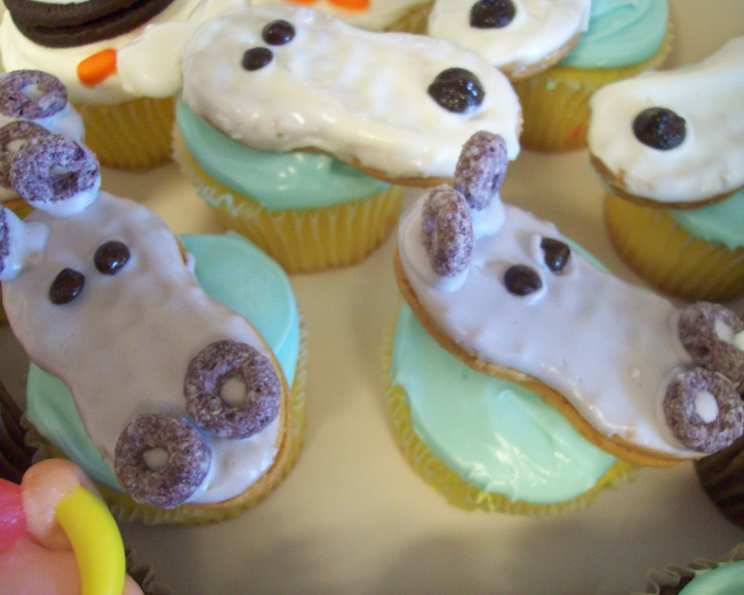
Zoo Cupcakes: A Wild Adventure in Frosting
I still remember the thrill of my fifth birthday party. My mom, a wizard in the kitchen as far as I was concerned, unveiled a platter of cupcakes that transformed our humble dining table into a vibrant jungle. Each cupcake was a unique animal, meticulously crafted with frosting, candies, and cookies. The delighted gasps and sticky, frosting-covered faces are etched in my memory, a testament to the magic of those simple Zoo Cupcakes. Now, decades later, I’m excited to share the joy and wonder of this whimsical treat, allowing you to create unforgettable memories with your own little cubs.
Recipe Overview
- Prep Time: 1 hour
- Cook Time: 0 minutes (using premade cupcakes)
- Total Time: 1 hour
- Yields: 12 cupcakes
- Serves: 12
- Dietary Type: Vegetarian
Ingredients
- 12 premade unfrosted cupcakes
- 1 (16 ounce) container chocolate frosting
- 1 (16 ounce) container vanilla frosting
- 1 (5 ounce) box food coloring (with red, yellow, green, and blue)
- Assorted candies and cookies for decoration (suggestions below)
Decoration Suggestions:
- Nutter Butter cookies
- Froot Loops cereal
- Chocolate chips
- Marshmallows
- Tic Tacs
- Runts
- Jelly beans
- Mini pretzels and pretzel sticks
- Good & Plenty candies
- Oreo cookies and Nilla cookies
Equipment Needed
- Small bowls for separating frosting
- Spatulas or butter knives for frosting
- Piping bags (optional)
- Microwave-safe bowls for melting frosting (optional)
- Wax paper or parchment paper
Instructions
-
Gather all your decorating supplies. The beauty of these cupcakes lies in the creativity, so don’t be afraid to substitute ingredients or add your own personal touch.
-
Prepare your frostings. Divide the vanilla frosting into several small bowls, depending on how many colors you want to create. Add a few drops of food coloring to each bowl and mix well until you achieve your desired shades. Remember, a little goes a long way, so start with a small amount and add more gradually. I used one drop each of red, blue, and yellow food coloring to create a gray frosting.
-
If you want to use melted frosting for dipping cookies or pretzels, place small amounts of chocolate frosting into a microwave-safe bowl. Microwave in 15-second intervals, stirring in between, until smooth and melted. Be careful not to overheat the frosting, or it will become grainy.
-
Begin decorating! Use your imagination to transform each cupcake into a unique animal. Here are a few ideas, drawing inspiration from the original source:
-
Hippo Cupcakes: Use a Nutter Butter cookie for the hippo’s face. Dip the cookie in melted frosting to cover them before adding to cupcake. Attach Tic Tacs for teeth and use frosting to add eyes.
-
Lion Cupcakes: Frost the cupcake with yellow or orange frosting. Use Froot Loops for the lion’s mane, pressing them gently into the frosting. Add chocolate chips for eyes and a small piece of jelly bean for the nose.
-
Zebra Cupcakes: Frost the cupcake with vanilla frosting. Cut small strips of Oreo cookie (without the cream filling) and arrange them on the frosting to create the zebra’s stripes.
-
Monkey Cupcakes: Use Nilla Wafers for the monkey’s face. Use chocolate frosting to add details like eyes, nose, and mouth. Attach the cookie to the cupcake with frosting. Use mini pretzel sticks for the ears, attach them to the cupcake using frosting.
-
Giraffe Cupcakes: Frost the cupcake with yellow frosting. Use small chocolate chips to create the giraffe’s spots.
-
Elephant Cupcakes: Frost the cupcake with gray frosting (created using food coloring as described above). Use a Nutter Butter cookie for the face, dipping it in melted frosting to cover it before adding to cupcake. Use small pieces of pretzels for the ears and add frosting for eyes.
-
Penguin Cupcakes: Frost the cupcake using black frosting. Use white frosting for the chest and add runts for the feet.
-
-
Continue decorating each cupcake with the candies, cookies, and frosting to bring your zoo animals to life.
-
Let the decorated cupcakes set for a few minutes to allow the frosting to firm up slightly. This will help prevent the decorations from sliding off.
Expert Tips & Tricks
- Melted Frosting Magic: Melting a small amount of frosting can act as a fantastic “glue” for attaching decorations that might otherwise be difficult to secure. Just be sure to let it cool slightly before using, so it doesn’t melt the surrounding frosting.
- Piping Perfection: For more precise details, use piping bags fitted with small tips. This allows you to create intricate designs and add fine details to your animal faces.
- Frosting Consistency: If your frosting is too thick, add a tiny splash of milk or water to thin it out. If it’s too thin, add a spoonful of powdered sugar.
- Prepare Ahead: You can bake or buy the cupcakes a day in advance. Store them in an airtight container at room temperature. This will save you time on the day of decorating.
- Edible Glue: If you are short on frosting, melted white chocolate can work as edible glue to hold your decorations.
Serving & Storage Suggestions
Serve these adorable Zoo Cupcakes at room temperature. Arrange them on a platter or cupcake stand to showcase your creative designs. For storage, place the cupcakes in an airtight container at room temperature for up to 2 days or in the refrigerator for up to 5 days. The frosting may become slightly harder in the refrigerator, so allow the cupcakes to come to room temperature before serving for the best texture. Freezing is not recommended, as the frosting and decorations may not hold up well.
Nutritional Information
Note: The following nutritional information is an estimate and will vary depending on the specific ingredients used, especially the types and amounts of candies and cookies.
| Nutrient | Amount per Serving | % Daily Value |
|---|---|---|
| Calories | 308 kcal | N/A |
| Calories from Fat | 115 g | N/A |
| Total Fat | 12.8 g | 19% |
| Saturated Fat | 3.2 g | 16% |
| Cholesterol | 0 mg | 0% |
| Sodium | 138.7 mg | 5% |
| Total Carbohydrate | 49.6 g | 16% |
| Dietary Fiber | 0.3 g | 1% |
| Sugars | 45.7 g | 182% |
| Protein | 0.4 g | 0% |
Variations & Substitutions
- Dietary Adaptations: Use gluten-free cupcakes, dairy-free frosting, and appropriate candies/cookies for a gluten-free or dairy-free version.
- Frosting Flavors: Experiment with different frosting flavors like lemon, strawberry, or peanut butter to add a unique twist.
- Theme Variations: Adapt the animal decorations to fit a specific theme, such as farm animals, sea creatures, or even dinosaurs!
- Homemade Cupcakes: If you prefer, bake your own cupcakes from scratch using your favorite recipe.
FAQs (Frequently Asked Questions)
Q: Can I use store-bought frosting instead of making my own?
A: Absolutely! Store-bought frosting is a convenient option, especially if you’re short on time. Just make sure to choose a good quality frosting that pipes well.
Q: How do I prevent the decorations from falling off the cupcakes?
A: Make sure the frosting is still slightly tacky when you add the decorations. You can also use a small amount of melted frosting or white chocolate as “glue.”
Q: Can I make these cupcakes ahead of time?
A: You can bake or buy the cupcakes a day in advance and store them in an airtight container. It’s best to decorate them closer to serving time to prevent the decorations from becoming stale.
Q: What if I don’t have all the suggested candies and cookies?
A: Get creative and use what you have on hand! The beauty of these cupcakes is their versatility. Use different candies, sprinkles, or even fruit to create your animal designs.
Q: How do I make the gray frosting?
A: Combine one drop each of red, blue, and yellow food coloring into white frosting and mix well. Adjust the amounts of each color until you achieve your desired shade of gray.
Final Thoughts
I hope this recipe inspires you to create your own menagerie of adorable Zoo Cupcakes. Don’t be afraid to let your imagination run wild and involve the kids in the decorating process. These cupcakes are not just a delicious treat, but a fun and memorable activity that will bring smiles to everyone’s faces. I encourage you to share your creations and any variations you come up with! Perhaps serve alongside some animal crackers and a tall glass of milk for a truly whimsical celebration.