
The Comfort of Zwieback: A Taste of Tradition
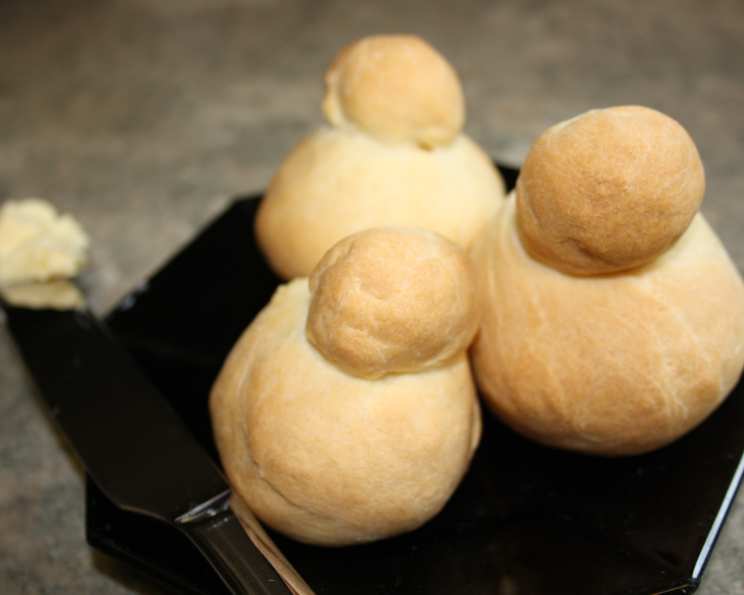
My grandmother, a woman whose hands seemed eternally dusted with flour, always had a basket of Zwieback sitting on her kitchen counter. I can still picture it: a simple, woven basket overflowing with these golden, double-decker buns. As a child, I was captivated by their unique shape, the little knob perched atop the larger bun, seemingly defying gravity. More than just bread, they represented warmth, family, and a connection to her heritage – a taste of love baked into every bite. The slightly sweet, almost toasted flavor of Zwieback is a memory I cherish, and one I’m excited to share with you.
Recipe Overview
- Prep Time: 2 hours (includes rising time)
- Cook Time: 15-20 minutes
- Total Time: 2 hours 20 minutes
- Servings: Varies (Yields approximately 36 buns)
- Dietary Type: Not specified – Contains dairy
Ingredients
- 2 cups milk
- 1 cup butter (at room temperature)
- 2 1/4 teaspoons dry yeast
- 1/2 cup lukewarm water
- 1 teaspoon salt
- 1 teaspoon sugar
- 6 cups flour
Equipment Needed
- Large mixing bowl
- Measuring cups and spoons
- Greased baking pan(s)
- Clean kitchen towel
- Liquid measuring cup or small bowl
Instructions
- Activate the yeast: In a liquid measuring cup or small bowl, dissolve the dry yeast and sugar in the lukewarm water. Let this mixture stand for about 5-10 minutes, or until it becomes foamy. This indicates that the yeast is active and ready to leaven the dough.
- Scald the milk: In a saucepan, scald the milk. This means heating the milk until it is just below boiling point, or when small bubbles start to form around the edges of the pan. Remove from heat and allow the milk to cool until it’s lukewarm. This step is important as it helps to improve the texture of the bread.
- Combine wet ingredients: In a large bowl, combine the cooled milk, softened butter, activated yeast mixture, and salt. The butter should be soft enough to easily incorporate into the milk.
- Incorporate the flour: Gradually add the flour to the wet ingredients, mixing with a spoon or your hands until a stiff batter forms. Don’t add all the flour at once; start with about half and then add more gradually.
- Knead the dough: Continue adding flour as needed until the dough becomes smooth and soft, but not sticky. Turn the dough out onto a lightly floured surface and knead it for about 8-10 minutes, or until it is elastic and pliable. Kneading develops the gluten in the flour, which gives the Zwieback its characteristic texture.
- First rise: Place the kneaded dough in a lightly oiled bowl, turning to coat all sides. Cover the bowl with a clean kitchen towel and let it rise in a warm place until it has doubled in bulk. This usually takes about 1 to 1.5 hours, depending on the temperature of your environment.
- Shape the buns: Once the dough has doubled, punch it down to release the air. Divide the dough into small pieces, about the size of a large walnut. Then, take a smaller piece of dough and shape it into a smaller bun.
- Assemble the Zwieback: Place the smaller bun on top of a larger one, and gently press down firmly with one finger so that the two stick together. This creates the distinctive double-bun shape of Zwieback.
- Second rise: Place the formed buns on a greased baking pan, leaving some space between each bun to allow for expansion. Cover the pan with a clean kitchen towel and let the buns rise again until they have doubled in bulk, about 30-45 minutes.
- Bake the Zwieback: Preheat your oven to 350°F (175°C). Bake the Zwieback in the preheated oven for about 15-20 minutes, or until they are golden brown on top.
- Cool: Remove the baked Zwieback from the oven and let them cool on a wire rack before serving.
Expert Tips & Tricks
- Room Temperature Butter is Key: Ensure your butter is truly at room temperature for easy incorporation. If you forget to take it out in advance, you can carefully microwave it in short bursts until softened, but avoid melting it.
- Don’t Overbake: Keep a close eye on the Zwieback while they bake. Overbaking will result in dry, hard buns.
- Warm Environment for Rising: Create a warm environment for the dough to rise by placing it in a turned-off oven with the light on, or near a warm stovetop.
- Adjust Flour as Needed: The amount of flour needed may vary depending on humidity. Add flour gradually until the dough reaches the desired consistency.
Serving & Storage Suggestions
Zwieback is best enjoyed warm, either plain or with a smear of butter, jam, or honey. They are also excellent dipped in coffee or tea. Store leftover Zwieback in an airtight container at room temperature for up to 3 days, or in the refrigerator for up to a week. For longer storage, freeze the baked Zwieback in a freezer-safe bag or container for up to 2-3 months. To reheat, thaw the Zwieback at room temperature and warm it in a low oven or microwave until heated through.
Nutritional Information
| Nutrient | Amount per Serving (estimated) | % Daily Value (approximate) |
|---|---|---|
| Calories | 130-150 kcal | 6-8% |
| Total Fat | 6-8 g | 8-10% |
| Saturated Fat | 4-5 g | 15-20% |
| Cholesterol | 15-20 mg | 5-7% |
| Sodium | 100-150 mg | 4-6% |
| Total Carbohydrate | 15-20 g | 5-7% |
| Dietary Fiber | 1 g | 2-4% |
| Sugars | 0-1 g | 0-2% |
| Protein | 3-4 g | 6-8% |
Note: Nutritional information is an estimate and may vary based on specific ingredients and portion sizes.
Variations & Substitutions
- Dairy-Free Zwieback: Substitute the milk with a plant-based milk alternative like almond, soy, or oat milk. Use a vegan butter substitute for the butter.
- Whole Wheat Zwieback: Replace up to half of the all-purpose flour with whole wheat flour for a nuttier flavor and added fiber.
- Sweet Zwieback: Add an extra tablespoon of sugar to the dough for a sweeter treat.
- Spiced Zwieback: Incorporate a pinch of ground cinnamon, nutmeg, or cardamom to the dough for a warm, spiced flavor.
FAQs (Frequently Asked Questions)
Q: Why is it important to scald the milk?
A: Scalding the milk helps to denature certain proteins that can interfere with gluten development, resulting in a softer and more tender crumb. It also helps to improve the overall texture of the Zwieback.
Q: Can I use instant yeast instead of active dry yeast?
A: Yes, you can use instant yeast. There’s no need to activate it in water first; simply add it directly to the dry ingredients.
Q: What if my dough isn’t rising?
A: Ensure that your yeast is fresh and active. Also, make sure the environment is warm enough. If the room is too cold, the dough will rise very slowly or not at all.
Q: How can I prevent the smaller bun from falling off during baking?
A: Make sure to press the smaller bun firmly onto the larger one to ensure they stick together. You can also lightly brush the bottom of the smaller bun with water before attaching it to the larger bun.
Q: Can I make the dough ahead of time?
A: Yes, you can prepare the dough, let it rise once, and then refrigerate it overnight. Let the dough come to room temperature before shaping and baking.
Final Thoughts
Baking Zwieback is more than just following a recipe; it’s about connecting with a tradition, creating a taste of home, and sharing a piece of your heart with those you love. Don’t be intimidated by the double-bun shape – it’s easier than it looks, and the results are well worth the effort. I encourage you to try this recipe, experiment with different variations, and create your own Zwieback memories. Share your creations and feedback, and let’s keep this delicious tradition alive for generations to come. Enjoy!